Уводзіны
This manual provides detailed instructions for the installation, operation, and maintenance of the IXITAB STC-3008, STC-3018, and STC-3028 series of digital temperature and humidity controllers. These devices are designed for precise control in various applications, including aquariums, terrariums, incubators, and industrial temperature/humidity control systems.
варыянты прадукту
- STC-3008: Dual Digital Temperature Controller with two temperature probes.
- STC-3018: Dual Digital Temperature Controller with two temperature probes.
- STC-3028: Digital Temperature and Humidity Controller with one combined temperature and humidity sensor.
Асноўныя характарыстыкі
- Dual display for simultaneous monitoring of two temperatures or temperature and humidity.
- Two independent relay outputs for controlling heating/cooling or humidification/dehumidification devices.
- Wide range of power supply options (AC 110V/220V, DC 12V/24V) depending on the model.
- High precision sensors for accurate readings.
- User-friendly interface for setting parameters.
Тэхніка бяспекі
To ensure safe operation and prevent damage to the device, please observe the following precautions:
- Always disconnect power before performing any wiring or maintenance.
- Пераканайцеся, што блок харчавання voltage matches the requirements of your specific controller model.
- Strictly distinguish the interface of the relay, sensor, and power connections to avoid short circuits or damage.
- Пераканайцеся, што ўсе правадныя злучэнні надзейныя і належным чынам ізаляваны.
- Keep the sensor and power wires separate and maintain a proper distance to prevent interference.
- Не падвяргайце прыладу ўздзеянню вады або празмернай вільгаці.
 Выява: Уверсе view of the STC-3018 controller showing the display, buttons, and a label with wiring instructions and safety notes. The label indicates power supply options (110-220VAC, 12V, 24V) and relay outputs (10A/220VAC). A temperature probe is connected to the device.
Прадукт скончаныview
Кампаненты
- Main Controller Unit (with digital displays and control buttons)
- Temperature Sensor (for STC-3008/3018 models)
- Temperature and Humidity Sensor (for STC-3028 model)
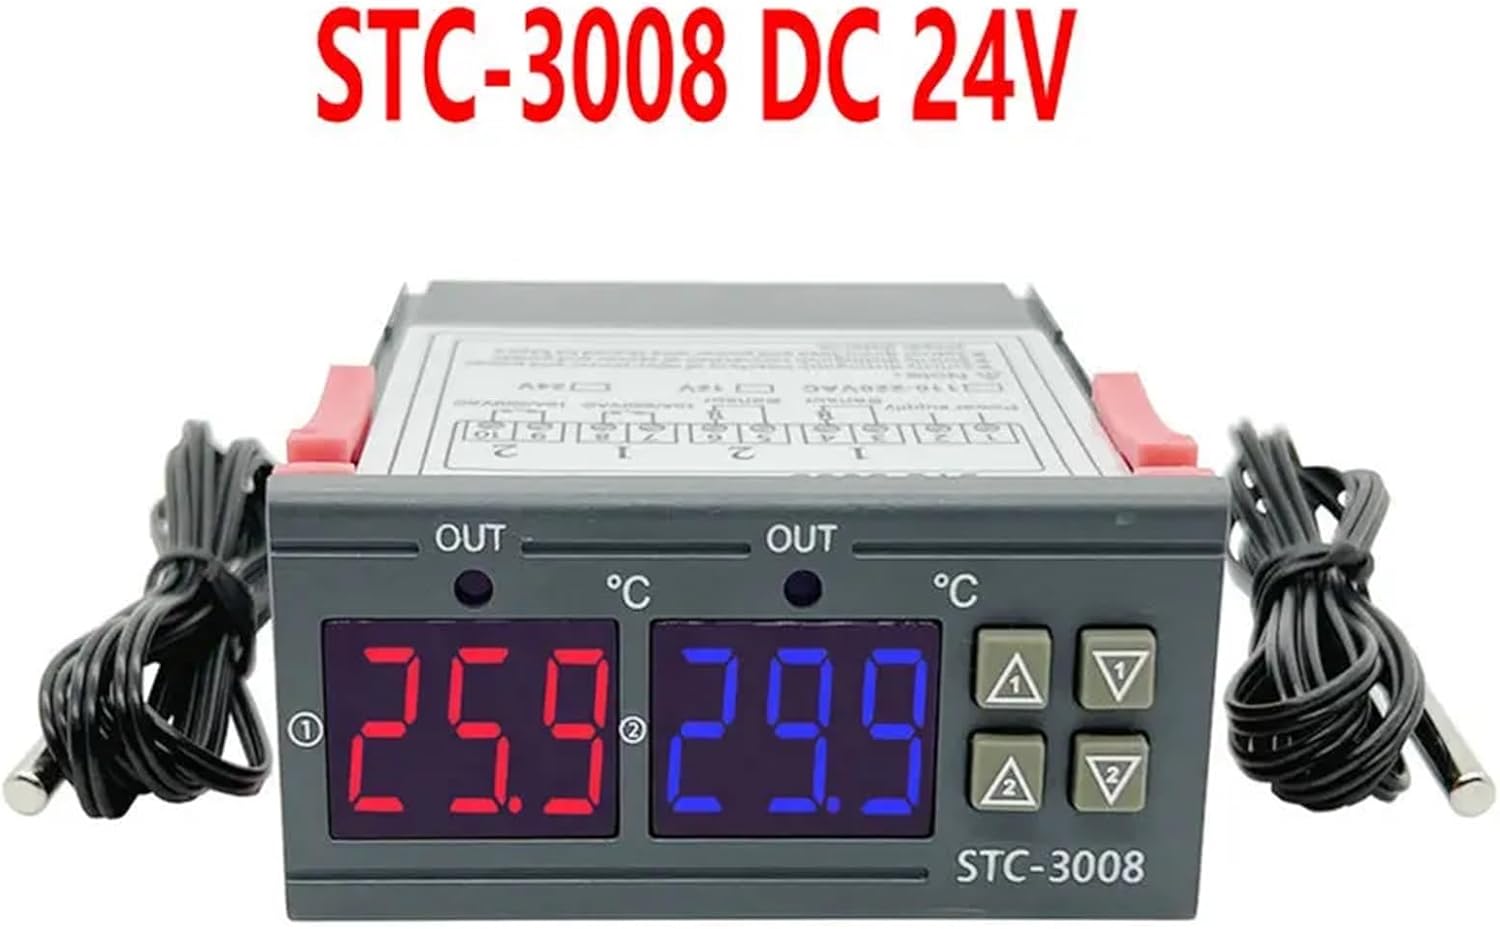 Выява: спераду view of the STC-3008 DC 24V model, featuring two digital displays (red and blue) showing temperature readings, and two connected temperature probes. The model name "STC-3008" is visible on the front panel.
 Image: A collage showing three different models: STC-3018 (top left), STC-3008 (top right and bottom left), and STC-3028 (bottom right). Each model is shown with its respective sensor, highlighting the visual differences and sensor types (temperature probe for 3008/3018, combined temperature/humidity sensor for 3028).
 Выява: буйны план view of the STC-3028 model, showcasing its dual digital display for temperature and humidity, along with the connected combined temperature and humidity sensor.
Тэхнічныя характарыстыкі
| Параметр | Каштоўнасць |
|---|---|
| мадэль | STC-3008, STC-3018, STC-3028 |
| Электразабеспячэнне | AC 110V/220V, DC 12V/24V (model dependent) |
| Дыяпазон вымярэння тэмпературы | -50°C да 110°C (-58°F да 230°F) |
| Humidity Measurement Range (STC-3028) | Ад 0% да 99% адноснай вільготнасці |
| Output Relay Capacity | 10A/220 В пераменнага току |
| Тып датчыка | NTC sensor (temperature), integrated sensor (humidity for STC-3028) |
| Памеры | Approx. 1.18 x 0.79 x 0.39 inches (main unit) |
| Вага прадмета | Прыбл. 1.76 унцый |
| Краіна паходжання | Кітай |
Мантаж і праводка
Важна: Ensure power is disconnected before performing any wiring to prevent electric shock or damage to the device.
Электрасхема
 Image: Detailed wiring diagram for the STC-3018 model. It illustrates connections for power supply (110V/AC220V, 12V, 24V), two sensor inputs, and two relay outputs (10A/220VAC). Examples of connected loads like a refrigerator, fan, and water heater are shown.
Крокі праводкі
- крыніца харчавання: Connect the appropriate power supply (AC 110V/220V or DC 12V/24V) to terminals 1 and 2. Verify that the voltage matches your specific controller model.
- Датчыкі: Connect the temperature sensors to terminals 3 and 4, and 5 and 6 (for STC-3008/3018). For the STC-3028, connect the combined temperature/humidity sensor to its designated terminals.
- Выхадныя рэле: Connect your heating/cooling or humidification/dehumidification devices to terminals 7 and 8 (Relay 1) and 9 and 10 (Relay 2). These are dry contacts, meaning they act as switches, and your load will require its own power source.
- Мантаж: The controller is designed for panel mounting. Insert the unit into a suitable cutout and secure it using the integrated clips on the sides.
Інструкцыя па эксплуатацыі
Функцыі кнопак
- Кнопка ўстаноўкі: Выкарыстоўваецца для ўваходу ў рэжым налады параметраў і пацверджання выбару.
- Up (▲) Button: Increases values, navigates through menu options.
- Down (▼) Button: Decreases values, navigates through menu options.
- Rst Button: Кароткае націск на view current settings; long press (3 seconds) to reset to factory default settings.
Temperature/Humidity Setting
 Image: A visual guide demonstrating the temperature and humidity setting process on the STC-3028 model. It shows how to set starting and stopping values for both temperature (heating/cooling) and humidity (humidification/dehumidification) using the control buttons.
- Setting Starting Temperature/Humidity: Доўгі націск Уверх (▲) button for 3 seconds. The starting value on the display will flash. Use the Уверх (▲) or Уніз (▼) buttons to adjust to your desired starting value. Press the Набор кнопка для пацверджання і выхаду.
- Setting Stopping Temperature/Humidity: Доўгі націск Уніз (▼) button for 3 seconds. The stopping value on the display will flash. Use the Уверх (▲) or Уніз (▼) buttons to adjust to your desired stopping value. Press the Набор кнопка для пацверджання і выхаду.
- Скід да заводскіх налад: Доўгі націск першы button for 3 seconds until the display shows "888" or similar indication of reset.
The controller will automatically activate or deactivate the connected relays based on the set starting and stopping values to maintain the desired temperature or humidity range. For temperature control, if the starting temperature is lower than the stopping temperature, it operates in heating mode. If the starting temperature is higher than the stopping temperature, it operates in cooling mode. Similar logic applies to humidity control for humidification/dehumidification.
Тэхнічнае абслугоўванне
Proper maintenance ensures the longevity and accuracy of your controller:
- Трымайце прыладу чыстай і без пылу і смецця. Выкарыстоўвайце для чысткі мяккую сухую тканіну.
- Забяспечце дастатковую вентыляцыю вакол прылады, каб прадухіліць перагрэў.
- Перыядычна правярайце ўсе злучэнні правадоў, каб пераканацца ў іх надзейнасці і адсутнасці карозіі.
- Avoid exposing the unit or sensors to extreme temperatures, high humidity, or corrosive environments outside their specified operating ranges.
- Do not attempt to disassemble the unit beyond what is described in this manual.
Ліквідацыю непаладак
If you encounter issues with your controller, refer to the table below for common problems and solutions:
| праблема | Магчымая прычына | Рашэнне |
|---|---|---|
| Дысплей не працуе | No power, incorrect wiring, faulty unit. | Check power supply connections. Verify wiring against the diagram. If problem persists, contact support. |
| Relay not switching | Incorrect temperature/humidity settings, faulty relay, load issue. | Review your set starting and stopping values. Check the wiring to the load device. Test the load device independently. |
| Няправільныя паказанні | Sensor damaged, sensor not properly placed, environmental interference. | Inspect sensor for physical damage. Ensure sensor is in the correct environment and not obstructed. Avoid placing sensor near heat sources or drafts. |
| "LLL" or "HHH" on display | Sensor open circuit (LLL) or short circuit (HHH). | Check sensor connection for looseness or damage. Replace sensor if it appears faulty. |
| Display shows "--- " | Sensor not connected or faulty. | Ensure sensor is securely connected. Replace sensor if necessary. |
Гарантыя і падтрымка
For warranty information or technical support regarding your IXITAB STC-3008, STC-3018, or STC-3028 controller, please refer to the documentation provided with your product at the time of purchase or contact IXITAB customer service through the platform where you purchased the item.
When contacting support, please be prepared to provide your product model number (STC-3008, STC-3018, or STC-3028) and details of your purchase.