Ruckus H550 Series (901-H550-US00)
Кіраўніцтва карыстальніка насценнай кропкі доступу Ruckus серыі H550 Wi-Fi 6 для памяшканняў
Model: 901-H550-US00
Уводзіны
This manual provides comprehensive instructions for the installation, operation, and maintenance of the Ruckus H550 Series Wi-Fi 6 Wall-Mounted Indoor Access Point. The H550 is an advanced all-in-one solution designed to deliver high-performance Wi-Fi 6 connectivity, integrated IoT capabilities (BLE, Zigbee), and wired Ethernet ports, making it ideal for hospitality, multi-dwelling units, and other indoor environments requiring robust and versatile network access.
Прадукт скончаныview
The Ruckus H550 is a compact, wall-mounted access point that combines Wi-Fi, wired, and IoT technologies into a single device. It is engineered to provide superior wireless coverage and capacity while simplifying network deployment and management.
Асноўныя характарыстыкі
- Падтрымка Wi-Fi 6 (802.11ax): Delivers higher throughput and efficiency, especially in dense environments.
- Integrated IoT: Built-in Bluetooth Low Energy (BLE) and Zigbee for smart device connectivity and automation.
- 4-партовы камутатар Gigabit Ethernet: Provides wired connectivity for devices such as VoIP phones, IPTV, and personal computers.
- Patented BeamFlex+ Technology: Enhances Wi-Fi coverage and mitigates interference using adaptive antenna patterns.
- ChannelFly Dynamic Channel Technology: Utilizes machine learning to automatically select the least congested Wi-Fi channels for optimal performance.
- Dual-Band Concurrent Radios: Supports simultaneous operation on 2.4 GHz and 5 GHz frequencies.
- Multiple Management Options: Can be managed via cloud, on-premises physical/virtual appliances, or in a controller-less setup.
Кампаненты і парты

Малюнак 1: Фронт view of the Ruckus H550 Access Point, showing the sleek white casing and Ruckus branding.

Малюнак 2: Знізу view of the H550, highlighting the four Gigabit Ethernet LAN ports (LAN1, LAN2, LAN3, LAN4/PoE Out) and a USB port. LAN4 supports Power over Ethernet (PoE) output.

Малюнак 3: Зверху ўніз view of the H550, showing the Ruckus logo and port labels.
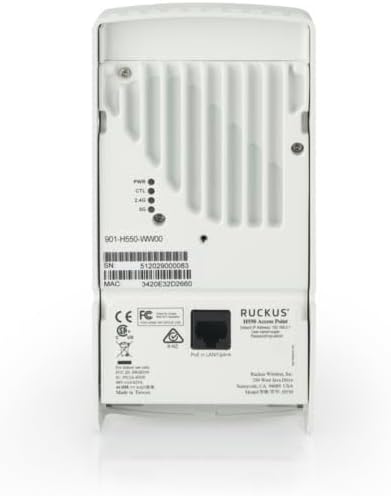
Малюнак 4: Тыл view of the H550, displaying the product label with model number, serial number, MAC address, and regulatory compliance markings. Also visible are the mounting points and LED indicators for Power, Control, 2.4 GHz, and 5 GHz.

Малюнак 5: Збоку view of the H550, showing ventilation grilles for heat dissipation.

Малюнак 6: Diagram illustrating the H550's versatile connectivity, showing its role in connecting various devices like laptops, smartphones, IoT devices, VoIP phones, IPTV, printers, and in-room IP devices to the cloud network.
Настройка
Proper installation ensures optimal performance and reliability of your Ruckus H550 Access Point. Follow these steps carefully.
1. Мантаж пункту доступу
The H550 is designed for wall-mounting, typically over a standard electrical junction box. An optional bracket for offset and wall mount is included.
- Выберыце месцазнаходжанне: Select a central location on a wall, free from obstructions, to ensure optimal Wi-Fi coverage.
- Падрыхтуйце сцяну: If mounting over a junction box, ensure wiring is accessible. If direct wall mounting, use appropriate anchors and screws (not included) for the wall material.
- Attach Bracket (if applicable): Secure the optional mounting bracket to the wall or junction box using screws.
- Mount H550: Align the H550 with the mounting points on the bracket or wall and slide it into place until it clicks securely.
2. Злучальныя кабелі
The H550 can be powered via Power over Ethernet (PoE) or an optional DC power adapter (not included).
- Ethernet Connection (PoE): Connect an Ethernet cable from a PoE-enabled switch or injector to the LAN1 port on the H550. This port provides both data and power.
- Дадатковае харчаванне пастаяннага току: If not using PoE, connect a compatible 12V DC power adapter (not included) to the DC power jack on the H550.
- Wired Device Connections: Connect wired devices (e.g., VoIP phone, PC, IPTV) to the remaining LAN2, LAN3, and LAN4 ports. LAN4 also supports PoE output for powering a single compatible device.
- USB-злучэнне: The USB port can be used for future expansion or specific applications as defined by Ruckus.
3. Пачатковае ўключэнне і канфігурацыя
Once powered, the H550 will begin its boot sequence. The LEDs on the back of the unit will indicate its status.
- Observe LEDs:
- PWR (магутнасць): Пастаянна зялёны колер азначае, што харчаванне ўключана.
- CTL (Control): Indicates connection to a controller or management system.
- 2.4G / 5G: Indicate activity on the respective Wi-Fi bands.
- Сеткавая інтэграцыя: The H550 will attempt to connect to a Ruckus controller (e.g., SmartZone, Unleashed, Cloud) for centralized management and configuration. Refer to your Ruckus network management system's documentation for specific configuration steps.
- Controller-less Setup (Unleashed): If using Unleashed firmware, the H550 can operate as a master AP, managing other Unleashed APs without a dedicated controller.
Інструкцыя па эксплуатацыі
The Ruckus H550 operates primarily as a network access point, providing wireless and wired connectivity. Its advanced features are largely managed through a central controller or its built-in web interface (for Unleashed mode).
Базавая аперацыя
- Падключэнне Wi-Fi: Once configured, the H550 will broadcast one or more Wi-Fi networks (SSIDs). Users can connect to these networks using their wireless devices (smartphones, laptops, tablets).
- Правадное падключэнне: Devices connected to the LAN ports will receive network access. The LAN4 port can provide PoE to a connected device, such as an IP phone.
- IoT Services: Integrated BLE and Zigbee radios enable connectivity for compatible IoT devices, facilitating smart room features or asset tracking.
Advanced Features and Management
Accessing and configuring advanced features typically requires logging into the Ruckus network management system (e.g., SmartZone, Unleashed web interface, Ruckus Cloud). Refer to the specific documentation for your chosen management platform.
- Канфігурацыя SSID: Create multiple SSIDs for different user groups (e.g., guest, staff, IoT), each with unique security settings and VLAN assignments.
- Налады бяспекі: Configure WPA2/WPA3 encryption, MAC filtering, and other security protocols.
- VLAN Tagджын: Assign VLANs to SSIDs and wired ports to segment network traffic.
- QoS (Якасць абслугоўвання): Prioritize critical traffic like VoIP or video streaming.
- Абнаўленні прашыўкі: Regularly update the H550's firmware through the management system to ensure optimal performance and security.
- Маніторынг: Use the management platform to monitor AP status, connected clients, traffic statistics, and potential issues.
Тэхнічнае абслугоўванне
Regular maintenance helps ensure the longevity and optimal performance of your Ruckus H550 Access Point.
- Захоўваць у чысціні: Periodically wipe the exterior of the access point with a soft, dry cloth. Do not use liquid cleaners or aerosols. Ensure ventilation openings are clear of dust and debris.
- Абнаўленні прашыўкі: Regularly check for and apply the latest firmware updates provided by Ruckus. Firmware updates often include performance improvements, bug fixes, and security enhancements.
- Умовы навакольнага асяроддзя: Ensure the access point operates within its specified temperature and humidity ranges. Avoid exposing it to direct sunlight, excessive heat, or moisture.
- Цэласнасць кабеля: Periodically inspect all connected Ethernet cables for damage or loose connections.
- Power Cycle (if needed): If the device is unresponsive or experiencing minor issues, a simple power cycle (unplugging and replugging the power source) can often resolve them.
Ліквідацыю непаладак
This section provides solutions to common issues you might encounter with your Ruckus H550 Access Point.
Няма харчавання / святлодыёды выключаны
- Праверце крыніцу харчавання: Ensure the Ethernet cable is securely connected to a PoE-enabled switch/injector, or the DC power adapter is properly plugged into a working outlet and the H550.
- Праверце пасведчанне аб куплі-продажы: Confirm that the PoE port on your switch/injector is active and providing power.
- Try Different Port/Adapter: Test with another PoE port or a different power adapter if available.
No Wi-Fi Signal / Cannot Connect
- Check H550 Status: Verify that the PWR, 2.4G, and 5G LEDs are illuminated as expected.
- Падключэнне кантролера: Ensure the H550 is properly connected to and managed by your Ruckus controller (SmartZone, Unleashed, Cloud). The CTL LED should indicate a healthy connection.
- SSID-трансляцыя: Confirm that the SSIDs are configured to broadcast and are not hidden.
- Client Device: Ensure your client device's Wi-Fi is enabled and it is within range.
- IP-адрас: Verify that client devices are receiving IP addresses from your network's DHCP server.
Slow Wi-Fi Performance
- Перашкоды: Check for potential sources of interference (e.g., cordless phones, microwaves, neighboring Wi-Fi networks).
- Выбар канала: Ensure ChannelFly is enabled or manually select less congested Wi-Fi channels.
- Моц сігналу: Move closer to the access point to check if signal strength improves performance.
- Прапускная здольнасць кліента: Too many devices on one AP can cause slowdowns. Consider adding more APs or optimizing client distribution.
- Прашыўка: Ensure the H550 has the latest firmware installed.
Wired Devices Not Connecting
- Праверка кабеля: Ensure Ethernet cables are securely connected to the H550's LAN ports and the client device.
- Статус порта: Check the link/activity LEDs on the H550's LAN ports and the connected device.
- PoE Out (LAN4): If using LAN4 for PoE out, ensure the connected device is PoE compatible and within the H550's PoE budget.
- Канфігурацыя VLAN: Verify that the VLAN settings for the wired ports are correct and match your network configuration.
Тэхнічныя характарыстыкі
| Асаблівасць | Дэталь |
|---|---|
| Марка | Рукус |
| Назва мадэлі | Серыя H550 |
| бесправадной стандарт | 802.11ax (Wi-Fi 6), 802.11ac, 802.11n, 802.11g, 802.11b |
| Клас дыяпазону частот | Dual-Band (2.4 GHz and 5 GHz concurrent) |
| Парты Ethernet | 4 x Gigabit Ethernet (1 x PoE In, 3 x Data, 1 x PoE Out on LAN4) |
| IoT Radios | Bluetooth Low Energy (BLE), Zigbee |
| Антэнная тэхналогія | Patented BeamFlex+ adaptive antenna technology |
| Увод магутнасці | PoE (802.3af/at) or 12V DC (adapter sold separately) |
| Рэкамендуемае выкарыстанне | Business, Hospitality, Multi-Dwelling Units |
| Уключаныя кампаненты | Access Point, Optional bracket for offset & wall mount |
| Сумяшчальныя прылады | Gaming Console, Personal Computer, Printer, Smart Television, Smartphone |
Гарантыя і падтрымка
Ruckus Networks products are backed by a limited warranty. For specific warranty terms and conditions, please refer to the warranty statement included with your product or visit the official Ruckus Networks webсайт.
For technical support, product documentation, and software downloads, please visit the Ruckus Networks Support Portal:
https://support.ruckuswireless.com/
When contacting support, please have your product model (H550 Series) and serial number (found on the back of the unit) ready.
Ask a question about this manual
Ask about setup, troubleshooting, compatibility, parts, safety, or missing instructions. Manuals+ will review the question and use this page’s manual context to help answer it.