1. Інфармацыя па бяспецы
Please read this manual carefully before using the LEVENHUK Atom DNB200 Digital Night Vision Binoculars to ensure proper operation and to prevent damage. Keep this manual for future reference.
- Do not attempt to disassemble or repair the device yourself. Refer all servicing to qualified specialists.
- Avoid direct exposure to strong light sources, especially sunlight, as this can damage the internal components.
- Keep the device away from high temperatures, direct sunlight, and high humidity.
- Use only the specified battery type (18650 Li-ion) and charger. Improper use can lead to fire or explosion.
- Захоўваць у месцах, недаступных дзецям.
2. Змесціва ўпакоўкі
Праверце, ці ёсць у вашай упакоўцы ўсе пералічаныя ніжэй прадметы:
- LEVENHUK Atom DNB200 Digital Night Vision Binoculars
- Сумка для пераноскі
- Шыйны рэмень
- Кабель USB
- Анучка для чысткі
- MicroSD Card (pre-installed or separate)
- Кіраўніцтва карыстальніка

Image 2.1: All items included in the LEVENHUK Atom DNB200 package, including the binoculars, carrying case, neck strap, USB cable, cleaning cloth, and a microSD card.
3. Кампаненты прадукту
Familiarize yourself with the main parts and controls of your digital night vision binoculars.

Малюнак 3.1: Верх view of the binoculars, highlighting the control panel with various buttons.
- Кнопка харчавання: Уключае/выключае прыладу.
- Кнопка рэжыму (M): Switches between Photo, Video, and Playback modes.
- IR Illuminator Button (Sun/Light icon): Adjusts the infrared illumination level.
- Кнопка ОК: Confirms selections in the menu or takes a photo/starts video recording.
- Zoom In/Up Button (Magnifying glass with +): Increases digital zoom or navigates up in menus.
- Zoom Out/Down Button (Magnifying glass with -): Decreases digital zoom or navigates down in menus.
- Фокуснае кола: Located on the side, adjusts optical focus for clear viewінж.
- Eyepiece/Display: Viewfinder for observing images.
- Аб'ектыў: Front lens for capturing light.
- ІЧ-святлодыёд: Infrared light emitter for night vision.
- Батарэйны адсек: Located at the rear.
- Порт USB-C: Для зарадкі і перадачы дадзеных.
- Слот для карты MicroSD: Для ўстаўкі карты памяці.

Выява 3.2: Спераду view of the binoculars, showcasing the display screen and objective lens.
4. Пачатак працы
4.1. Устаноўка батарэі
The device uses one 18650 Li-ion rechargeable battery.
- Locate the battery compartment cover on the rear of the binoculars.
- Адкрыйце крышку.
- Insert the 18650 battery according to the polarity markings (+/-) inside the compartment.
- Надзейна зачыніце крышку батарэйнага адсека.
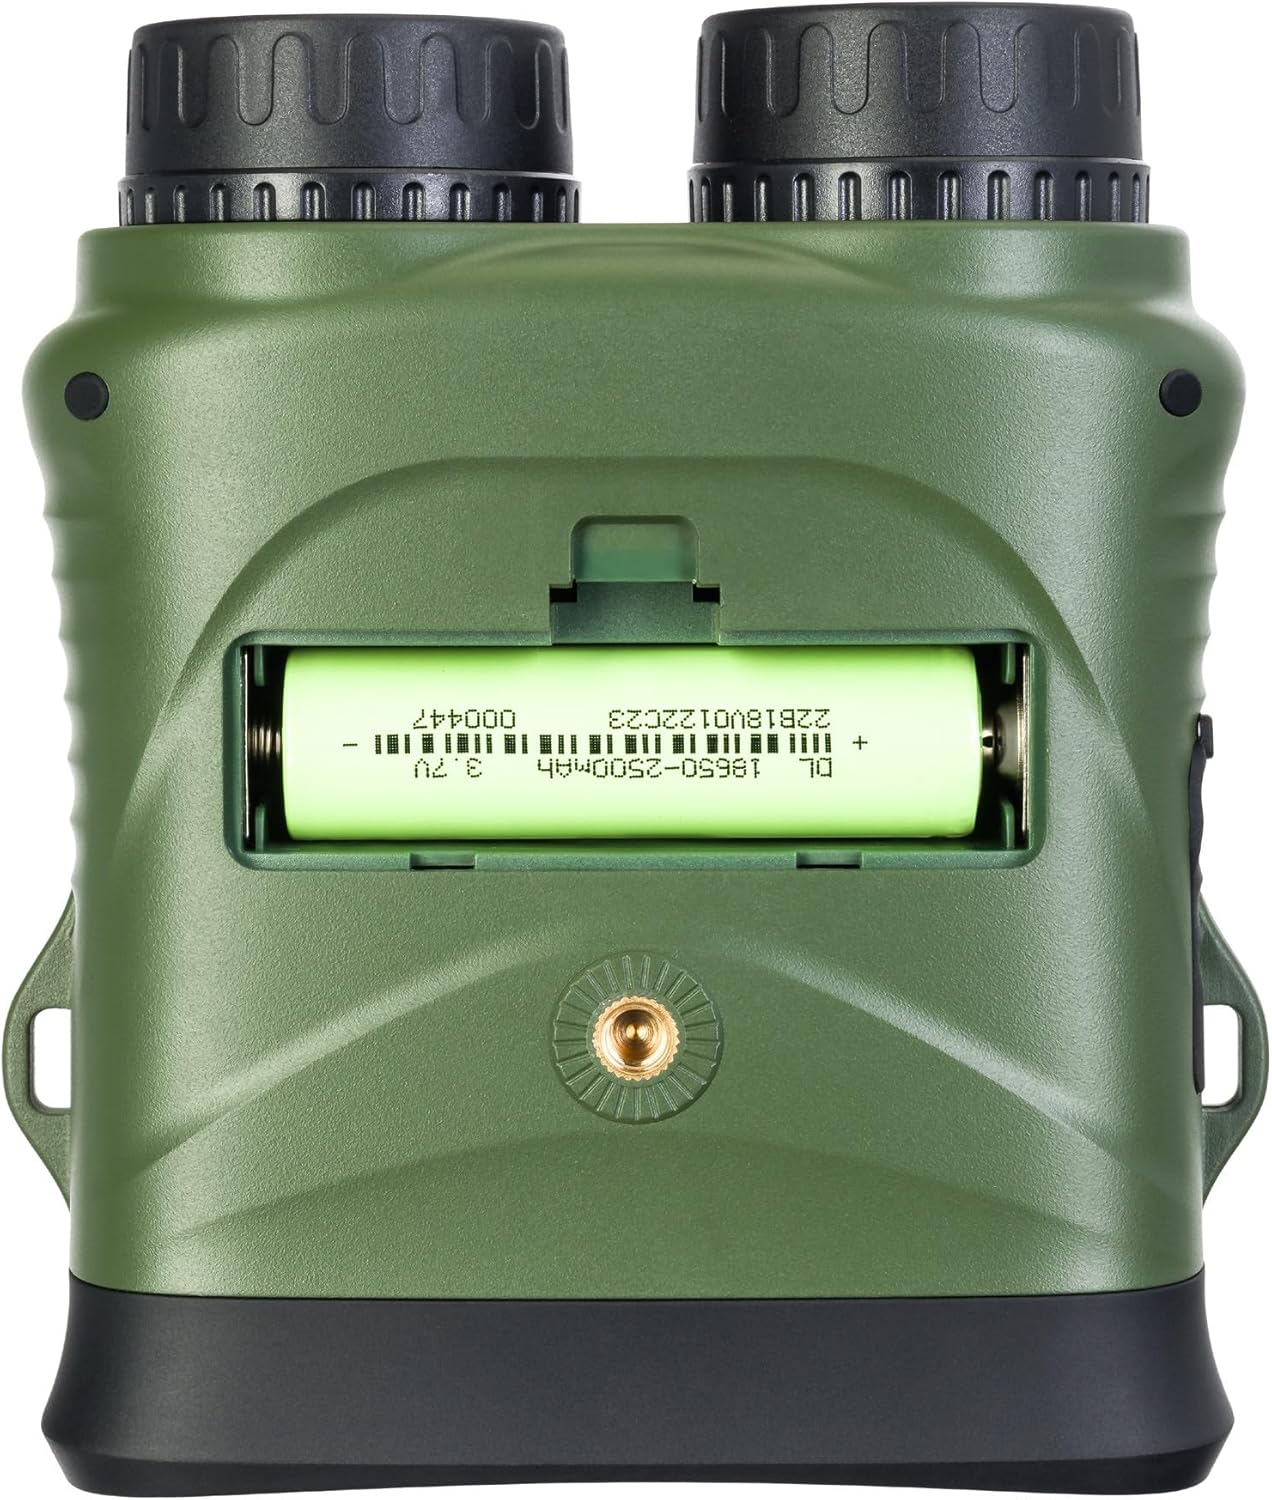
Малюнак 4.1: ззаду view of the binoculars with the battery compartment open, illustrating correct battery insertion.
4.2. Усталёўка карты памяці
A microSD card (up to 32GB, Class 10 recommended) is required to save photos and videos.
- Locate the microSD card slot on the side of the binoculars, usually protected by a rubber flap.
- Акуратна адкрыйце гумовую заглушку.
- Устаўце карту microSD залатымі кантактамі ўніз да пстрычкі.
- Close the rubber flap to protect the port from dust and moisture.

Малюнак 4.2: Збоку view of the binoculars, showing the USB-C port and the microSD card slot under a protective cover.
4.3. Уключэнне / выключэнне харчавання
- Каб уключыць: Press and hold the Power button (⑁) for a few seconds until the display illuminates.
- Каб выключыць: Press and hold the Power button (⑁) again until the display turns off.
5. Інструкцыя па эксплуатацыі
5.1. Рэгуляванне фокусу
To achieve a clear image, adjust the focus:
- Паглядзіце ў акуляр.
- Rotate the focus wheel (located on the side of the binoculars) until the image appears sharp.
5.2. Выбар рэжыму
Націсніце Рэжым (M) кнопка для пераключэння паміж даступнымі рэжымамі:
- Рэжым фота: For capturing still images.
- Рэжым відэа: For recording video footage.
- Рэжым прайгравання: Для паўторнагаviewing captured photos and videos.
5.3. Night Vision and IR Illumination
The device automatically switches to night vision mode in low light conditions. To enhance visibility in complete darkness:
- У рэжыме фота ці відэа націсніце кнопку IR Illuminator button (Sun/Light icon).
- Each press will cycle through different IR illumination levels (e.g., Off, Level 1, Level 2, Level 3). Higher levels provide more illumination but consume more battery.
5.4. Лічбавы зум
Выкарыстоўвайце Zoom In (+) і Zoom Out (-) buttons to adjust the digital magnification of the image on the display.
5.5. Захоп фота і відэа
- Каб зрабіць фота: In Photo Mode, frame your subject and press the OK кнопка.
- Каб запісаць відэа: In Video Mode, press the OK button once to start recording. Press it again to stop recording. A recording indicator will appear on the screen.
5.6. Налады меню
To access and adjust device settings:
- Націсніце і ўтрымлівайце Рэжым (M) кнопку для ўваходу ў меню.
- Выкарыстоўвайце Zoom In (+) і Zoom Out (-) кнопкі для навігацыі па пунктах меню.
- Націсніце OK кнопку, каб выбраць опцыю або ўвайсці ў падменю.
- Націсніце Рэжым (M) зноў націсніце кнопку, каб выйсці з меню.
Common settings include: Video Resolution, Photo Resolution, Date Stamp, Language, Auto Power Off, Format SD Card.
6. Тэхнічнае абслугоўванне
6.1. Уборка
- Лінзы: Use the included cleaning cloth or a soft, lint-free cloth specifically designed for optical surfaces. Breathe lightly on the lens or use a small amount of lens cleaning fluid if necessary.
- Цела: Wipe the body of the device with a soft, dry cloth. Do not use abrasive cleaners or solvents.
6.2. Захоўванне
- When not in use, store the binoculars in their carrying case in a cool, dry place.
- Выміце батарэйку, калі прылада не будзе выкарыстоўвацца працяглы час, каб прадухіліць уцечку.
7. Выпраўленне непаладак
| праблема | Магчымая прычына | Рашэнне |
|---|---|---|
| Прылада не ўключаецца. | Батарэя разраджаная або няправільна ўстаўленая. | Charge the battery or re-insert it with correct polarity. |
| Выява размытая. | Focus is not adjusted. | Паварочвайце кола факусоўкі, пакуль выява не стане рэзкай. |
| Немагчыма захаваць фота/відэа. | No microSD card or card is full/corrupted. | Insert a microSD card, delete old fileабо адфарматуйце карту (гэта сатрэ ўсе дадзеныя). |
| Poor night vision performance. | IR illuminator is off or set too low. | Increase the IR illumination level using the IR button. |
| Прылада завісае. | Праграмны збой. | Press and hold the Power button for 10 seconds to force a shutdown, then restart. |
8. Тэхнічныя характарыстыкі
| Асаблівасць | Спецыфікацыя |
|---|---|
| Нумар мадэлі | 81702 |
| Памеры прадукту | 3.94 х 1.97 х 0.5 цалі |
| Вага прадмета | 3.53 унцыі |
| Марка | Левенгук |
| Асаблівасць | Начное бачанне |
| Колер | Чорны |
| Зрэнкі | 5 міліметра |
| Апісанне бінакулярнай прызмы | Прызма на даху |
| Крыніца харчавання | 18650 Li-ion Rechargeable Battery (included) |
| Захоўванне | MicroSD card (up to 32GB, Class 10 recommended) |
9. Гарантыя і падтрымка кліентаў
LEVENHUK products are covered by a manufacturer's warranty. For detailed warranty terms and conditions, please refer to the warranty card included with your product or visit the official Levenhuk webсайт.
If you encounter any issues or have questions regarding your LEVENHUK Atom DNB200 Digital Night Vision Binoculars, please contact our customer support team:
- Webсайт: www.levenhuk.com
- электронная пошта: Спасылацца на webсайт для кантактаў са службай падтрымкі.
- тэлефон: Спасылацца на webсайт для кантактаў са службай падтрымкі.
Please have your product model (DNB200) and serial number ready when contacting support.