1. Інфармацыя па бяспецы
Калі ласка, уважліва прачытайце ўсе інструкцыі па тэхніцы бяспекі перад выкарыстаннем гэтага прадукта. Невыкананне гэтых інструкцый можа прывесці да паражэння электрычным токам, пажару або іншых небяспек.
- Не падвяргайце праектар уздзеянню дажджу або вільгаці, каб прадухіліць узгаранне або паражэнне электрычным токам.
- Не адкрывайце праектар casing. Унутры няма дэталяў, якія можна абслугоўваць самастойна. Па ўсіх пытаннях абслугоўвання звяртайцеся да кваліфікаванага персаналу.
- Забяспечце належную вентыляцыю. Не блакуйце вентыляцыйныя адтуліны.
- Выкарыстоўвайце толькі адаптар сілкавання, які пастаўляецца з праектарам.
- Пазбягайце прамога траплення ў вочы аб'ектыва праектара падчасamp уключаны.
- Трымайце праектар далей ад крыніц цяпла і прамых сонечных прамянёў.
2. Змесціва ўпакоўкі
Праверце, ці ўсе пералічаныя ніжэй прадметы ўваходзяць у вашу ўпакоўку:
- 1 x Jectse Mini LED Projector
- 1 x Remote Control (2 AAA batteries not included)
- 1 x AV Line (3-in-1 RCA cable)
- 1 х Інструкцыя па эксплуатацыі
- 1 х адаптар сілкавання

Figure 2.1: Contents of the Jectse Mini LED Projector package.
3. Прадукт скончыўсяview
The Jectse Mini LED Projector is a compact and portable device designed for various multimedia applications. It features a 1080P resolution, LED light source, and multiple connectivity options.

Малюнак 3.1: Пярэдняя і верхняя часткі view of the Jectse Mini LED Projector.
3.1 Кампаненты праектара

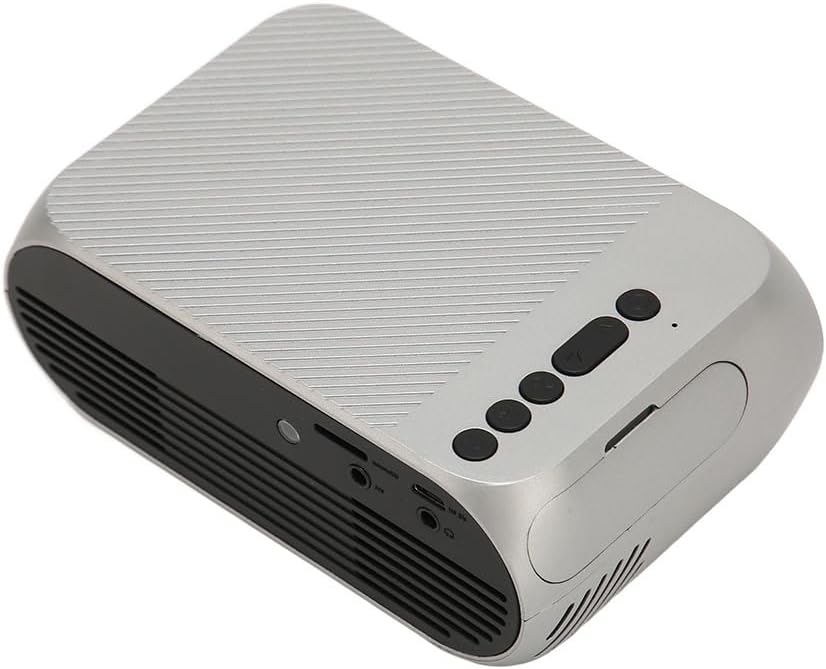
Figure 3.2: Top panel controls of the Jectse Mini LED Projector.
- Аб'ектыў: Праецыруе выяву на экран.
- Вентыляцыйная рашотка: Ensures proper airflow for cooling.
- Кнопкі кіравання: (Refer to Figure 3.2) For basic navigation and power control.
- Фокуснае кола: Рэгулюе выразнасць выявы.
Малюнак 3.3: Задняя і бакавая часткі view з партамі ўводу/вываду.
3.2 Парты ўводу/вываду
- HD Multimedia Interface (HDMI): For connecting devices like laptops, gaming consoles, and media players.
- AV-порт: For connecting older devices using the included AV cable.
- Порт USB: Для падключэння USB-назапашвальнікаў для прайгравання медыяфайлаў files непасрэдна.
- Спажываная магутнасць: Для падлучэння адаптара сілкавання.
- Audio Output (3.5mm Jack): Для падлучэння знешніх дынамікаў або навушнікаў.
4. Настройка
4.1 Размяшчэнне
Place the projector on a stable, flat surface. Ensure there is adequate space around the projector for ventilation. The ideal projection distance is between 1.5 to 2 meters for optimal image size and clarity.

Figure 4.1: Recommended projection distance and screen sizes.
4.2 Падключэнне харчавання
- Падключыце адаптар сілкавання да ўваходнага порта сілкавання праектара.
- Падключыце адаптар сілкавання да адпаведнай электрычнай разеткі (100-240 В).
4.3 Падключэнне крыніц уваходнага сігналу
The projector supports HD Multimedia Interface, AV, and USB inputs.

Figure 4.2: Projector compatibility with various devices.
- HD Multimedia Interface: Connect an HD Multimedia Interface cable from your source device (e.g., laptop, game console) to the projector's HD Multimedia Interface port.
- АВ: Connect the included AV cable to the projector's AV port and the corresponding audio/video output ports on your source device.
- USB: Insert a USB flash drive into the projector's USB port.
4.4 Рэгуляванне фокусу
After powering on the projector, rotate the focus wheel (usually located near the lens) until the projected image appears clear and sharp.
5. Інструкцыя па эксплуатацыі
5.1 Уключэнне/выключэнне
- Каб уключыць: Press the Power Switch button on the projector or the power button on the remote control.
- Каб выключыць: Press the Power Switch button again. The projector will shut down.
5.2 Выбар крыніцы
After powering on, use the "Signal Source Button" on the projector or the "Source" button on the remote control to cycle through available input sources (HD Multimedia Interface, AV, USB).
5.3 Навігацыя па меню
Use the Direction Buttons and Confirm Button on the projector or the arrow keys and OK button on the remote control to navigate through the projector's on-screen menu for settings adjustments (e.g., picture mode, aspect ratio, sound settings).
5.4 Выкарыстанне дыстанцыйнага кіравання
Insert two AAA batteries (not included) into the remote control. Point the remote control towards the projector's IR receiver to operate functions such as power, source selection, volume, and menu navigation.
6. Тэхнічнае абслугоўванне
6.1 Ачыстка аб'ектыва
Выкарыстоўвайце мяккую тканіну без ворса, спецыяльна распрацаваную для аптычных лінзаў, каб акуратна працерці аб'ектыў праектара. Не выкарыстоўвайце абразіўныя ачышчальнікі або празмерныя сілы, бо гэта можа падрапаць аб'ектыў.
6.2 Генеральная ўборка
Wipe the exterior of the projector with a soft, dry cloth. Do not use liquid cleaners or solvents. Ensure the ventilation grilles are free from dust and debris to maintain optimal cooling.
7. Выпраўленне непаладак
| праблема | Магчымая прычына | Рашэнне |
|---|---|---|
| Няма праецыравання выявы |
|
|
| Відарыс размыты |
|
|
| Няма гуку |
|
|
| Пульт дыстанцыйнага кіравання не працуе |
|
|
8. Тэхнічныя характарыстыкі
| Асаблівасць | Дэталь |
|---|---|
| Марка | Джэкцэ |
| Нумар мадэлі | Jectse3giz17bkpy |
| дазвол | 1920*1080p |
| Крыніца святла | святлодыёд |
| Жыццё святлодыёдаў | 3000 гадзіны |
| Адлегласць праекцыі | 1.5-2м |
| Каэфіцыент праекцыі | 1.6:1 |
| Суадносіны бакоў | 16:9 |
| Увод магутнасці | 100-240В |
| Памер прадукту | 13 х 8.5 х 5 см (прыблізна 5.1 х 3.3 х 2 цалі) |
| Вага прадмета | 1.1 фунта |
| Тэхналогія падлучэння | HD Multimedia Interface, AV, USB |
| Асаблівасці | Adjustable, Portable Design |
9. Гарантыя і падтрымка
For warranty information or technical support, please refer to the contact details provided with your purchase or visit the official Jectse webсайт. Захоўвайце пацвярджэнне пакупкі для прэтэнзій па гарантыі.