1. Уводзіны
This manual provides detailed instructions for the safe and effective operation of your MASTECH MY74 Digital Multimeter. Please read this manual thoroughly before using the device and retain it for future reference. The MY74 is a compact, handheld digital multimeter designed for measuring AC/DC voltage, AC/DC current, resistance, capacitance, frequency, temperature, diode, continuity, and transistor hFE.
2. Інфармацыя па бяспецы
WARNING: To avoid electric shock or personal injury, read and understand all safety information before using this multimeter.
- Always ensure the multimeter is in good working condition and free from damage.
- Не наносіце больш за намінальны аб'ёмtage, як пазначана на лічыльніку, паміж клемамі або паміж любой клемай і зазямленнем.
- Будзьце асцярожныя пры працы з voltagвышэй за 30 В пераменнага току (RMS), 42 В пікавага або 60 В пастаяннага току. Гэтыя аб'ёмыtagуяўляюць небяспеку паражэння.
- Заўсёды адключайце вымяральныя дроты ад ланцуга перад зменай функцый.
- Do not use the meter if the battery cover is not properly closed.
- Замяніце батарэю, як толькі з'явіцца індыкатар разрадкі батарэі.
- Adhere to the measurement category (CAT III 600V) for safe operation.
3. Прадукт скончыўсяview
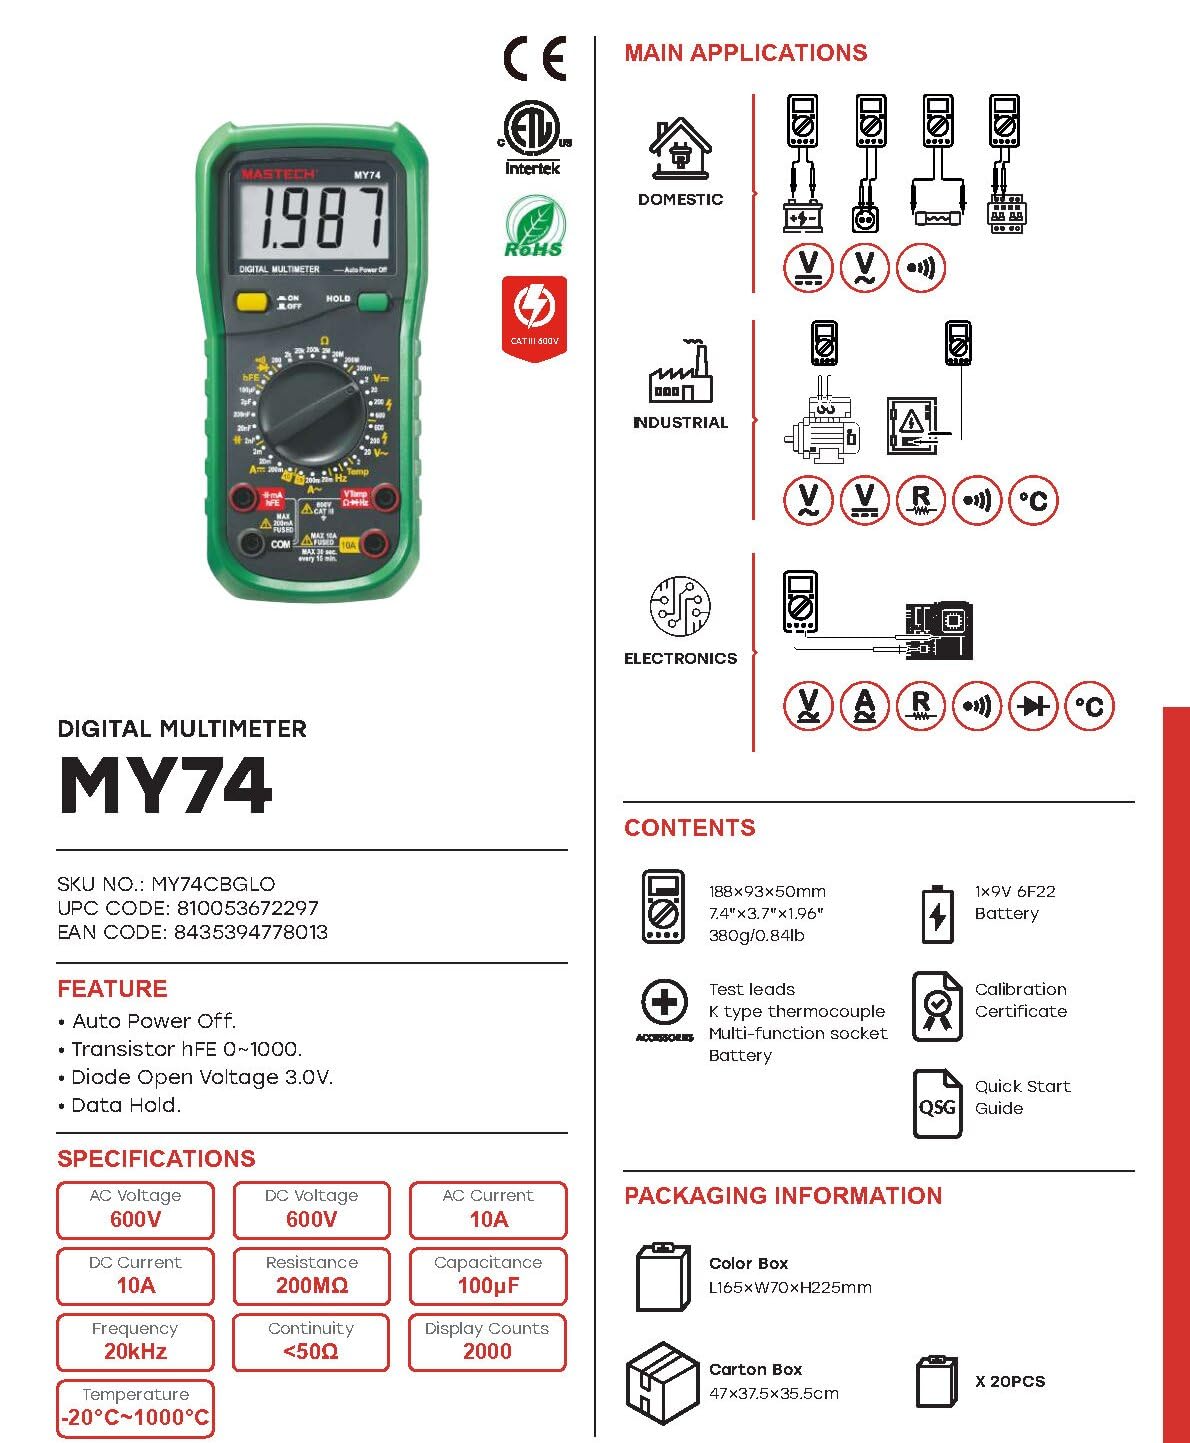
The MASTECH MY74 Digital Multimeter features a clear display, a rotary function switch, and input jacks for test leads. Familiarize yourself with the components shown below.

Асноўныя кампаненты ўключаюць:
- ВК-дысплей: Паказвае паказанні вымярэнняў, адзінкі вымярэння і індыкатары функцый.
- Паваротны перамыкач функцый: Selects the desired measurement function.
- Кнопка ON/OFF: Уключае або выключае прыладу.
- Кнопка HOLD: Зафіксуе бягучыя паказанні на дысплеі.
- Уваходныя гнязда:
- COM: Агульны тэрмінал для ўсіх вымярэнняў.
- VΩHz: Уваход для тtage, resistance, frequency, capacitance, diode, and continuity measurements.
- мАмкА: Увод для міліampтут і мікраampтут бягучыя вымярэнні.
- 10А: Input for 10 Ampтут бягучыя вымярэнні.
4. Асаблівасці
The MASTECH MY74 Digital Multimeter offers the following key features:
- Дысплей: 2000 адлікаў
- Функцыя аўтаматычнага адключэння
- Transistor hFE measurement (0~1000)
- Дыёд адкрыты аб'ёмtagе: 3.0 В.
- Continuity Buzzer: Activates below 50Ω
- Функцыя ўтрымання дадзеных
- Low Battery Display indicator
5. Настройка
5.1 Устаноўка батарэі
Для MASTECH MY74 патрэбныя 2 батарэйкі LR44 (у камплекце). Каб усталяваць або замяніць батарэйкі:
- Ensure the multimeter is turned off and disconnect all test leads.
- Знайдзіце батарэйны адсек на задняй панэлі глюкометра.
- Адкруціце крышку батарэйнага адсека.
- Устаўце батарэйкі, выконваючы правільную палярнасць (+ і -).
- Замяніце крышку батарэйнага адсека і замацуеце яе шрубай.
5.2 Падключэнне вымяральных правадоў
Always connect the black test lead to the COM jack. Connect the red test lead to the appropriate input jack based on the measurement function:
- VΩHz: Для выпtage, resistance, frequency, capacitance, diode, and continuity.
- мАмкА: Для вымярэння току да 200 мА.
- 10А: Для вымярэння току да 10А.
6. Інструкцыя па эксплуатацыі
Before taking any measurement, ensure the test leads are correctly connected and the rotary switch is set to the desired function.
6.1 DC Voltage Measurement (V–)
- Connect the red test lead to the VΩHz jack and the black test lead to the COM jack.
- Усталюйце паваротны перамыкач на патрэбны ўзровень гучнасці пастаяннага токуtagдыяпазон (напрыклад, 200 мВ, 2 В, 20 В, 200 В, 600 В).
- Падключыце вымяральныя шпулькі паралельна да ланцуга або кампанента, які правяраецца.
- Прачытайце тtage значэнне на дысплеі.
6.2 AC VoltagВымярэнне (V∼)
- Connect the red test lead to the VΩHz jack and the black test lead to the COM jack.
- Усталюйце паваротны перамыкач на патрэбны ўзровень гучнасці пераменнага токуtage range (e.g., 2V, 20V, 200V, 750V).
- Connect the test leads in parallel to the AC circuit or component.
- Прачытайце тtage значэнне на дысплеі.
6.3 DC Current Measurement (A–)
УВАГА: Ніколі не падключайце мультыметр паралельна даtagкрыніцы току пры вымярэнні току. Гэта можа перагарэць засцерагальнік або пашкодзіць вымяральнік.
- Падключыце чорны тэставы провад да гнязда COM.
- For currents up to 200mA, connect the red test lead to the mAµA jack. For currents up to 10A, connect the red test lead to the 10A jack.
- Set the rotary switch to the appropriate DC Current range (e.g., 2mA, 20mA, 200mA, 10A).
- Разамкніце ланцуг і падключыце мультыметр паслядоўна з нагрузкай.
- Прачытайце бягучае значэнне на дысплеі.
6.4 AC Current Measurement (A∼)
УВАГА: Ніколі не падключайце мультыметр паралельна даtagкрыніцы току пры вымярэнні току. Гэта можа перагарэць засцерагальнік або пашкодзіць вымяральнік.
- Падключыце чорны тэставы провад да гнязда COM.
- For currents up to 200mA, connect the red test lead to the mAµA jack. For currents up to 10A, connect the red test lead to the 10A jack.
- Set the rotary switch to the appropriate AC Current range (e.g., 2mA, 20mA, 200mA, 10A).
- Разамкніце ланцуг і падключыце мультыметр паслядоўна з нагрузкай.
- Прачытайце бягучае значэнне на дысплеі.
6.5 Resistance Measurement (Ω)
УВАГА: Перад вымярэннем супраціўлення пераканайцеся, што ланцуг абясточаны і ўсе кандэнсатары разраджаны.
- Connect the red test lead to the VΩHz jack and the black test lead to the COM jack.
- Set the rotary switch to the desired Resistance range (e.g., 200Ω, 2kΩ, 20kΩ, 200kΩ, 2MΩ, 200MΩ).
- Падключыце вымяральныя дроты да кампанента, які трэба вымераць.
- Прачытайце значэнне супраціву на дысплеі.
6.6 Праверка дыёдаў (→|–)
- Connect the red test lead to the VΩHz jack and the black test lead to the COM jack.
- Усталюйце паваротны перамыкач у становішча «Праверка дыёдаў».
- Падключыце чырвоны вымяральны провад да анода, а чорны — да катода дыёда.
- На дысплеі будзе адлюстроўвацца гучнасць прамой перадачыtage drop. Reverse the leads; the display should show "OL" (Open Loop) for a good diode.
6.7 Праверка бесперапыннасці (♫)
- Connect the red test lead to the VΩHz jack and the black test lead to the COM jack.
- Усталюйце паваротны перамыкач у становішча «Праверка цэласнасці».
- Падключыце вымяральныя дроты да ланцуга або кампанента.
- If the resistance is less than approximately 50Ω, the buzzer will sound, indicating continuity.
6.8 Тэст транзістара hFE
- Усталюйце паваротны перамыкач у становішча hFE.
- Insert the transistor's Emitter, Base, and Collector leads into the corresponding holes in the multi-function socket (NPN or PNP).
- Read the hFE value on the display.
6.9 Вымярэнне ёмістасці (F)
CAUTION: Ensure the capacitor is fully discharged before measuring capacitance to avoid damage to the meter.
- Connect the red test lead to the VΩHz jack and the black test lead to the COM jack.
- Set the rotary switch to the Capacitance range (e.g., 2nF, 20nF, 200nF, 2µF, 20µF, 100µF).
- Падключыце вымяральныя дроты да кандэнсатара.
- Прачытайце значэнне ёмістасці на дысплеі.
6.10 Вымярэнне частаты (Гц)
- Connect the red test lead to the VΩHz jack and the black test lead to the COM jack.
- Set the rotary switch to the Frequency range (20kHz).
- Connect the test leads in parallel to the signal source.
- Прачытайце значэнне частаты на дысплеі.
6.11 Вымярэнне тэмпературы (°C/°F)
- Connect the K-type thermocouple to the VΩHz and COM jacks, observing polarity.
- Set the rotary switch to the Temperature range.
- Размясціце тэрмапарны зонд у месцы, дзе трэба вымяраць тэмпературу.
- Прачытайце значэнне тэмпературы на дысплеі.
7. Тэхнічнае абслугоўванне
7.1 Ачыстка
Працярыце корпус рэкламайamp тканінай і мяккім мыйным сродкам. Не выкарыстоўвайце абразіўныя рэчывы або растваральнікі. Перад выкарыстаннем пераканайцеся, што глюкометр цалкам сухі.
7.2 Замена батарэі
Refer to section 5.1 for battery replacement instructions. Replace batteries promptly when the low battery indicator appears to ensure accurate readings.
7.3 Замена засцерагальніка
Калі функцыя вымярэння току не працуе, магчыма, спатрэбіцца замяніць засцерагальнік. Глядзіце спецыфікацыі, каб даведацца пра правільны тып і намінальны паказчык засцерагальніка. Замену засцерагальніка павінен выконваць толькі кваліфікаваны персанал.
8. Выпраўленне непаладак
| праблема | Магчымая прычына | Рашэнне |
|---|---|---|
| Лічыльнік не ўключаецца. | Разраджаныя або няправільна ўсталяваныя батарэйкі. | Праверце палярнасць батарэек або заменіце батарэйкі. |
| Адлюстравана "OL" (перагрузка). | Measurement exceeds selected range or open circuit. | Select a higher range or check for open circuit. |
| Incorrect current reading. | Blown fuse or incorrect input jack. | Check fuse and ensure test lead is in the correct current input jack (mAµA or 10A). |
| Няма гукавога сігналу бесперапыннасці. | Resistance is too high or circuit is open. | Check the circuit for breaks. Ensure resistance is below 50Ω. |
9. Тэхнічныя характарыстыкі
The following table details the technical specifications for the MASTECH MY74 Digital Multimeter.

| Функцыя | Дыяпазон | дазвол | Дакладнасць |
|---|---|---|---|
| DC Voltage | 200 мВ/2 В/20 В/200 В | 0.1 мВ/1 мВ/10 мВ/0.1 В | ±(0.5%+2) |
| 600В | 1V | ±(0.8%+2) | |
| Пераменнага токуtage | 2В/20В/200В | 1 мВ/10 мВ/100 мВ | ±(0.8%+3) |
| 750В | 1V | ±(1.2%+3) | |
| Пастаянны ток | 2 мА | 1 мкА | ±(0.8%+1) |
| 20 мА | 10 мкА | ±(1.5%+1) | |
| 200 мА | 0.1 мА | ±(1.5%+1) | |
| 10А | 10 мА | ±(2.0%+5) | |
| Ток пераменнага току | 20 мА | 10 мкА | ±(1.0%+5) |
| 200 мА | 0.1 мА | ±(1.8%+5) | |
| 10А | 0.01А | ±(3.0%+7) | |
| Супраціў | 200 Ом | 0.1 Ом | ±(0.8%+3) |
| 2kΩ/20kΩ/200kΩ/2MΩ | 1Ω/10Ω/100Ω/1kΩ | ±(0.8%+2) | |
| 20 МОм | 10 кОм | ±(1.0%+2) | |
| 200 МОм | 0.1 МОм | ±(6.0%+10) | |
| Дыёд адкрыты аб'ёмtage | 3.0В | Н/Д | Н/Д |
| Ёмістасць | 2 нФ/20 нФ/200 нФ/2 мкФ | 1 пФ/10 пФ/0.1 нФ/1 нФ | ±(4.0%+3) |
| 20 мкФ | 10nF | ±(5.0%+3) | |
| 100 мкФ | 0.1 мкФ | ±(6.0%+10) | |
| Частата | 20 кГц | 0.01 кГц | ±(2.0%+5) |
| тэмпература | -20°C~0°C | 1°C | ±(5.0%+4) |
| 1°C~400°C | 1°C | ±(2.0%+3) | |
| 401°C~1000°C | 1°C | ±(2.0%+5) | |
| Транзістар hFE | 0~1000 | Н/Д | Н/Д |
| Дысплей | 2000 адлікаў | ||
| Аўтаматычнае выключэнне | так | ||
| Бесперапыннасць зумер | <50Ω | ||
| Утрыманне дадзеных | так | ||
| Дысплей з нізкім узроўнем зарадкі | так | ||
| Крыніца харчавання | 2 батарэі LR44 (у камплекце) | ||
| Памеры прадукту | 16 х 9 х 5 см | ||
| Вага прадмета | 0.5 кілаграма | ||
| Рэйтынг бяспекі | CAT III 600V, CE, RoHS | ||
Note: Accuracy specifications are given for one year after calibration, at 18°C to 28°C (64°F to 82°F), with relative humidity up to 75%.
10. Гарантыя і падтрымка
MASTECH products are designed for reliability and performance. For warranty information and technical support, please refer to the documentation included with your purchase or visit the official MASTECH webсайт. Тэрмін даступнасці запасных частак у ЕС складае 1 год.