1. Уводзіны
The Mastech MS8233A is a compact, battery-powered digital multimeter designed for measuring AC/DC voltage, DC current, resistance, diode, continuity, and temperature. It features a 2000-count display, data hold function, and a low battery indicator, making it suitable for various electrical testing applications.
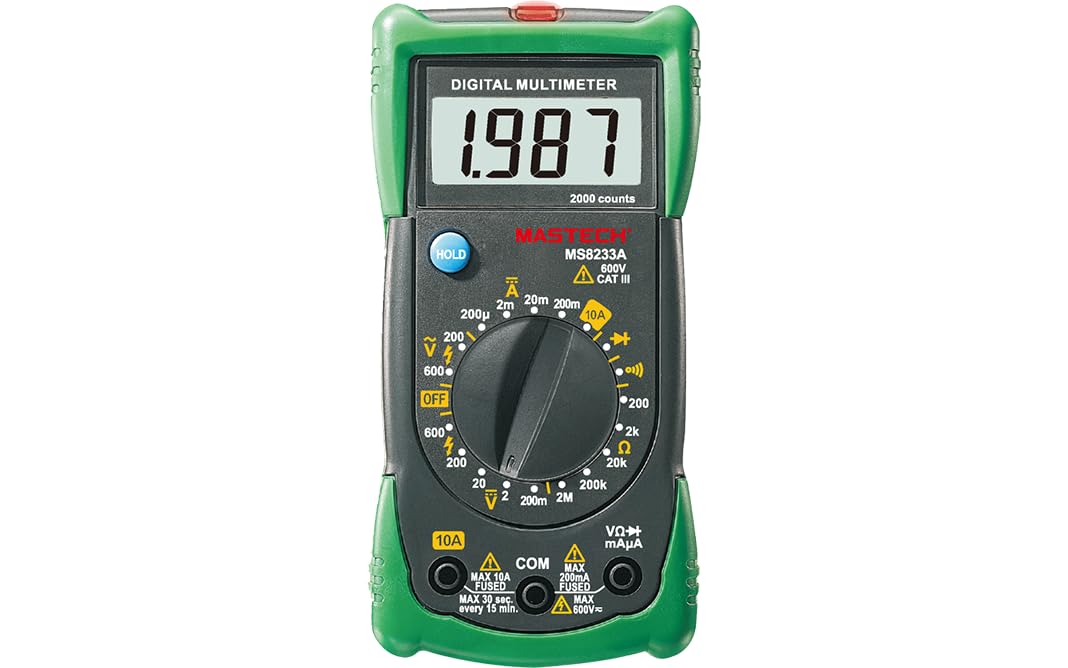
Малюнак 1: Спераду view of the Mastech MS8233A Digital Multimeter, showing the display, rotary switch, and input jacks.
2. Інфармацыя па бяспецы
Каб забяспечыць бяспечную працу і абслугоўванне лічыльніка, выконвайце наступныя інструкцыі:
- Заўсёды пераканайцеся, што лічыльнік знаходзіцца ў добрым працоўным стане перад выкарыстаннем.
- Не ўжываць абtagабо ток, які перавышае максімальныя ўказаныя межы для лічыльніка.
- Будзьце асцярожныя пры працы з voltagвышэй за 60 В пастаяннага току або 30 В пераменнага току RMS, бо гэта стварае небяспеку паражэння электрычным токам.
- Заўсёды адключайце вымяральныя дроты ад ланцуга перад зменай функцый.
- Неадкладна замяніце батарэйку, калі з'явіцца індыкатар нізкага зараду батарэі, каб забяспечыць дакладныя паказанні.
- Do not operate the meter if the case is open or if it appears damaged.
- Прытрымвайцеся мясцовых і нацыянальных кодэксаў бяспекі.
3. Асаблівасці прадукту
- Дысплей: 2000 адлікаў
- Дыёд адкрыты аб'ёмtagе: 3.0 В.
- Continuity Buzzer: Sounds at less than 60Ω
- Функцыя ўтрымання дадзеных
- Low Battery Display indicator
- Меры AC/DC voltage, DC current, resistance, diode check, continuity test, and temperature.
4. Змесціва ўпакоўкі
Праверце наяўнасць усіх прадметаў у камплекце:
- Mastech MS8233A Digital Multimeter
- Выпрабаванні
- 1x 9V 6F22 Battery (pre-installed or included separately)
- сертыфікат каліброўкі
- Кароткае кіраўніцтва

Figure 2: Illustration of package contents and main applications for the MS8233A multimeter.
5. Настройка
5.1 Устаноўка батарэі
The MS8233A requires one 9V 6F22 battery. If the battery is not pre-installed or needs replacement:
- Пераканайцеся, што мультыметр выключаны, і адключыце ўсе вымяральныя правады.
- Знайдзіце вечка батарэйнага адсека на задняй панэлі прылады.
- Unscrew the retaining screw(s) and carefully remove the cover.
- Падключыце батарэйку 9 В да клеммы, выконваючы правільную палярнасць.
- Устаўце батарэйку ў адсек і зачыніце вечка, замацаваўшы яго шрубай (шрубамі).
5.2 Падключэнне вымяральных правадоў
Insert the test leads into the appropriate input jacks:
- Insert the black test lead into the “COM” (common) jack.
- Для большасці вымярэнняў (аб'ёмtage, resistance, diode, continuity, temperature), insert the red test lead into the “VΩmA” jack.
- For DC current measurements up to 10A, insert the red test lead into the “10A” jack.
6. Інструкцыя па эксплуатацыі
To operate the multimeter, turn the rotary switch to the desired function. The display will show the measurement value.
6.1 DC Voltage Measurement (V–)
- Усталюйце паваротны перамыкач на патрэбны ўзровень гучнасці пастаяннага токуtagдыяпазон (напрыклад, 200 мВ, 2 В, 20 В, 200 В, 600 В).
- Падключыце чырвоны вымяральны кабель да станоўчага (+) полюса ланцуга, а чорны — да адмоўнага (-).
- Прачытайце тtage значэнне на дысплеі.
6.2 AC VoltagВымярэнне (V∼)
- Усталюйце паваротны перамыкач на патрэбны ўзровень гучнасці пераменнага токуtagдыяпазон (напрыклад, 200 В, 600 В).
- Падключыце вымяральныя дроты да сеткі пераменнага току.tagэлектронная крыніца.
- Прачытайце тtage значэнне на дысплеі.
6.3 DC Current Measurement (A–)
- Set the rotary switch to the desired DC Current range (e.g., 200µA, 2mA, 20mA, 200mA, 10A).
- Важна: For 10A measurements, move the red test lead to the “10A” jack. For other current ranges, use the “VΩmA” jack.
- Open the circuit where current is to be measured and connect the meter in series.
- Прачытайце бягучае значэнне на дысплеі.
6.4 Resistance Measurement (Ω)
- Set the rotary switch to the desired Resistance range (e.g., 200Ω, 2kΩ, 20kΩ, 200kΩ, 2MΩ).
- Перад вымярэннем супраціўлення пераканайцеся, што ланцуг або кампанент абясточаны.
- Падключыце вымяральныя дроты да кампанента, які трэба вымераць.
- Прачытайце значэнне супраціву на дысплеі.
6.5 Diode Test (→|–)
- Усталюйце паваротны перамыкач у становішча «Праверка дыёдаў».
- Падключыце чырвоны вымяральны провад да анода, а чорны — да катода дыёда.
- На дысплеі будзе адлюстроўвацца гучнасць прамой перадачыtage drop. Reverse the leads to check for open circuit (OL) indication.
6.6 Continuity Test (♫)
- Усталюйце паваротны перамыкач у становішча «Праверка цэласнасці».
- Падключыце вымяральныя дроты да ланцуга або кампанента.
- If the resistance is below approximately 60Ω, the buzzer will sound, indicating continuity.
6.7 Temperature Measurement (℃/℉)
The MS8233A can measure temperature using a K-type thermocouple (not always included, check package contents).
- Set the rotary switch to the Temperature function.
- Падключыце тэрмапару тыпу K да ўваходных гнёздаў, выконваючы палярнасць.
- Размясціце тэрмапарны зонд у месцы, дзе трэба вымяраць тэмпературу.
- Прачытайце значэнне тэмпературы на дысплеі.
6.8 Функцыя ўтрымання дадзеных
Press the “HOLD” button to freeze the current reading on the display. Press it again to release the hold function and resume live readings.
7. Тэхнічнае абслугоўванне
7.1 Замена батарэі
Калі на дысплеі з'явіцца індыкатар нізкага зараду батарэі, заменіце батарэю 9 В, як апісана ў раздзеле 5.1.
7.2 Ачыстка
Працярыце корпус рэкламайamp тканінай і мяккім мыйным сродкам. Не выкарыстоўвайце абразіўныя рэчывы або растваральнікі. Перад выкарыстаннем пераканайцеся, што глюкометр цалкам сухі.
7.3 Замена засцерагальніка
The current input jacks are typically protected by fuses. If the meter fails to measure current, the fuse may need replacement. Refer to the specific fuse ratings printed on the meter or in the detailed specifications. Fuse replacement should only be performed by qualified personnel.
8. Выпраўленне непаладак
If the multimeter does not function correctly, consider the following:
- Няма дысплея або цьмянае адлюстраванне: Check battery charge and ensure it is correctly installed. Replace if necessary.
- Няправільныя паказанні: Verify the correct function and range are selected. Ensure test leads are properly connected and making good contact. Check battery level.
- Cannot measure current: Check the fuse for the current input. Ensure the red test lead is in the correct current jack (e.g., 10A).
- “OL” (Overload) displayed: The measured value exceeds the selected range. Switch to a higher range or verify the circuit is not open.
Калі праблемы не знікнуць, звярніцеся ў службу падтрымкі.
9. Тэхнічныя характарыстыкі
9.1 Агульныя тэхнічныя характарыстыкі
- Power Source: 2 LR44 batteries required (included) - Note: Product description states 1x 9V 6F22 battery. Please verify with actual product.
- Памеры прадукту: 16 х 9 х 5 см
- Вага прадмета: 0.5 кілаграма
- Manufacturer: MASTECH/MGL
- Safety Rating: CAT III 600V
- Сертыфікаты: CE, RoHS
- Upper Temperature Rating: 50 Degrees Celsius
9.2 Электрычныя характарыстыкі
| Тэхнічныя характарыстыкі | Дыяпазон | дазвол | Дакладнасць |
|---|---|---|---|
| DC Voltage | 200 мВ/2 В/20 В/200 В 600В | 0.1 мВ/1 мВ/10 мВ/100 мВ 1V | ±(0.5%+3) ±(0.5%+3) |
| Пераменнага токуtage | 200В 600В | 100mV 1V | ±(1.2%+10) ±(1.2%+10) |
| Пастаянны ток | 200µA/2mA/20mA/200mA 10А | 0.1µA/1µA/10µA/0.1mA 0.01А | ±(1.0%+3) ±(3.0%+5) |
| Супраціў | 200Ω/2kΩ/20kΩ/200kΩ 2 МОм | 0.1Ω/1Ω/10Ω/100Ω 1 кОм | ±(0.8%+4) ±(0.8%+4) |
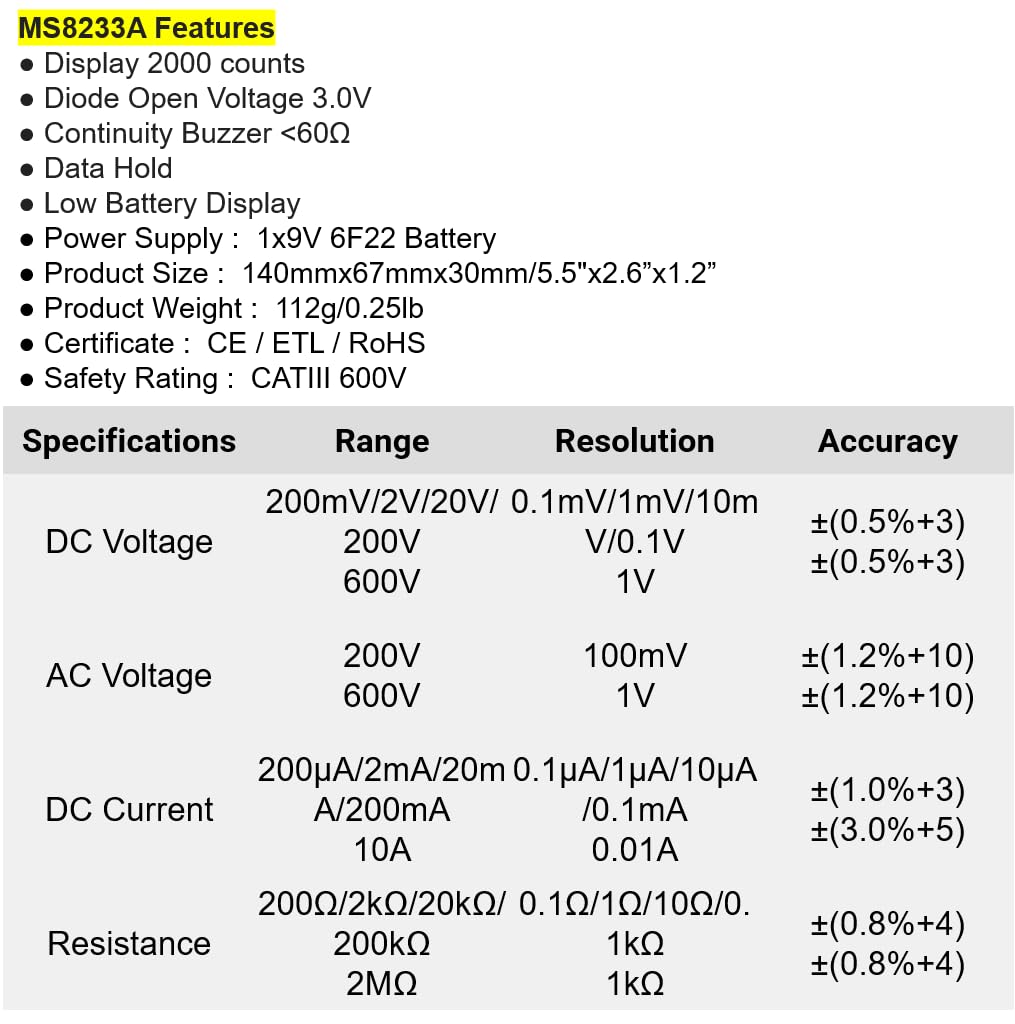
Figure 3: Detailed electrical specifications for the Mastech MS8233A.
9.3 Related Models Comparison

Figure 4: Comparison table of various Mastech manual ranging digital multimeters, including the MS8233A.
10. Гарантыя і падтрымка
Mastech products are designed for reliability and performance. For warranty information or technical support, please refer to the warranty card included with your product or contact Mastech customer service through their official webсайт. Захоўвайце чэк аб куплі як пацвярджэнне пакупкі для гарантыйных прэтэнзій.