EazeID D210S Label Maker
EazeID D210S Label Maker Instruction Manual
Model: D210S | Brand: EazeID
1. Уводзіны
Thank you for choosing the EazeID D210S Label Maker. This portable device is designed for efficient and versatile labeling, suitable for various environments including home, office, and school. Featuring a user-friendly QWERTY keyboard and dual power options, it produces durable, laminated labels resistant to water, abrasion, fading, and temperature changes.
This manual provides detailed instructions on how to set up, operate, and maintain your label maker to ensure optimal performance and longevity.
2. Настройка
2.1. Змесціва ўпакоўкі
Перад пачаткам працы пераканайцеся, што ў вашай упакоўцы ёсць усе неабходныя рэчы:
- EazeID D210S Gray label maker (1 unit)
- Sample label tape waterproof (12mm 0.47 laminated White, 4M) (1 unit)
- Кабель тыпу C (1 шт.)
- Кіраўніцтва карыстальніка (1 адзінка)

Image: Contents of the EazeID D210S Label Maker package, including the device, sample tape, Type-C cable, and manual.
2.2. Харчаванне прылады
The EazeID D210S label maker offers two power options:
- Кабель USB Type-C: Connect the included Type-C cable to the label maker and a compatible power adapter (not included). The device does not support charging via Type-C; it operates directly from the power source.
- Батарэі AAA: For portable use, insert 6 AAA batteries (not included) into the battery compartment located on the underside of the device. Ensure correct polarity.
Заўвага:
- It is recommended to use a charger block with an output voltage of ±5V when using the Type-C cable.
- Do not leave batteries in the printer when it is powered by the USB Type-C cable.

Image: Illustration of the label maker's dual power options: USB Type-C for continuous power and AAA batteries for portability.
2.3. Усталёўка этыкетачнай стужкі
To install the label tape:
- Open the tape compartment cover on the back of the label maker.
- Insert the label tape cassette with the tape facing the print head. Ensure the tape is properly aligned and clicks into place.
- Шчыльна зачыніце вечка адсека для стужкі.
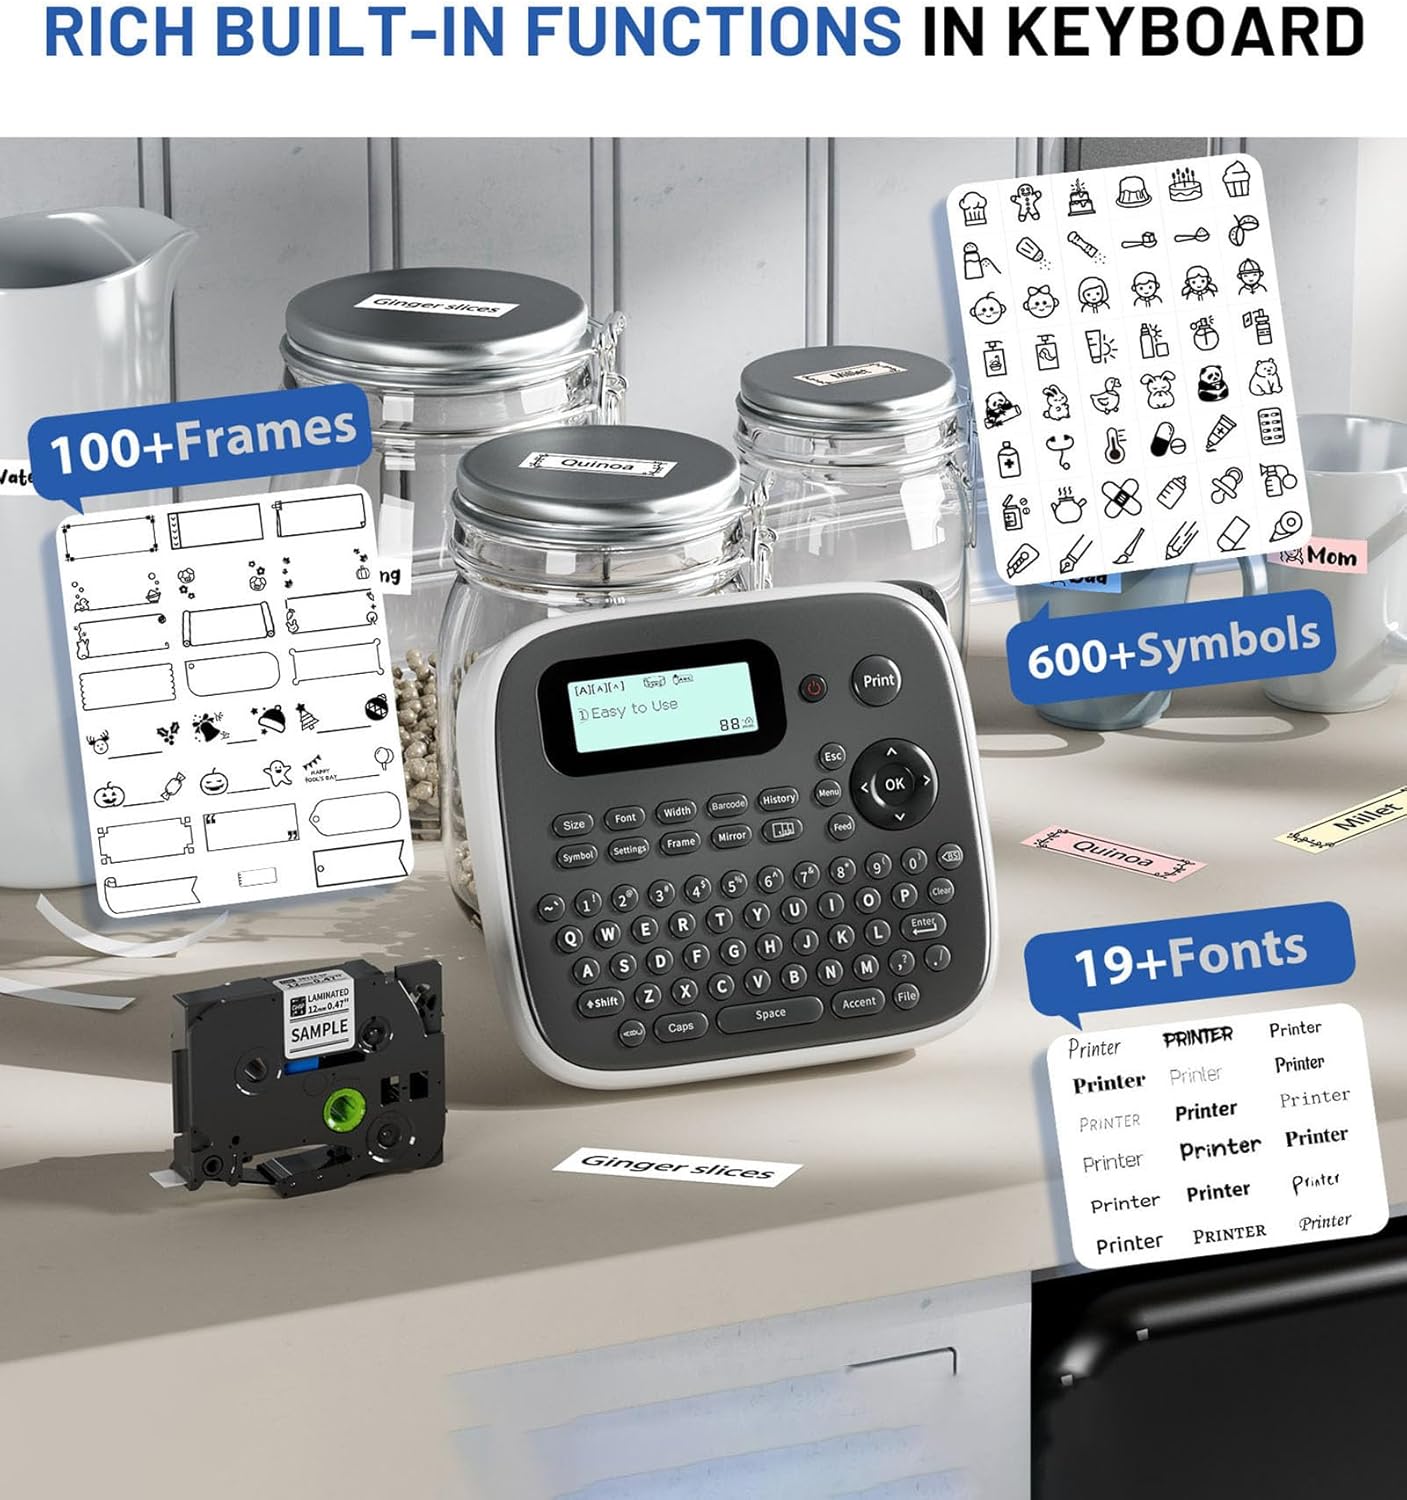
Image: The label maker with its tape compartment open, illustrating the tape installation area and the integrated cutter.
3. Інструкцыя па эксплуатацыі
3.1. Асноўныя спосабы стварэння этыкетак
Follow these steps to create a basic label:
- Уключэнне: Націсніце кнопку харчавання, каб уключыць прыладу для вырабу этыкетак.
- Увод з клавіятуры: Use the QWERTY keyboard to type your desired text. The text will appear on the LCD screen.
- Друк: Націсніце Друк кнопку, каб раздрукаваць этыкетку.

Image: A visual guide demonstrating the simple three-step process to operate the label maker.
3.2. Text Formatting and Special Functions
The D210S label maker includes a variety of built-in functions to customize your labels:
- Стылі шрыфтоў: Access 16 font styles using the dedicated Шрыфт ключ.
- Сімвалы: Choose from over 640 symbols using the Сімвал ключ.
- кадры: Apply over 100 frames to your labels using the Каркас ключ.
- Іншыя функцыі: Utilize keys for Size, Width, Barcode, History, Mirror, and more for advanced customization.

Image: The label maker showcasing its extensive library of frames, symbols, and font options for creative labeling.
3.3. Printing Multiple Labels
The D210S offers efficient options for printing multiple labels:
- Multi-Copy Editing: Use the multi-copy editing one-touch key to continuously edit and print up to 55 different labels. This is ideal for creating a series of unique labels without re-entering the menu.
- Printing Identical Labels: To print multiple copies of the same label, it is advisable to print them all at once and then cut them individually. You can specify the number of copies (1-9) by pressing зрух + Друк, then using the navigation keys or a number key, and finally pressing OK or Друк.

Image: A flowchart demonstrating how to use the multi-copy function for sequential label printing.

Image: A guide on how to efficiently print multiple identical labels using the Shift + Print key combination.
3.4. Clearing Text
To clear text or formatting:
- Delete Letters One by One: Націсніце BS (Backspace) ключ.
- Delete All Text and Format: Прэса Ясна → OK → [Text & Format] → OK.
- Delete Text Only: Прэса Ясна → [Толькі тэкст] → OK.

Image: A step-by-step guide on using the Clear function to remove text or formatting from the label maker's display.
3.5. Using the Built-in Cutter
After printing, use the integrated cutter to cleanly separate your label from the tape roll. The cutter is located on the side of the device. Press the cutter lever firmly to cut the label.
3.6. Optimizing Label Tape Usage
To reduce label tape costs, it is recommended to set the label margin to "Narrow" in the device settings. Navigate to Налады → Маржа → вузкія.
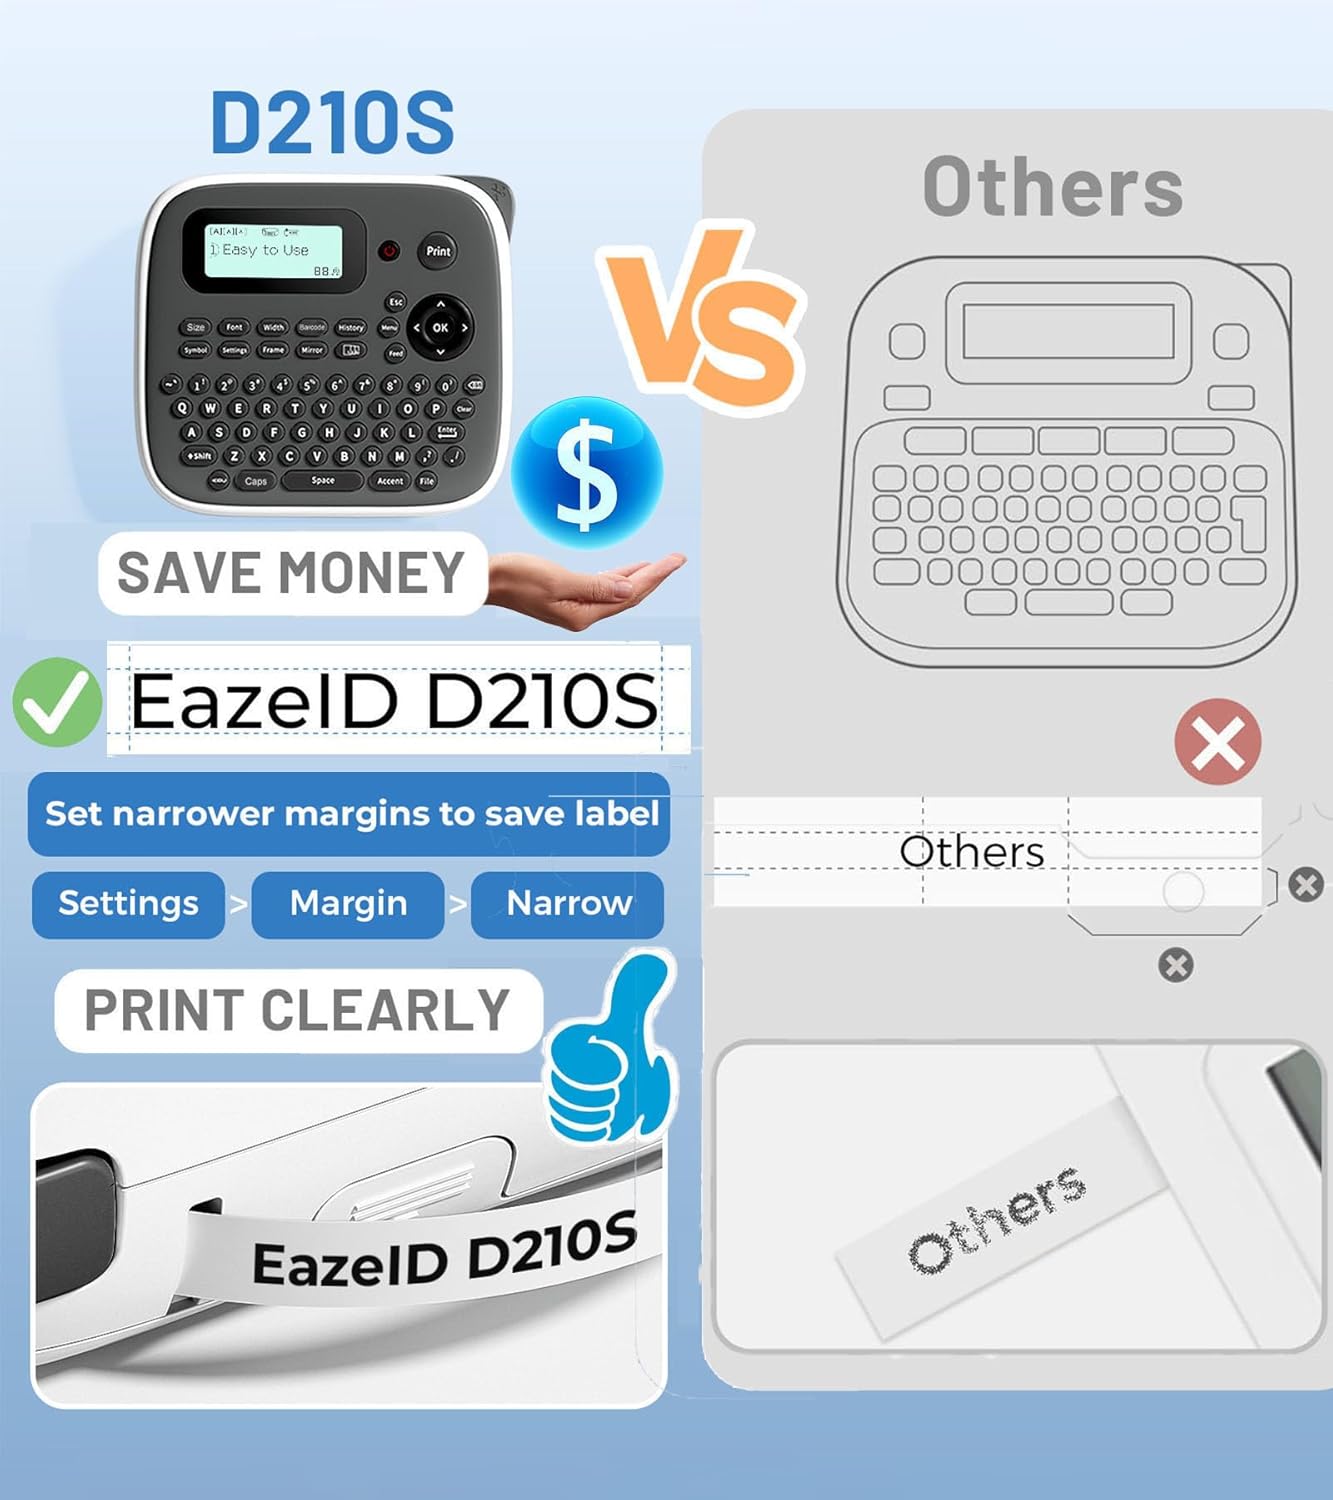
Image: A visual comparison highlighting the tape-saving benefit of using the 'Narrow' margin setting on the D210S.
4. Тэхнічнае абслугоўванне
4.1. Уборка
To ensure optimal performance and print quality, regularly clean your label maker:
- Працярыце знешнія паверхні прылады мяккай сухой тканінай.
- If the print head becomes dirty, gently wipe it with a cotton swab dampened with isopropyl alcohol. Ensure the device is turned off and disconnected from power before cleaning.
- Remove any dust or debris from the tape compartment.
4.2. Tape Replacement
When the label tape runs out or you wish to change tape types, follow the tape installation instructions in Section 2.3. Ensure you use compatible EazeID D210S label tapes for best results.
4.3. Захоўванне
Store the label maker in a cool, dry place away from direct sunlight and extreme temperatures. If storing for an extended period, remove the AAA batteries to prevent leakage.
5. Выпраўленне непаладак
If you encounter issues with your EazeID D210S Label Maker, refer to the following common problems and solutions:
| праблема | Магчымая прычына | Рашэнне |
|---|---|---|
| Прылада не ўключаецца | Low or dead batteries; USB cable not connected properly; incorrect power adapter. | Replace AAA batteries; ensure USB Type-C cable is securely connected; use a compatible 5V power adapter. |
| Poor print quality (faint, blurry, or missing lines) | Dirty print head; incorrect tape installation; low tape quality. | Clean the print head (see Section 4.1); re-install label tape correctly; ensure you are using genuine EazeID D210S compatible tape. |
| Tape jams frequently | Improper tape installation; foreign objects in tape path; tape not feeding smoothly. | Re-install tape, ensuring it is seated correctly; check for and remove any obstructions; ensure tape is not creased or damaged. |
| Label not cutting properly | Cutter blade dull or obstructed. | Ensure no tape residue is blocking the cutter; if issues persist, contact customer support. |
| На экране паведамленне пра памылку | Канкрэтная памылка. | Refer to the on-screen message for guidance. Common errors relate to tape issues (e.g., "Tape End"). Follow instructions or re-install tape. |
6. Тэхнічныя характарыстыкі
| Назва мадэлі | D210S Gray Label Maker Machine |
| Марка | EazeID |
| Тэхналогія друку | Цеплавы |
| Тэхналогія падлучэння | Клавіятура |
| Максімальны памер носьбіта | 12 мм |
| Максімальнае разрозненне каляровага друку | 180 DPI |
| Максімальнае дазвол чорна-белай друку | 203 DPI |
| Электразабеспячэнне | Type-C Cable or 6 AAA Batteries |
| Памеры прадукту | 5 х 5 х 2 цалі |
| Вага прадмета | 1.26 фунта |
| Уключаныя кампаненты | Label maker, Sample label tape, Type-C Cable, User Manual |
| Максімальная колькасць копій за адзін запуск | 55 (different labels) |
7. Гарантыя і падтрымка
7.1. Інфармацыя аб гарантыі
The EazeID D210S Label Maker comes with a limited warranty. Please refer to the warranty card included in your package or visit the official EazeID webпадрабязныя ўмовы адносна гарантыйнага пакрыцця і тэрміну дзеяння глядзіце на сайце.
7.2. Падтрымка кліентаў
For technical assistance, troubleshooting not covered in this manual, or inquiries about replacement parts and accessories, please contact EazeID customer support. Contact information can typically be found on the EazeID official webсайце або на ўпакоўцы прадукту.
8. Відэа пра прадукты
Сярод прадстаўленых дадзеных для ўбудавання ў гэта кіраўніцтва афіцыйных відэа прадукту ад прадаўца не знойдзена.