1. Уводзіны
The Mastech MS8250D is a high-performance digital multimeter designed for accurate measurement of AC/DC voltage, AC/DC current, resistance, capacitance, frequency, and temperature. It features a 6600-count display, auto/manual ranging, True RMS, Non-Contact Voltage (NCV) detection, diode and continuity testing, and a USB interface for PC connectivity. This manual provides detailed instructions for safe and effective use of the device.
Асноўныя характарыстыкі:
- 6600-count digital display
- Automatic and Manual Ranging
- Праўда вымярэння RMS
- Бескантактавы выпtage (NCV) выяўленне
- Diode and Continuity Tester (buzzer < 50Ω)
- MAX/MIN value recording
- Функцыя ўтрымання дадзеных
- Падсвятленне дысплея
- Аўтаматычнае выключэнне
- Рэжым адноснага вымярэння
- Індыкацыя разраду батарэі
- USB Interface for Windows OS
2. Інфармацыя па бяспецы
ПАПЯРЭДЖАННЕ: To avoid electric shock or personal injury, and to avoid damage to the meter or to the equipment under test, read all safety information carefully before using the meter. This device complies with CE, RoHS, and UL safety standards.
- Always ensure the test leads are in good condition and properly connected.
- Не наносіце больш за намінальны аб'ёмtage, як пазначана на лічыльніку, паміж клемамі або паміж любой клемай і зазямленнем.
- Будзьце асцярожныя пры працы з voltagвышэй за 30 В пераменнага току (RMS), 42 В пікавага або 60 В пастаяннага току. Гэтыя аб'ёмыtagуяўляюць небяспеку паражэння.
- Before measuring current, ensure the circuit is de-energized and the meter is connected in series.
- Заўсёды адключайце вымяральныя дроты ад ланцуга перад зменай функцый або дыяпазонаў.
- Не выкарыстоўвайце глюкометр, калі ён выглядае пашкоджаным або калі корпус адкрыты.
- Замяніце батарэйку, як толькі з'явіцца індыкатар нізкага зараду батарэі, каб забяспечыць дакладныя паказанні.
- Adhere to the specified measurement categories (CAT III 1000V / CAT IV 600V) for safe operation.
3. Прадукт скончыўсяview
Familiarize yourself with the components of your Mastech MS8250D Digital Multimeter.

Малюнак 3.1: Фронт view of the Mastech MS8250D Digital Multimeter, showing the display, function dial, and input jacks. The display shows "1.987 V", indicating a voltage measurement. The function dial is set to T-RMS. Input jacks are labeled for µA mA, A, VΩHz%, and COM.
Асноўныя кампаненты:
- ВК-дысплей: Паказвае паказанні вымярэнняў, адзінкі вымярэння і індыкатары функцый.
- Функцыянальны цыферблат: Выкарыстоўваецца для выбару патрэбнай функцыі вымярэння (напрыклад, аб'ёмtage, Current, Resistance, Diode, Continuity, Temperature).
- Функцыянальныя кнопкі:
- ТРЫМАЦЬ: Зафіксуе бягучыя паказанні на дысплеі.
- RANGE: Switches between auto and manual ranging.
- REL: Актывуе рэжым адноснага вымярэння.
- MAX / MIN: Запісвае максімальныя і мінімальныя значэнні.
- ФУНКЦЫЯ: Selects sub-functions within a dial position (e.g., AC/DC, Diode/Continuity).
- T-RMS: (Indicated on dial) True RMS measurement.
- NCV: Бескантактавы выпtagэлектроннае выяўленне.
- Кнопка падсвятлення: Activates display backlight.
- Уваходныя гнязда:
- COM: Common terminal for all measurements (negative lead).
- VΩHz%: Уваход для тtage, resistance, frequency, capacitance, and diode/continuity measurements (positive lead).
- µA mA: Input for microampere and milliampere current measurements (positive lead). Fused for protection.
- A: Уваход для ampere current measurements (positive lead). Fused for protection.
Уключаныя кампаненты:
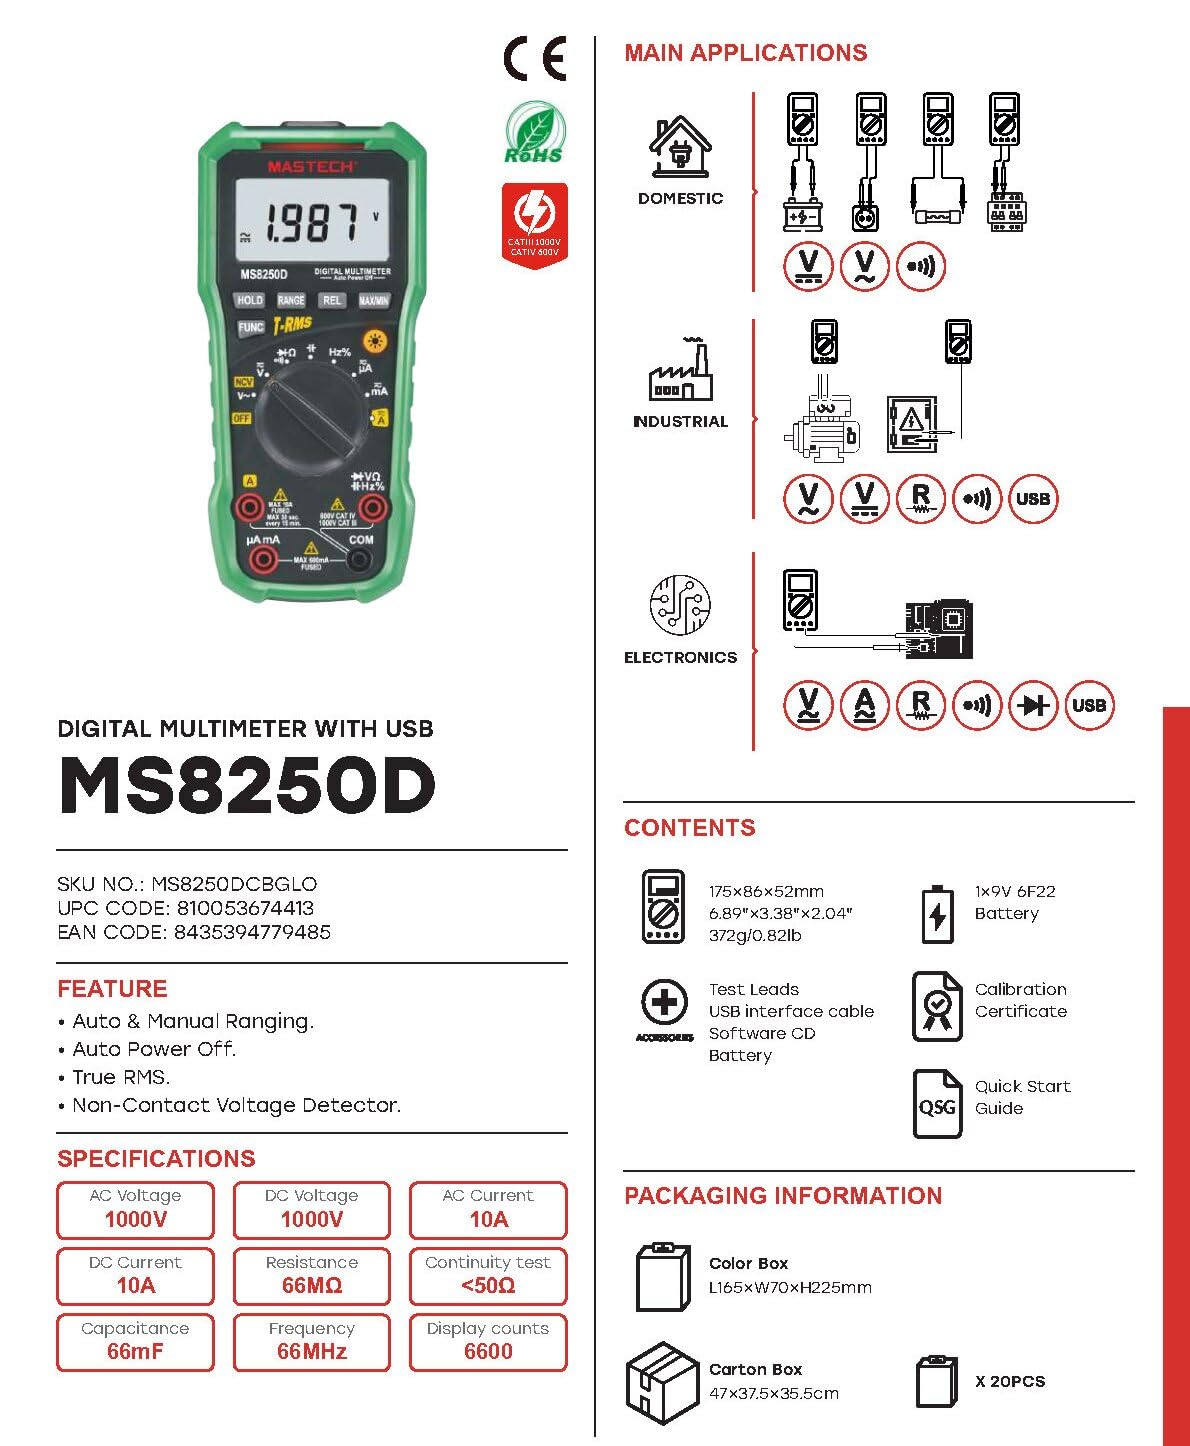
Малюнак 3.2: Diagram showing the Mastech MS8250D Multimeter and its included accessories. The image also illustrates typical applications in domestic, industrial, and electronics settings.
- Mastech MS8250D Digital Multimeter
- Вымяральныя дроты (чырвоны і чорны)
- 1x 9V 6F22 Battery (pre-installed or included separately)
- Інтэрфейсны кабель USB
- Software CD (for Windows OS)
- сертыфікат каліброўкі
- Кароткае кіраўніцтва
4. Настройка
4.1 Устаноўка батарэі
The MS8250D requires one 9V 6F22 battery for operation. Two LR44 batteries are also mentioned in specifications, likely for a different internal component or an error in data. For the main power, use the 9V battery.
- Пераканайцеся, што мультыметр выключаны.
- Знайдзіце вечка батарэйнага адсека на задняй панэлі глюкометра.
- Выкарыстоўвайце адвёртку, каб аслабіць шрубу(ы), якая(ыя) мацуе вечка.
- Зніміце вечка.
- Connect the 9V battery to the battery clips, observing correct polarity (+ and -).
- Змесціце батарэю ў адсек.
- Закрыйце батарэйны адсек і замацуйце яго шрубай (шрубамі).
Заўвага: The meter also uses 2 LR44 batteries, which are typically included and pre-installed for specific functions like the backlight or non-contact voltage detection. Refer to the quick-start guide for specific details on these smaller batteries if replacement is needed.
4.2 Падключэнне вымяральных правадоў
Always connect the black test lead to the COM jack. Connect the red test lead to the appropriate input jack based on the measurement type:
- Для тtage, Resistance, Capacitance, Frequency, Diode, and Continuity measurements: Connect the red lead to the ВΩГц% дамкрат.
- For Current measurements (µA or mA): Connect the red lead to the мкА мА дамкрат.
- For High Current measurements (A): Connect the red lead to the A дамкрат.
Ensure the test leads are fully inserted into the jacks.
5. Інструкцыя па эксплуатацыі
5.1 Уключэнне/выключэнне сілкавання
To turn the meter ON, rotate the function dial from the "OFF" position to any desired measurement function. To turn the meter OFF, rotate the function dial back to the "OFF" position.
The meter features an Аўтаматычнае выключэнне function to conserve battery life. It will automatically power off after a period of inactivity. To disable or re-enable this feature, refer to the quick-start guide or the full user manual provided on the software CD.
5.2 Auto Ranging and Manual Ranging
The MS8250D defaults to Аўтамабільны дыяпазон, which automatically selects the best measurement range. Press the RANGE кнопка для пераключэння Ручное ранжыраванне. In manual ranging, each press of the RANGE button cycles through available ranges. To return to auto ranging, press and hold the RANGE кнопка.
5.3 Вымярэнне AC/DC Voltagе (V)
- Усталюйце функцыянальны дыск у становішча V~ (AC Томtagд) або V- (DC Voltagд) пазіцыя.
- Падключыце чорны тэставы провад да COM гняздо і чырвоны вымяральны провад да ВΩГц% дамкрат.
- Падключыце вымяральныя зонды да ланцуга або кампанента, які трэба вымераць.
- Прачытайце тtage value on the display. The meter will automatically detect AC or DC if the dial is set to the combined V position, or you can use the ФУНКЦЫЯ button to toggle between AC and DC if available on your model.
5.4 Вымярэнне пераменнага/пастаяннага току (А, мА, мкА)
ПАПЯРЭДЖАННЕ: Never connect the meter in parallel to a voltagкрыніцы току пры вымярэнні току. Гэта можа перагарэць засцерагальнік або пашкодзіць вымяральнік.
- Выключыце харчаванне ланцуга.
- Усталюйце функцыянальны дыск у становішча A~ (AC Current), A- (DC Current), мА~, мА-, µA~, або µA- становішча.
- Падключыце чорны тэставы провад да COM дамкрат.
- Падключыце чырвоны выпрабавальны провад да A jack for high current, or мкА мА jack for low current.
- Open the circuit where the current is to be measured and connect the meter in series with the load.
- Падайце харчаванне ў ланцуг.
- Read the current value on the display. Use the ФУНКЦЫЯ button to toggle between AC and DC if needed.
5.5 Вымярэнне супраціўлення (Ом)
- Усталюйце функцыянальны дыск у становішча Ω становішча.
- Падключыце чорны тэставы провад да COM гняздо і чырвоны вымяральны провад да ВΩГц% дамкрат.
- Пераканайцеся, што ланцуг або кампанент, які тэстуецца, адключаны ад напругі.
- Падключыце вымяральныя зонды да кампанента.
- Прачытайце значэнне супраціву на дысплеі.
5.6 Diode Test and Continuity Test
- Усталюйце функцыянальны дыск у становішча Дыёд/Праверка цеплаправоднасці position (often shared with resistance or capacitance).
- Падключыце чорны тэставы провад да COM гняздо і чырвоны вымяральны провад да ВΩГц% дамкрат.
- Выкарыстоўвайце ФУНКЦЫЯ button to select between Diode Test and Continuity Test.
- Для праверкі дыёдаў: Падключыце чырвоны зонд да анода, а чорны зонд да катода дыёда. На дысплеі будзе адлюстроўвацца прамая напруга.tage drop (typically 0.5V to 0.8V for silicon diodes). Reversing the probes should show "OL" (Open Loop).
- Для праверкі бесперапыннасці: Connect the probes across the circuit or component. If resistance is less than approximately 50Ω, the buzzer will sound, indicating continuity.
5.7 Вымярэнне ёмістасці (F)
- Усталюйце функцыянальны дыск у становішча Ёмістасць position (often shared with resistance or diode).
- Падключыце чорны тэставы провад да COM гняздо і чырвоны вымяральны провад да ВΩГц% дамкрат.
- Ensure the capacitor is fully discharged before testing to avoid damage to the meter.
- Падключыце вымяральныя зонды да вывадаў кандэнсатара.
- Прачытайце значэнне ёмістасці на дысплеі.
5.8 Вымярэнне частаты (Гц) і каэфіцыента запаўнення (%)
- Усталюйце функцыянальны дыск у становішча Гц% position (often shared with voltagе).
- Падключыце чорны тэставы провад да COM гняздо і чырвоны вымяральны провад да ВΩГц% дамкрат.
- Падключыце вымяральныя зонды да крыніцы сігналу.
- The display will show the frequency. Press the ФУНКЦЫЯ button to toggle to Duty Cycle measurement if available.
5.9 Бескантактны выпtage (NCV) Выяўленне
- Усталюйце функцыянальны дыск у становішча NCV становішча.
- Hold the meter with the NCV sensor (usually at the top of the meter) near a live AC voltagэлектронная крыніца.
- Лічыльнік будзе паказваць наяўнасць аб'ёму пераменнага токуtage through an audible beep and/or visual indicator (e.g., LED).
5.10 USB Interface (Windows OS)
The MS8250D includes a USB interface for connecting to a computer running Windows OS. This allows for data logging and real-time monitoring of measurements. Install the provided software from the CD and follow the on-screen instructions for driver installation and software usage.
6. Тэхнічнае абслугоўванне
6.1 Ачыстка
Працярыце корпус лічыльніка рэкламайamp тканінай і мяккім мыйным сродкам. Не выкарыстоўвайце абразіўныя рэчывы або растваральнікі. Перад выкарыстаннем пераканайцеся, што глюкометр цалкам сухі.
6.2 Замена батарэі
When the low battery indicator appears on the display, replace the 9V battery immediately to ensure accurate readings. Follow the steps in Section 4.1 Battery Installation.
6.3 Замена засцерагальніка
If the meter fails to measure current, the fuse may be blown. Fuses are located inside the meter. To replace a fuse:
- Пераканайцеся, што вымяральны прыбор выключаны, і ўсе вымяральныя правады адключаны.
- Open the battery compartment cover (and potentially the main case, depending on design).
- Акуратна выміце стары засцерагальнік.
- Replace with a fuse of the exact same type and rating (e.g., F600mA/250V for mA/µA range, F10A/250V for A range). Refer to the meter's internal markings or the full manual for specific fuse ratings.
- Reassemble the meter, ensuring all screws are tightened.
ПАПЯРЭДЖАННЕ: Never use a fuse with a different rating or bypass the fuse. This can damage the meter and pose a serious safety hazard.
7. Выпраўленне непаладак
| праблема | Магчымая прычына | Рашэнне |
|---|---|---|
| Лічыльнік не ўключаецца. | Разрадзіўся акумулятар. | Заменіце батарэю 9 В. |
| Адлюстравана "OL" (перагрузка). | Вымярэнне перавышае абраны дыяпазон або максімальную магутнасць вымяральніка. | Switch to a higher range (if in manual ranging) or ensure the measurement is within the meter's limits. |
| Няма бягучых паказанняў. | Blown fuse; incorrect lead connection; open circuit. | Check and replace fuse if necessary. Ensure leads are connected correctly (in series). Verify circuit continuity. |
| Няправільныя паказанні. | Low battery; poor lead contact; external interference. | Replace battery. Ensure leads are firmly connected. Move away from strong electromagnetic fields. |
| Display shows "USB" but no PC connection. | Drivers not installed; incorrect software settings. | Install drivers from the provided CD. Refer to software manual for connection instructions. |
8. Тэхнічныя характарыстыкі
The following table details the technical specifications of the Mastech MS8250D Digital Multimeter.

Малюнак 8.1: Detailed specifications table for the Mastech MS8250D, outlining ranges, resolutions, and accuracies for various measurement functions.
| Функцыя | Дыяпазон | дазвол | Дакладнасць |
|---|---|---|---|
| DC Voltage | |||
| 660mV | 0.1mV | ±(0.8%+3) | |
| 6.6В/66В/660В/1000В | 1 мВ/10 мВ/0.1 В/1 В | ±(0.5%+5) | |
| Пераменнага токуtage (сапраўднае RMS) | |||
| 660mV | 0.1mV | ±(1.5%+5) | |
| 6.6В/66В | 1 мВ/10 мВ | ±(1.2%+5) | |
| 660В/1000В | 0.1В/1В | ±(1.0%+3) | |
| Пастаянны ток | |||
| 660 мкА/6600 мкА/66 мА/660 мА | 0.1µA/1µA/10µA/0.1mA | ±(1.0%+5) | |
| 10А | 10 мА | ±(2.0%+5) | |
| Пераменны ток (сапраўднае сярэдняквадратычнае) | |||
| 660 мкА/6600 мкА/66 мА/660 мА | 0.1 мкА/1 мкА/0.01 мА/0.1 мА | ±(1.5%+5) | |
| 10А | 10 мА | ±(3.0%+5) | |
| Супраціў | |||
| 660Ω / 6.6kΩ / 66kΩ / 660kΩ / 6.6MΩ | 0.1Ω / 1Ω / 10Ω / 100Ω / 1kΩ | ±(0.8%+5) | |
| 66 МОм | 10kΩ | ±(1.5%+5) | |
| Ёмістасць | |||
| 6.6nF/66nF/660nF/6.6µF/66µF | 1pF/10pF/0.1nF/1nF/10nF | ±(4.0%+5) | |
| 600 мкФ | 1 мкФ | ±(3.0%+5) | |
| 6.6 мФ/66 мФ | 1µF/10µF | ±(4.0%+5) | |
| Частата | |||
| 66 Гц/660 Гц/6.6 кГц/66 кГц | 0.01 Гц / 0.1 Гц / 1 Гц / 10 Гц | ±(1.5%+5) | |
| 660 кГц/6.6 МГц/66 МГц | 0.1 кГц/1 кГц/10 кГц | ±(1.5%+5) | |
| Працоўны цыкл | |||
| 0.1%~99.9% | 0.1% | ±(2.0%+5) | |
Агульныя характарыстыкі:
- Дысплей: 6600 графаў
- Крыніца харчавання: 1x 9V 6F22 Battery (main power), 2x LR44 batteries (auxiliary, e.g., backlight)
- Аўтаматычнае выключэнне: так
- Сапраўднае RMS: так
- Бескантактавы выпtagДэтэктар e (NCV): так
- Дыёд адкрыты аб'ёмtage: 3.2В
- Зумер бесперапыннасці: <50Ω
- MAX / MIN: так
- Утрыманне дадзеных: так
- Індыкатар нізкага ўзроўню батарэі: так
- Падсвятленне дысплея: так
- Інтэрфейс USB: Yes (Windows OS)
- Рэйтынг бяспекі: CAT III 1000В / CAT IV 600В
- Дакладнасць вымярэння: 0.4% (general, specific accuracies per function in table)
- Аперацыйная Voltage (мінімум): 3.2 вольт
- Верхні рэйтынг тэмпературы: 50 градусы па Цэльсіі
- Памеры (Д х Ш х У): 20 х 15 х 25 см
- Вага прадмета: 1 кг
- матэрыял: Акрыланітрылбутадыенстырол (АБС)
- колер: Сіні
- вытворца: МАСТЭЧ
- Краіна паходжання: Тайвань
- Сертыфікаты: CE, RoHS, UL
9. Гарантыя і падтрымка
Mastech products are designed for reliability and durability. For specific warranty information, please refer to the warranty card included with your product or contact Mastech customer support directly. Typically, Mastech offers a limited warranty against defects in materials and workmanship.
For technical support, troubleshooting assistance, or warranty claims, please contact your authorized Mastech dealer or visit the official Mastech webсайт для кантактнай інфармацыі.
Тэрмін наяўнасці запасных частак у ЕС: 1 год