
1. Уводзіны
Дзякуй за пакупкуasing the Pisichen 8-inch Touch Panel Mobile HD Mini Monitor. This compact and versatile display is designed to enhance your productivity and entertainment experience across various devices. Featuring a responsive 5-point capacitive touch screen and multiple connectivity options, it offers a seamless and immersive visual interface.

Figure 1.1: Pisichen 8-inch Touch Panel Mobile HD Mini Monitor
This monitor is equipped with:
- 5-Point Capacitive Touch: For intuitive and precise interaction.
- HD 800x480 Resolution: Delivering clear and vivid visuals.
- Разнастайныя падключэнні: Two HDMI ports and one USB-C port for broad compatibility.
- Некалькі рэжымаў адлюстравання: Supports duplicate, extended, and second screen modes.
- HDR Mode & Built-in Speakers: Enhances visual depth and provides integrated audio.
2. Змесціва ўпакоўкі
Калі ласка, праверце ўпакоўку на наяўнасць наступных прадметаў:
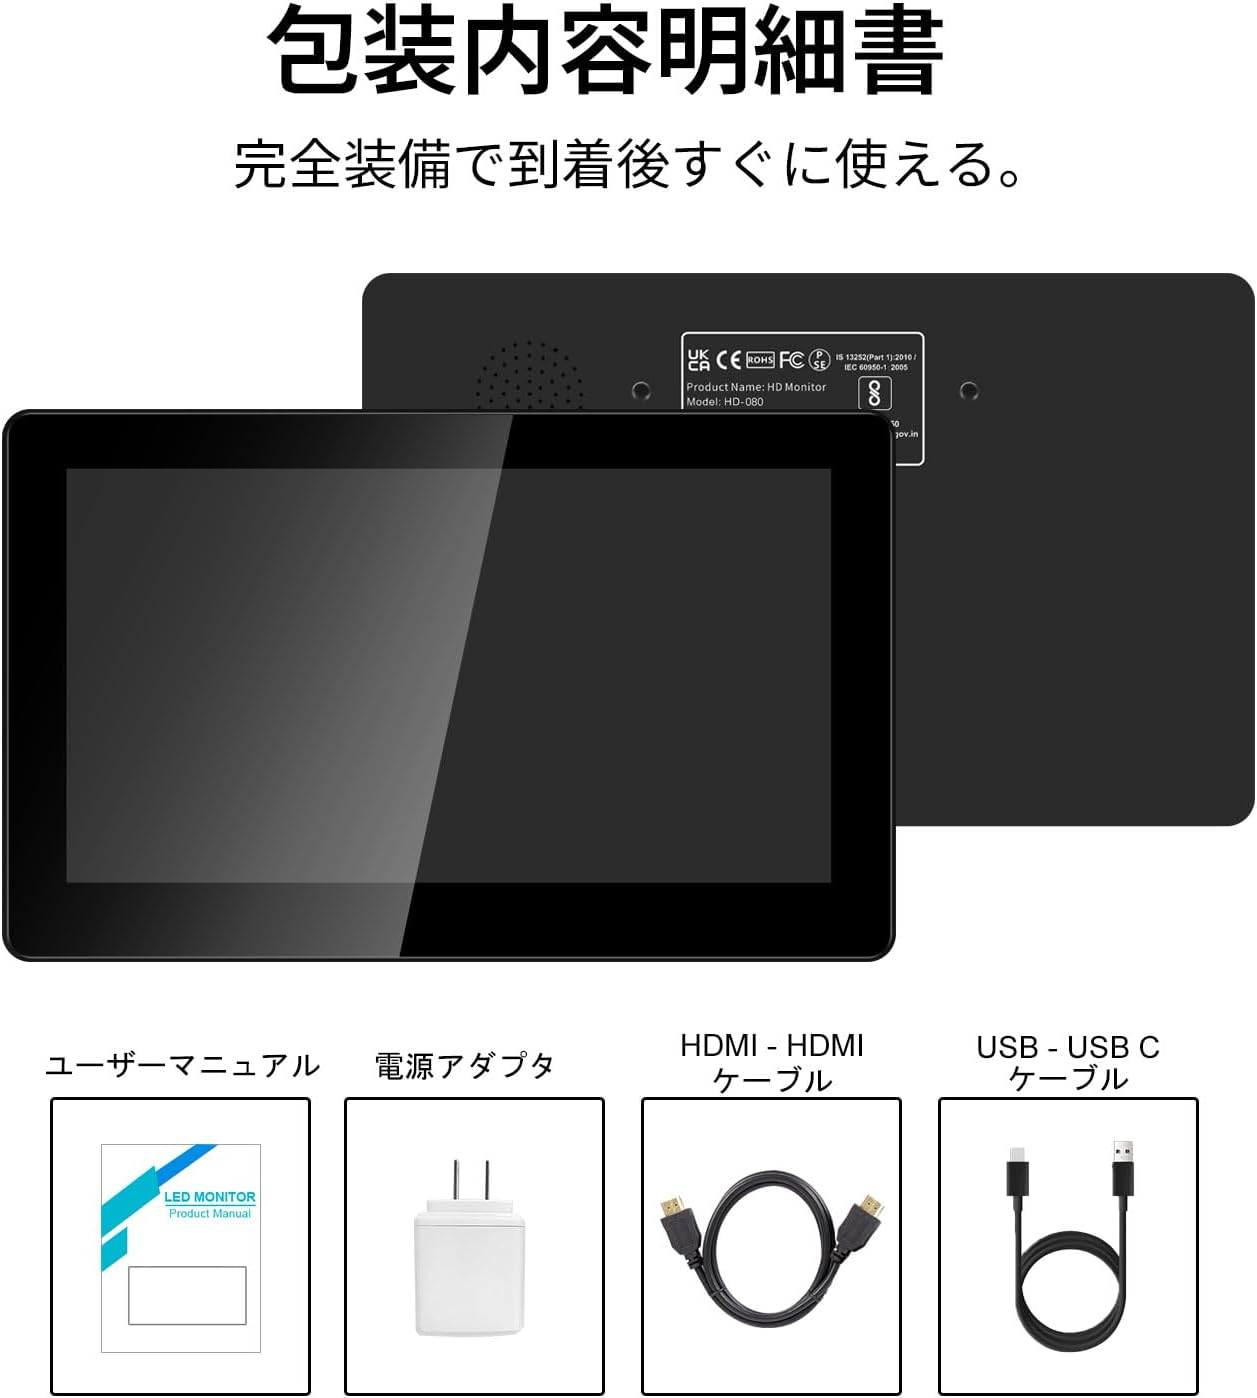
Малюнак 2.1: Змест пакета
- Pisichen 8-inch Touch Panel Mobile HD Mini Monitor
- Кіраўніцтва карыстальніка
- Адаптар сілкавання
- Кабель HDMI - HDMI
- USB-A to USB-C Cable (for power and touch functionality)
3. Інструкцыі па ўсталёўцы
Follow these steps to set up your Pisichen mini monitor:
3.1 Падключэнне манітора
- Падключэнне сілкавання: Connect the provided power adapter to the monitor's power port and plug it into a power outlet. Alternatively, use the USB-C port for power by connecting it to a compatible USB power source.
- Відэа ўваход:
- For HDMI devices (PC, laptop, game console): Use the HDMI to HDMI cable to connect your device's HDMI output to one of the monitor's HDMI ports (HDMI 1 or HDMI 2).
- For USB-C devices (with DisplayPort Alternate Mode support): Connect a USB-C to USB-C cable (not included) from your device to the monitor's USB-C port. This single cable can provide both video and power/touch.
- Touch Functionality (for HDMI connections): If using an HDMI connection and requiring touch functionality, connect the provided USB-A to USB-C cable from your source device's USB-A port to the monitor's USB-C port. This enables touch input.
- Аўдыявыхад: If you prefer external audio, connect headphones or external speakers to the 3.5mm audio jack on the monitor.

Figure 3.1: Monitor Ports and Connections
3.2 Першапачатковае ўключэнне
Once connected, press the ON/OFF button on the side of the monitor to power it on. The monitor should automatically detect the input signal. If not, use the menu buttons to select the correct input source.
4. Інструкцыя па эксплуатацыі
4.1 Асноўныя элементы кіравання
На баку манітора ёсць некалькі кнопак для кіравання:
- Кнопка ON/OFF: Powers the monitor on or off.
- Volume Down / Brightness Up: Adjusts volume or increases brightness.
- Volume Up / Brightness Down: Adjusts volume or decreases brightness.
- Signal Switch / Return: Switches between input signals or acts as a 'back' button in menus.
- Menu / OK: Opens the OSD (On-Screen Display) menu or confirms a selection.
4.2 Touch Panel Operation
The 5-point capacitive touch panel allows for intuitive interaction:
- Націсніце: Выберыце элементы або актывуйце функцыі.
- Правядзіце пальцам: Scroll through content or navigate interfaces.
- Звядзенне пальцамі для павелічэння: Павялічваць або памяншаць змест (напрыклад, выявы, карты).
- Жэсты некалькімі пальцамі: Supported for specific operating systems and applications.

Figure 4.1: 5-Point Touch Panel Gestures
Note: Touch functionality may require specific driver installation on some operating systems or devices. Ensure your device supports touch input over the chosen connection method.
4.3 Рэжымы адлюстравання
Манітор падтрымлівае розныя рэжымы адлюстравання пры падключэнні да кампутара:
- Рэжым дублявання: Displays the same content on both your primary screen and the mini monitor.
- Пашыраны рэжым: Пашырае працоўны стол на абодва экраны, што дазваляе павялічыць працоўную прастору.
- Рэжым другога экрана: Uses only the mini monitor as the display.
- Партрэтны рэжым: The monitor can be rotated for vertical display, useful for specific applications.
These modes can typically be configured through your operating system's display settings.

Figure 4.2: Multiple Display Modes
4.4 HDR Mode
The monitor supports HDR (High Dynamic Range) mode, which can be enabled via the OSD menu or your connected device's display settings. HDR provides a wider range of colors and contrasts, resulting in a more vibrant and realistic image.
5. Тэхнічнае абслугоўванне
To ensure the longevity and optimal performance of your Pisichen mini monitor, follow these maintenance guidelines:
- Ачыстка экрана: Выкарыстоўвайце мяккую безворсовую тканіну, злёгку dampened with water or a screen-cleaning solution. Avoid harsh chemicals, abrasive materials, or excessive moisture.
- Ачыстка Casing: Працярыце манітор casinпрацярыце мяккай сухой тканінай.
- захоўванне: Калі манітор не выкарыстоўваецца працяглы час, захоўвайце яго ў прахалодным, сухім месцы, удалечыні ад прамых сонечных прамянёў і экстрэмальных тэмператур.
- Апрацоўка: Пазбягайце падзення манітора і моцных удараў. Не стаўце на яго цяжкія прадметы.
- Вентыляцыя: Ensure the monitor's vents are not blocked to prevent overheating.
6. Выпраўленне непаладак
Калі ў вас узніклі праблемы з маніторам, звярніцеся да наступных распаўсюджаных праблем і іх рашэнняў:
- Няма дысплея / чорны экран:
- Пераканайцеся, што адаптар сілкавання надзейна падключаны, а манітор уключаны.
- Verify that the video cable (HDMI or USB-C) is properly connected to both the monitor and the source device.
- Check if the correct input source is selected using the monitor's menu buttons.
- Калі магчыма, праверце з іншым відэакабелем або прыладай-крыніцай.
- No Touch Functionality:
- If using HDMI, ensure the USB-A to USB-C cable is connected from your source device to the monitor's USB-C port.
- For USB-C connections, ensure your device supports touch input over USB-C.
- Check your operating system's settings for touch screen calibration or driver status.
- Няма аўдыя:
- Increase the monitor's volume using the side buttons.
- Check your source device's audio output settings to ensure audio is being sent to the monitor.
- If using external speakers/headphones, ensure they are properly connected to the 3.5mm audio jack.
- Image Quality Issues (e.g., lines on screen, distorted colors):
- Праверце відэакабель на наяўнасць пашкоджанняў або няшчыльных злучэнняў.
- Adjust the monitor's display settings (brightness, contrast, color temperature) via the OSD menu.
- Пераканайцеся, што дазвол дысплея і частата абнаўлення вашай прылады-крыніцы сумяшчальныя са спецыфікацыямі манітора.
- If persistent, try connecting to a different source device or using a different cable.
7. Тэхнічныя характарыстыкі
| Марка | Пісічэнь |
| Нумар мадэлі | HD-8TS-800P |
| Памер экрана | 8 цаляў |
| дазвол | 800 х 480 пікселяў |
| Суадносіны бакоў | 16:9 |
| Сэнсарная панэль | 5-кропкавы ёмістны сэнсарны экран |
| Сувязь | 2x HDMI, 1x USB-C (Power/Touch), 1x 3.5mm Audio Jack |
| Колер | Чорны |
| Памеры прадукту (Ш х В х Г) | 206 x 130 x 20 мм (прыблізна) |
| Вага прадукту | 910 г |
| Асаблівасці | HDR Mode, Built-in Dual Stereo Speakers |
8. Гарантыя і падтрымка
Pisichen is committed to providing reliable and high-quality products. While specific warranty details are not provided in this manual, please retain your proof of purchase for any warranty claims. For technical support, troubleshooting assistance, or inquiries regarding your product, please contact Pisichen customer service through the retailer where you purchased the product or visit the official Pisichen brand store online.
We strive for continuous innovation, product content updates, and ongoing improvement in product quality. Our goal is to be a company loved and trusted by our customers.