1. Уводзіны
This manual provides detailed instructions for the installation, operation, and maintenance of your GAMEON Midnight I Series Mid Tower Gaming PC Case. Please read this manual thoroughly before beginning installation to ensure proper setup and to maximize the performance and lifespan of your product. Keep this manual for future reference.
2. Інфармацыя па бяспецы
- Always disconnect the power supply from the wall outlet before performing any installation or maintenance inside the PC case.
- Handle the tempered glass panels with care. Tempered glass, while durable, can shatter if dropped or subjected to sharp impacts.
- Avoid exposing the case to extreme temperatures or high humidity.
- Do not attempt to modify the case or its components. Unauthorized modifications may void your warranty and pose safety risks.
- Трымайце дробныя дэталі і шрубы далей ад дзяцей.
3. Змесціва ўпакоўкі
Калі ласка, пераканайцеся, што ўсе пералічаныя ніжэй прадметы прысутнічаюць у вашай упакоўцы:
- GAMEON Midnight I Series Mid Tower Gaming PC Case
- 7 x 120mm ARGB PWM Cooling Fans (pre-installed)
- Accessory Box (containing screws, cable ties, and other mounting hardware)
- ARGB/PWM Fan Controller and Remote Control
- Кіраўніцтва карыстальніка (гэты дакумент)
4. Прадукт скончыўсяview
The GAMEON Midnight I Series PC case is designed for optimal cooling and aesthetic appeal, featuring tempered glass panels and pre-installed ARGB PWM fans.

Figure 4.1: Internal layout of the PC case, highlighting the spacious interior for component installation.

Figure 4.2: Rear and top internal view, illustrating fan placement and overall structure.
4.1 ARGB+PWM Case Fans
The case comes with 7 pre-installed 120mm ARGB PWM fans, providing efficient cooling and customizable lighting. The fans are controlled via an included ARGB/PWM controller and remote.

Figure 4.3: ARGB+PWM fan features and fan mounting support. The front supports 360mm water cooling. Fan mounts include 3x120mm for PSU cover, 3x120mm for bottom, 3x120mm for top, and 1x120mm for rear.
4.2 Парты ўводу/вываду на пярэдняй панэлі
The front panel provides convenient access to essential ports for connectivity.
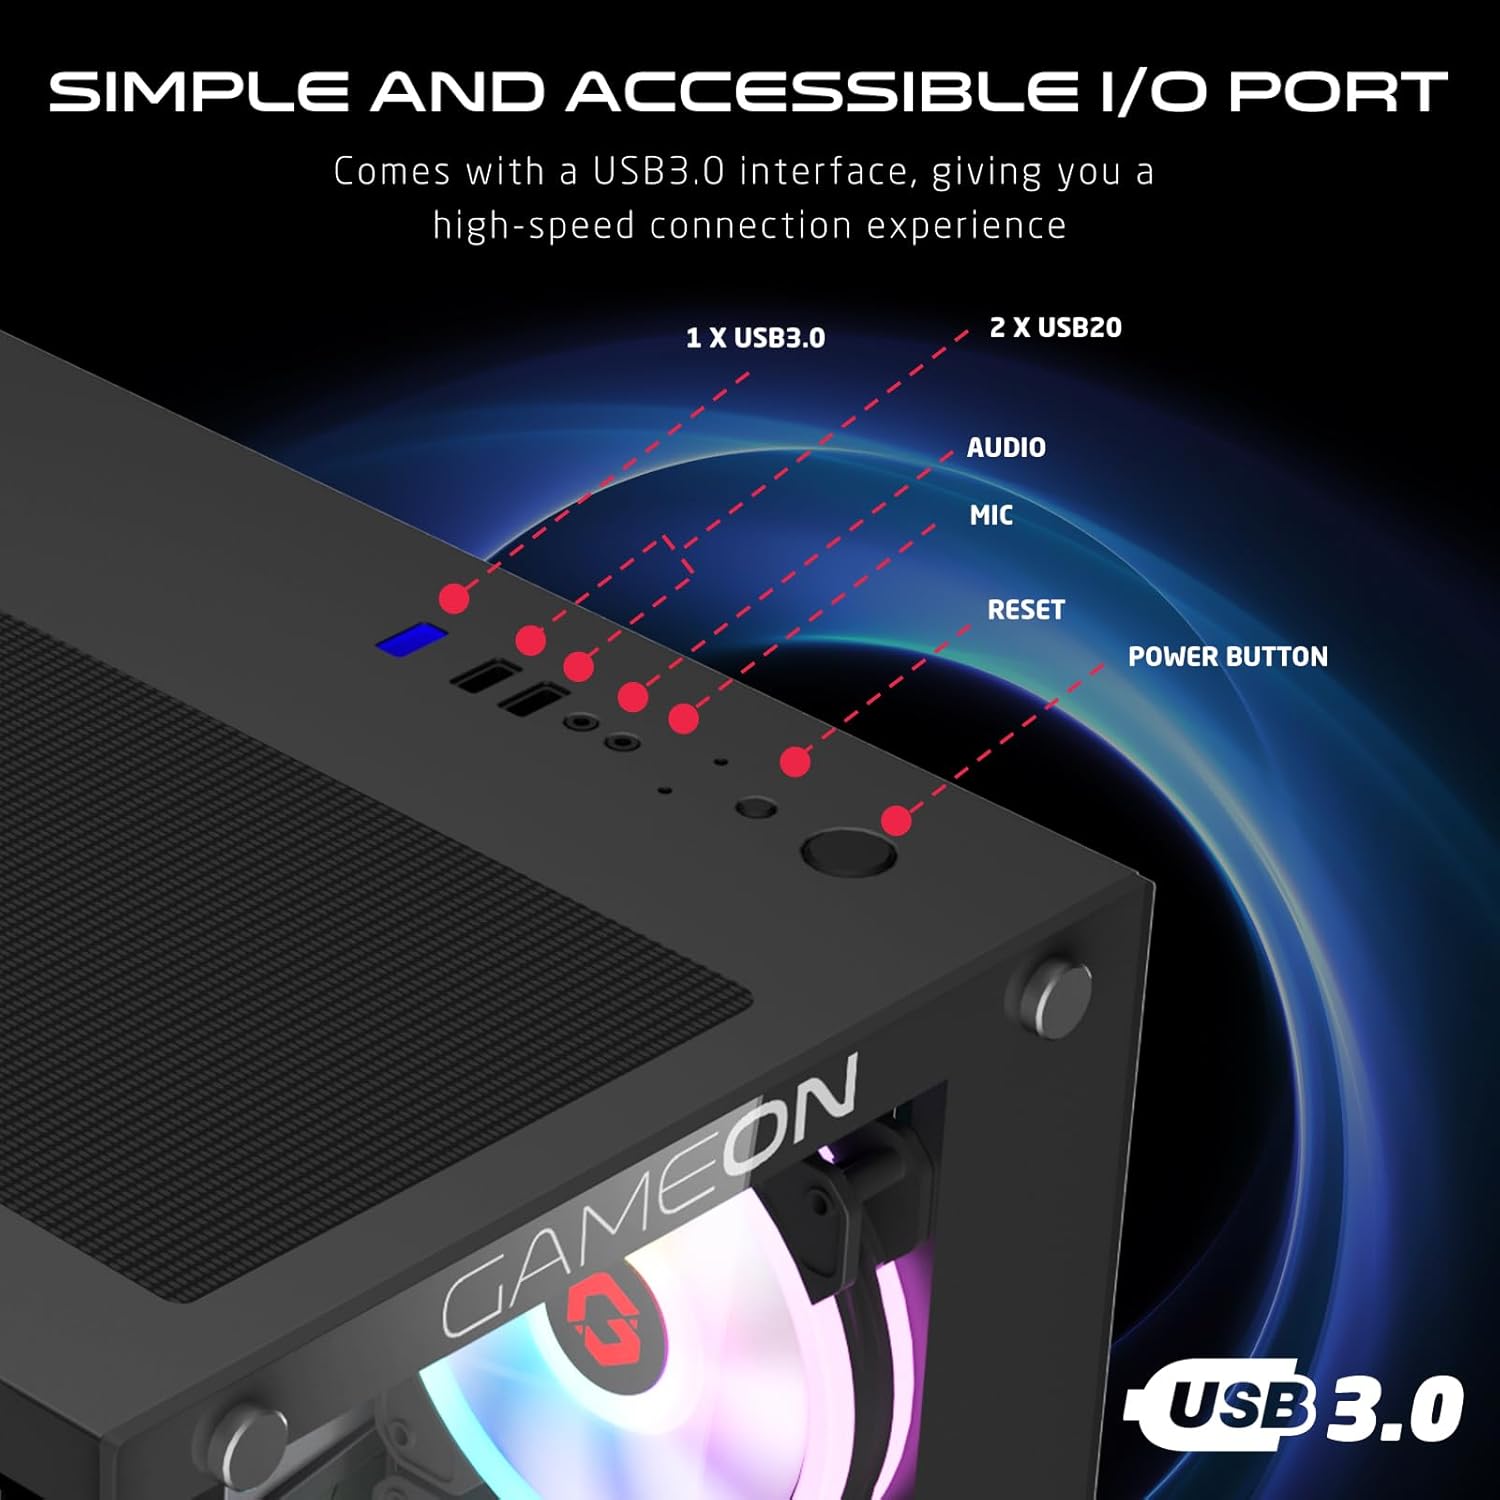
Figure 4.4: Front I/O ports, including 1x USB 3.0, 2x USB 2.0, Audio jack, Microphone jack, Reset button, and Power button.
4.3 Cooling and Construction
The case is designed with an optimized cooling solution, featuring multiple fan mounts and durable tempered glass panels.

Figure 4.5: Optimized cooling solution with massive air intake and exhaust. Features 7 pre-installed fans and durable tempered glass construction.
4.4 Compatibility and Drive Support
The case offers wide compatibility for various motherboard form factors and ample drive bay support.

Figure 4.6: Motherboard compatibility includes ATX, M-ATX, and ITX. Drive bay support for 2x HDD and 2x SSD. Also shown are the front panel header connections.
5. Інструкцыі па ўсталёўцы
Follow these steps to install your components into the GAMEON Midnight I Series PC case.
5.1 Падрыхтоўка справы
- Пастаўце корпус на роўную, устойлівую паверхню.
- Carefully remove the tempered glass side panel(s) by unscrewing the thumb screws and gently sliding the panel off. Set them aside in a safe place.
- Выдаліце ўсе ўнутраныя упаковачныя матэрыялы.
5.2 Устаноўка мацярынскай платы
- Install the I/O shield (if not pre-installed on your motherboard) into the rear opening of the case.
- Align your motherboard with the standoffs inside the case. Ensure the standoffs match your motherboard's form factor (ATX, M-ATX, ITX).
- Замацуйце матчыну плату з дапамогай прадастаўленых шруб.
5.3 Устаноўка блока сілкавання (БП).
- Знайдзіце месца для мацавання блока харчавання ў ніжняй задняй частцы корпуса.
- Slide your PSU into position from the rear of the case.
- Secure the PSU with the provided screws.
5.4 Усталёўка дыска (HDD/SSD)
The case supports 2x 3.5" HDDs and 2x 2.5" SSDs.
- Для жорсткіх дыскаў 3.5 цалі: Locate the drive cage, typically near the PSU shroud. Slide the HDD into the drive bay and secure it with screws.
- Для 2.5-цалевых SSD-назапашвальнікаў: Mount the SSDs to the designated mounting points, usually on the back of the motherboard tray or within the drive cage, using the provided screws.
5.5 Усталёўка відэакарты і платы пашырэння
- Зніміце неабходныя вечкі слотаў PCIe з задняй панэлі корпуса.
- Устаўце відэакарту або іншыя карты пашырэння ў адпаведныя слоты PCIe на матчынай плаце.
- Замацуеце карты шрубамі.
5.6 Арганізацыя кабеляў
Выкарыстоўвайце адтуліны для пракладкі кабеляў і кропкі мацавання за паддонам матчынай платы для іх арганізацыі. Гэта паляпшае цыркуляцыю паветра і эстэтыку.
5.7 Connecting Front Panel I/O and Fans
- Connect the front panel cables (Power SW, Reset SW, HDD LED, Power LED, USB 3.0, USB 2.0, HD Audio) to their corresponding headers on your motherboard. Refer to your motherboard manual for header locations.
- Ensure the pre-installed ARGB fans are connected to the included ARGB/PWM controller. Connect the controller to a SATA power connector from your PSU and a 3-pin ARGB header (if available) and a 4-pin PWM header on your motherboard for software control, or use the remote for standalone control.
6. Інструкцыя па эксплуатацыі
6.1 Уключэнне/выключэнне
- After all components are installed and cables connected, replace the side panels.
- Connect your monitor, keyboard, mouse, and power cable to the PSU.
- Press the Power button on the front panel to turn on your PC.
- To turn off, use the operating system's shutdown function or press and hold the Power button for several seconds.
6.2 Кіраванне вентылятарам ARGB
The pre-installed ARGB fans can be controlled in two ways:
- Пульт дыстанцыйнага кіравання: Use the included remote to cycle through various lighting effects, adjust brightness, and change fan speed.
- Праграмнае забеспячэнне матчынай платы: If the ARGB controller is connected to a compatible 3-pin ARGB header on your motherboard, you can synchronize lighting effects with your motherboard's RGB software (e.g., ASUS Aura Sync, MSI Mystic Light Sync, ASRock Polychrome RGB, Gigabyte RGB Fusion).
7. Тэхнічнае абслугоўванне
Рэгулярнае тэхнічнае абслугоўванне дапамагае забяспечыць аптымальную прадукцыйнасць і даўгавечнасць корпуса вашага ПК.
7.1 Ачыстка пылавога фільтра
The case includes dust filters to prevent dust buildup. It is recommended to clean them every 1-3 months, depending on your environment.
- Locate the dust filters (e.g., top, bottom, front).
- Акуратна зніміце фільтры.
- Clean them using compressed air, a soft brush, or by rinsing with water (ensure they are completely dry before re-installing).
- Re-attach the dust filters.
7.2 Генеральная ўборка
- Выкарыстоўвайце мяккі, damp тканінай для працірання вонкавых паверхняў корпуса. Пазбягайце абразіўных ачышчальнікаў.
- For tempered glass panels, use a glass cleaner and a microfiber cloth to avoid streaks.
7.3 Чыстка вентылятара
Periodically inspect the fan blades for dust accumulation. Use compressed air to gently clear dust from the fan blades and grilles.
8. Выпраўленне непаладак
If you encounter issues with your PC case, refer to the following common problems and solutions.
8.1 Fans Not Spinning or ARGB Not Working
- Праверце падключэнне сілкавання: Ensure the ARGB/PWM controller is properly connected to a SATA power connector from your PSU.
- Check Fan Connections: Verify that all fans are securely connected to the ARGB/PWM controller.
- Акумулятар пульта дыстанцыйнага кіравання: If using the remote, check if its battery needs replacement.
- Праграмнае забеспячэнне матчынай платы: If using motherboard software for control, ensure the controller is connected to the correct ARGB header and the software is installed and configured correctly.
- Напрамак вентылятара: Пераканайцеся, што вентылятары правільна арыентаваны для аптымальнага патоку паветра (ўваход/выхлап).
8.2 Front I/O Ports Not Functioning
- Check Motherboard Connections: Ensure all front panel cables (USB 3.0, USB 2.0, HD Audio) are correctly and securely connected to their respective headers on the motherboard. Refer to your motherboard manual.
8.3 PC Not Powering On
- Power Button Connection: Verify the Power SW cable from the front panel is correctly connected to the motherboard's front panel header.
- PSU Connection: Ensure the PSU is properly connected to the wall outlet and the power switch on the PSU is in the 'ON' position.
- Internal Power Cables: Check that all necessary power cables (24-pin ATX, CPU, GPU) are securely connected to the motherboard and components.
9. Тэхнічныя характарыстыкі
| Асаблівасць | Спецыфікацыя |
|---|---|
| Назва мадэлі | GO-EMPERORII-M (Midnight I Series) |
| Тып корпуса | Сярэдняя вежа |
| Матэрыял | Загартаванае шкло |
| Колер | Чорны |
| Памеры прадукту (Д х Ш х У) | 44 х 28 х 42.7 см |
| Вага прадмета | 6.45 кг |
| Падтрымка мацярынскай платы | ATX, Micro ATX, ITX |
| Папярэдне ўсталяваныя вентылятары | 7 вентылятары ARGB PWM 120 мм |
| Памер вентылятара | 120 мм |
| Спосаб астуджэння | Air, Water (supports up to 360mm radiator in front) |
| Прывадныя адсекі | 2 жорсткія дыскі 3.5 цалі, 2 цвёрдацельныя назапашвальнікі 2.5 цалі |
| Пярэднія парты I / O | 1 x USB 3.0, 2 x USB 2.0, Audio, Mic, Reset, Power |
| Дадатковыя магчымасці | Dust Filters, ARGB Controller with Remote |
10. Гарантыя і падтрымка
This product comes with a standard manufacturer's warranty. For specific warranty terms and conditions, please refer to the documentation provided with your purchase or contact GAMEON customer support. For technical assistance or further inquiries, please visit the official GAMEON webсайт або звярніцеся да іх каналаў падтрымкі.