1. Уводзіны
This manual provides detailed instructions for the setup, operation, maintenance, and troubleshooting of your Maxtang MTN-6900HX Mini PC. Please read this manual thoroughly before using the device to ensure proper functionality and safety. The Maxtang MTN-6900HX is a compact, high-performance mini PC featuring an AMD Ryzen 9 6900HX processor, designed for various applications including everyday computing, photo editing, video editing, and gaming.

Выява 1.1: Спераду view of the Maxtang MTN-6900HX Mini PC. This image shows the compact design of the device.
2. Інфармацыя па бяспецы
- Always disconnect the power adapter before cleaning or performing any maintenance.
- Не падвяргайце прыладу ўздзеянню вады, вільгаці або экстрэмальных тэмператур.
- Забяспечце належную вентыляцыю, каб прадухіліць перагрэў. Не закрывайце вентыляцыйныя адтуліны.
- Выкарыстоўвайце толькі прадастаўлены адаптар сілкавання або сумяшчальны яго заменнік.
- Не кідайце прыладу і не падвяргайце яе моцным ударам.
- Не спрабуйце адкрываць або рамантаваць прыладу самастойна. Звярніцеся да кваліфікаванага абслугоўваючага персаналу.
3. Змесціва ўпакоўкі
Праверце наяўнасць усіх прадметаў у камплекце:
- 1x Maxtang MTN-6900HX Mini PC (No RAM, No SSD, No OS)
- 1x кабель HDMI
- 1x адаптар сілкавання
- 1x шнур харчавання
- 1x VESA Mount
- 4 -х крапежныя шрубы
- 1x Кіраўніцтва па эксплуатацыі прадукту (гэты дакумент)
4. Прадукт скончыўсяview
The Maxtang MTN-6900HX Mini PC features a comprehensive set of ports and internal expansion options. Familiarize yourself with the device's layout before proceeding with installation.
4.1 Знешнія парты

Image 4.1: Detailed diagram of the Maxtang MTN-6900HX Mini PC's front and rear ports.
Пярэдняя панэль:
- USB 3.2: Two USB 3.2 Gen2 ports (10Gbps) for high-speed data transfer.
- USB-C (USB 3.2 10Gb): Адзін порт USB-C для перадачы дадзеных.
- Аўдыё: 3.5mm audio jack for headphones or speakers.
- Скінуць: Кнопка скіду.
- Кнопка харчавання: Для ўключэння/выключэння прылады.
Задняя панэль:
- DC-in (Power input): Падключыце адаптар сілкавання сюды.
- HDMI: One HDMI port for video output (up to 4K@60Hz).
- Вентыляцыйныя адтуліны: Для адводу цяпла.
- DP: One DisplayPort for video output (up to 8K@60Hz).
- USB 4.0: Two USB4 ports (40Gbps, 100W PD, 8K video output).
- USB 2.0: Адзін порт USB 2.0.
- LAN RJ45 2.5G: One 2.5 Gigabit Ethernet port for wired network connection.
- Кенсінгтанскі замак: Слот бяспекі.
4.2 Унутраныя кампаненты

Малюнак 4.2: Унутраная частка view of the Mini PC, highlighting the M.2 2280 NVMe SSD slots and DDR5 SO-DIMM slots.
The Mini PC supports:
- M.2 2280 NVMe SSD: Two PCIe Gen4 2280 slots for NVMe SSDs, supporting up to 4TB each (total 8TB).
- DDR5 SO-DIMM: Two dual-channel DDR5 SO-DIMM slots, supporting up to 64GB RAM.
- WiFi/Bluetooth Module: One M.2 slot for a WiFi and Bluetooth module (pre-installed or user-installable depending on configuration).
5. Hardware Installation (RAM & SSD)
This Mini PC is shipped without RAM, SSD, or an operating system. Follow these steps to install the necessary components.
5.1 Installing RAM (DDR5 SO-DIMM)

Image 5.1: Illustration of installing DDR5 SO-DIMM modules into the memory slots.
- Выключэнне: Ensure the Mini PC is powered off and disconnected from the power source.
- Адкрыць справу: Carefully open the Mini PC case. Refer to the specific model's instructions for case removal.
- Locate Slots: Identify the two DDR5 SO-DIMM slots on the motherboard.
- Устаўце аператыўную памяць: Align the notch on the DDR5 SO-DIMM module with the key in the slot. Insert the module at a 45-degree angle and push down firmly until the side clips snap into place, securing the module.
- Паўтарыць: If installing two modules for dual-channel operation, repeat for the second slot.
5.2 Installing NVMe SSD (M.2 2280)
Малюнак 5.2: View of the M.2 2280 NVMe SSD slots, indicating where to install storage.
- Locate Slots: Identify the M.2 2280 NVMe SSD slots on the motherboard.
- Устаўце SSD: Gently slide the M.2 SSD into the slot, ensuring the gold contacts are fully engaged.
- Бяспечны SSD-дыск: Once inserted, push down the end of the SSD and secure it with the provided screw.
- Закрыць справу: After installing all components, carefully close the Mini PC case.
6. Initial Setup and Operating Instructions
6.1 Падключэнне перыферыйных прылад
- Дысплей: Connect your monitor(s) to the HDMI, DisplayPort, or USB4 ports using the appropriate cables.
- Клавіятура/мыш: Падключыце клавіятуру і мыш USB да даступных партоў USB.
- Сетка: For a wired connection, connect an Ethernet cable to the 2.5GbE LAN port. For wireless, ensure your WiFi module is installed.
- Магутнасць: Connect the power adapter to the DC-in port on the Mini PC, then plug the power cord into an electrical outlet.
6.2 Powering On and OS Installation
- Уключэнне: Press the power button on the front panel. The power indicator should illuminate.
- BIOS/UEFI: Upon first boot, you may need to enter the BIOS/UEFI settings (usually by pressing Дэл or F2 during startup) to configure boot options or verify hardware detection.
- Ўстаноўка аперацыйнай сістэмы: Since the device comes without an OS, you will need to install one. Prepare a bootable USB drive with your preferred operating system (e.g., Windows 11 Pro 64-bit or Linux 64-bit). Insert the USB drive and follow the on-screen instructions to install the OS onto your NVMe SSD.
6.3 Канфігурацыя дысплея
The Mini PC supports multiple displays, including triple screen output via HDMI, DisplayPort, and USB4.

Малюнак 6.1: Прыкладample setup showing the Mini PC connected to three external displays.
- Connect up to three monitors using the HDMI (4K@60Hz), DisplayPort (8K@60Hz), and USB4 (4K@60Hz) ports.
- After OS installation, you can configure display settings (resolution, orientation, extended/duplicate desktop) within your operating system's display settings.
6.4 Падключэнне да сеткі
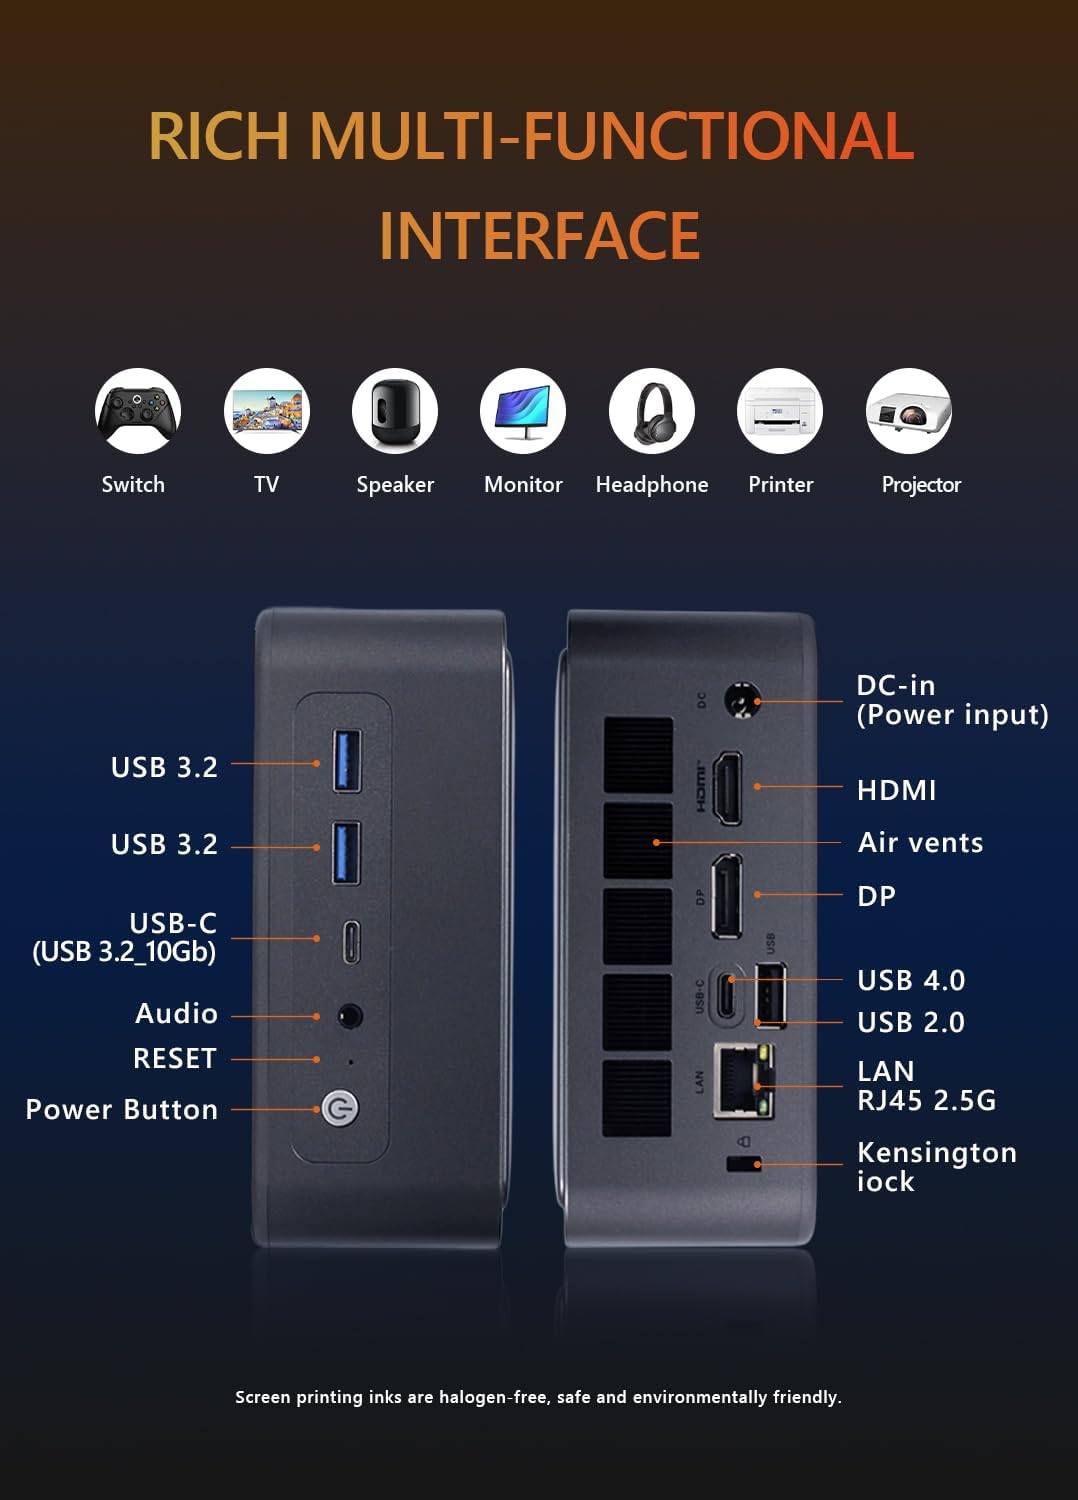
Image 6.2: Visual representation of the Mini PC's network capabilities, including 2.5GbE LAN, WiFi 6, and Bluetooth 5.2.
- Правадная лакальная сетка: Connect an Ethernet cable to the 2.5GbE RJ45 port for a stable and high-speed wired network connection.
- Wi-Fi: If a Wi-Fi module is installed, connect to your wireless network through the operating system's network settings. The device supports Wi-Fi 6.
- Bluetooth: If a Bluetooth module is installed, pair Bluetooth devices (e.g., headphones, keyboards) through the operating system's Bluetooth settings. The device supports Bluetooth 5.2.
7. Тэхнічнае абслугоўванне
- Уборка: Use a soft, dry cloth to clean the exterior of the Mini PC. For dust in vents, use compressed air. Do not use liquid cleaners directly on the device.
- Абнаўленні праграмнага забеспячэння: Рэгулярна абнаўляйце аперацыйную сістэму, драйверы і праграмы, каб забяспечыць аптымальную прадукцыйнасць і бяспеку.
- Вентыляцыя: Ensure the Mini PC is placed in a well-ventilated area and that its air vents are not obstructed to prevent overheating.
- Рэзервовае капіраванне даных: Periodically back up important data to an external storage device or cloud service.
8. Выпраўленне непаладак
If you encounter issues with your Mini PC, refer to the following common troubleshooting steps:
- Няма харчавання:
- Check if the power adapter is securely connected to both the Mini PC and the electrical outlet.
- Пераканайцеся, што разетка працуе.
- Паспрабуйце іншую разетку.
- Няма дысплея:
- Verify that the monitor is powered on and the correct input source is selected.
- Ensure the video cable (HDMI, DP, USB4) is securely connected to both the Mini PC and the monitor.
- Паспрабуйце іншы відэакабель або манітор, калі такі маецца.
- Аперацыйная сістэма не загружаецца:
- Confirm that RAM and SSD are correctly installed as per Section 5.
- Check BIOS/UEFI settings to ensure the boot order is correct and the SSD is detected.
- If installing a new OS, ensure the bootable USB drive is properly created and selected as the boot device.
- Няма падключэння да сеткі:
- Для правадных падключэнняў праверце стан кабеля Ethernet і маршрутызатара/мадэма.
- For Wi-Fi, ensure the Wi-Fi module is installed and drivers are updated. Check your Wi-Fi network settings in the OS.
- Перагрэў:
- Ensure the Mini PC's vents are clear and not obstructed.
- Place the device in a location with good airflow.
- Рэгулярна чысціце вентыляцыйныя адтуліны ад пылу.
9. Тэхнічныя характарыстыкі
Detailed technical specifications for the Maxtang MTN-6900HX Mini PC:
| Асаблівасць | Спецыфікацыя |
|---|---|
| Назва мадэлі | MTN-6900HX |
| Працэсар | AMD Ryzen 9 6900HX (8 Cores/16 Threads, up to 4.9GHz) |
| Графіка | AMD Radeon Graphics (Radeon 680M) |
| Памяць (RAM) | Dual Channel DDR5 SO-DIMM, Max 64GB (User-installed) |
| Захоўванне | 2x M.2 2280 NVMe PCIe Gen4 SSD slots, Max 4TB each (User-installed) |
| Аперацыйная сістэма | No OS pre-installed (Supports Windows 10/11 64-bit, Linux 64-bit) |
| Відэавыхад | 1x HDMI (4K@60Hz), 1x DisplayPort (8K@60Hz), 2x USB4 (4K@60Hz) |
| Парты USB | 2x USB4 (40Gbps), 2x USB 3.2 Gen2 (10Gbps), 1x USB 2.0 |
| Сетка | 1x 2.5GbE RJ45 LAN, Wi-Fi 6, Bluetooth 5.2 |
| Аўдыё | 1x 3.5 мм аўдыяраз'ём |
| Увод магутнасці | 19V/20V DC-in |
| Памеры | 127 мм x 135 мм x 55 мм |
| Дадатковыя магчымасці | Kensington Lock slot, VESA Mount support |
9.1 Processor Details

Image 9.1: Details of the AMD Ryzen 9 6900HX processor, including core count, threads, boost clock, and L3 cache.
9.2 Graphics Details

Image 9.2: Specifications for the integrated AMD Radeon 680M graphics, including shader count and GPU memory.
10. Гарантыя і падтрымка
Гарантыя: This product comes with a 12-month product warranty from the date of order. Please retain your proof of purchase for warranty claims.
Абслугоўванне кліентаў: For technical support or warranty inquiries, please contact Maxtang customer service. Refer to your purchase platform or the Maxtang official webсайт для кантактных дадзеных.
Кантактная інфармацыя вытворцы: 6/F, Bldg 3, Honghui Industrial Park, Liuxian 2nd Road, Bao'an Dist, Shenzhen, China 518101