myGEKOgear D111
myGEKOgear Orbit D111 Dash Cam User Manual
Мадэль: D111
1. Уводзіны
This manual provides detailed instructions for the installation, operation, and maintenance of your myGEKOgear Orbit D111 Full HD Dash Cam. Please read this manual thoroughly before using the device to ensure proper functionality and to maximize your user experience.
2. Што ў скрынцы
Праверце наяўнасць усіх прадметаў у камплекце:
- Orbit D111 Dashcam
- Сеткавы кабель (аўтамабільная зарадная прылада)
- Мацаванне прысоскі
- Карта Micro SD на 32 ГБ
- Кіраўніцтва карыстальніка (гэты дакумент)
3. Прадукт скончыўсяview
The myGEKOgear Orbit D111 is a compact dash camera designed to record your driving in Full HD 1080P resolution. It features a 3-inch display, a 140-degree wide-angle lens, G-Sensor for emergency recording, and supports loop recording.

Малюнак 3.1: Фронт view of the Orbit D111 Dash Cam with its suction cup mount.
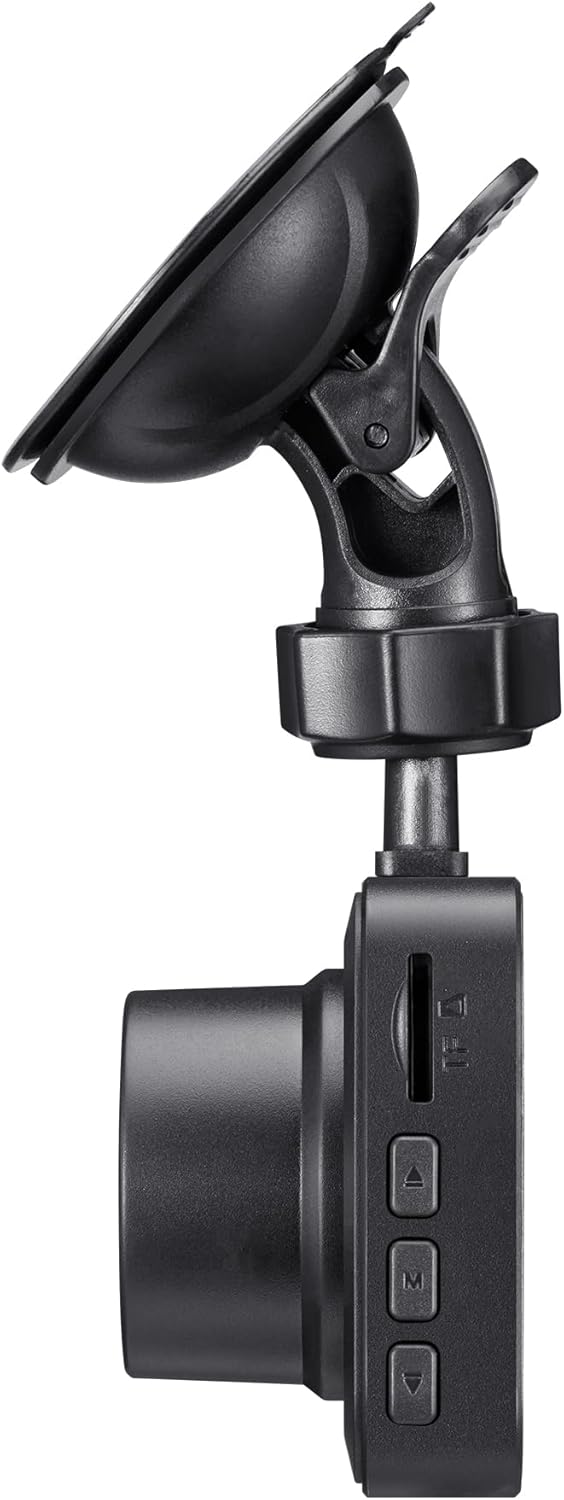
Малюнак 3.2: Збоку view illustrating the control buttons and ports on the Orbit D111 Dash Cam.
4. Настройка
4.1. Усталёўка карты MicroSD
The Orbit D111 supports MicroSD cards up to 64GB. A 32GB MicroSD card is included. Ensure the card is inserted correctly before use.
- Знайдзіце слот для карты MicroSD на бакавой частцы відэарэгістратара.
- Устаўце карту MicroSD залацістымі кантактамі да задняй панэлі камеры, пакуль яна не зафіксуецца на месцы.
- Каб выняць, акуратна націсніце на карту, пакуль яна не выскочыць.

Малюнак 4.1: MicroSD card and adapter, illustrating the type of storage supported.
4.2. Мантаж Dash Cam
Use the provided suction cup mount to secure the dash cam to your vehicle's windshield.
- Ачысціце месца на лабавым шкле, дзе вы збіраецеся ўсталяваць відэарэгістратар.
- Прымацуйце прысоску да відэарэгістратара.
- Моцна прыцісніце прысоску да лабавога шкла і павярніце рычаг, каб зафіксаваць яе.
- Адрэгулюйце кут камеры, каб забяспечыць выразны view дарогі наперадзе.

Малюнак 4.2: The Orbit D111 Dash Cam securely mounted on a vehicle's windshield, displaying its live recording view.
4.3. Падключэнне сілкавання
Connect the dash cam to your vehicle's power source using the included power cable.
- Plug the small end of the power cable into the dash cam's power port.
- Plug the other end (car charger) into your vehicle's 12V power outlet (cigarette lighter socket).
- The dash cam will typically power on and begin recording automatically when the vehicle's ignition is turned on.
5. Інструкцыя па эксплуатацыі
5.1. Уключэнне/выключэнне харчавання
The dash cam is designed to power on and off automatically with your vehicle's ignition. You can also manually power it on or off by pressing and holding the power button.
5.2. Рэжымы запісу
The Orbit D111 features continuous loop recording and emergency recording via its G-Sensor.
- цыклічны запіс: The camera records video in segments (e.g., 1, 3, or 5 minutes). When the MicroSD card is full, the oldest unlocked fileперазапісваюцца, каб вызваліць месца для новых запісаў.
- G-сенсор (экстраны запіс): The built-in G-Sensor detects sudden impacts or rapid deceleration. When triggered, it automatically locks the current video segment, preventing it from being overwritten by loop recording.

Малюнак 5.1: Visual representation of the G-Sensor feature, which automatically saves critical footage during incidents.
5.3. Дысплей і навігацыя па меню
The 3-inch IPS display provides a live view of the recording and allows access to settings.

Малюнак 5.2: Ясна view of the 3-inch display, showing the live feed and recording indicators.
Use the physical buttons on the side of the dash cam to navigate through the menu options and adjust settings such as video resolution, loop recording duration, G-Sensor sensitivity, and date/time.
5.4. Шырокавугольны аб'ектыў
Шырокавугольны аб'ектыў з вуглом агляду 140 градусаў захоплівае шырокі view of the road, covering multiple lanes and reducing blind spots.

Малюнак 5.3: Illustration of the 140-degree wide-angle lens coverage, showing an expansive view дарогі.
6. Тэхнічнае абслугоўванне
- Уборка: Use a soft, dry cloth to clean the camera lens and display. Avoid abrasive cleaners or solvents.
- Карта MicroSD: Periodically format the MicroSD card (at least once a month) within the camera's settings to ensure optimal performance and prevent data corruption. Back up any important files перад фарматаваннем.
- Абнаўленні прашыўкі: Check the myGEKOgear website for available firmware updates. Keeping your dash cam's firmware updated can improve performance and add new features.

Малюнак 6.1: A laptop screen displaying a firmware update interface, indicating the availability of ongoing software support.
7. Выпраўленне непаладак
- Камера не ўключаецца:
- Ensure the power cable is securely connected to both the dash cam and the vehicle's 12V outlet.
- Check if the vehicle's 12V outlet is functioning (e.g., by testing with another device).
- The dash cam may have a low battery; charge it for a few minutes. - Запіс спыняецца або завісае:
- The MicroSD card may be full. Format the card (after backing up important files).
- The MicroSD card may be faulty or too slow. Use a high-speed (Class 10 or U1/U3) MicroSD card.
- Ensure the card is properly inserted. - Дрэнная якасць відэа:
- Ачысціце аб'ектыў камеры.
- Пераканайцеся, што з аб'ектыва знята ахоўная плёнка.
- Праверце налады раздзялення відэа ў меню камеры. - G-Sensor is too sensitive/not sensitive enough:
- Адрэгулюйце адчувальнасць G-сенсара ў меню камеры. - Няправільная дата/час:
- Set the correct date and time in the camera's settings menu.
8. Тэхнічныя характарыстыкі
| Асаблівасць | Спецыфікацыя |
|---|---|
| Назва мадэлі | D111 |
| Дазвол відэазахопу | 1080p Full HD |
| Дысплей | 3-цалевы экран IPS |
| Поле View | 140 градусаў |
| Асаблівасці | Built-In Display, Compact Design, G-Sensor, Loop Recording |
| Падтрымка захоўвання | Up to 64GB MicroSD (32GB included) |
| Тэхналогія падлучэння | USB |
| Тып мацавання | Windshield Mount (Suction Cup) |
| Памеры прадукту | 3.5 х 2 х 2 цалі |
| Вага прадмета | 9.6 унцыі |
| Вытворца | Адэса |
9. Гарантыя і падтрымка
For warranty information and technical support, please refer to the official myGEKOgear webсайт або звярніцеся непасрэдна ў службу падтрымкі кліентаў. Захоўвайце чэк аб куплі як пацверджанне пакупкі.
Ask a question about this manual
Ask about setup, troubleshooting, compatibility, parts, safety, or missing instructions. Manuals+ will review the question and use this page’s manual context to help answer it.