1. Уводзіны
This manual provides detailed instructions for the installation, operation, and maintenance of your Sharkoon MK6 RGB Micro ATX PC Case. Please read this manual thoroughly before beginning assembly to ensure proper setup and optimal performance.
The Sharkoon MK6 RGB is a compact Micro ATX PC case designed with a modern glass aesthetic, featuring tempered glass panels on the front and side. It includes three pre-installed addressable RGB PWM fans for efficient cooling and customizable lighting. The case supports BTF motherboards and offers ample space for various components, including large graphics cards and extensive cooling solutions.
2. Усталёўка і ўстаноўка кампанентаў
Before starting, ensure you have all necessary tools, including a screwdriver set and anti-static wrist strap.
2.1 Адкрыццё кейса
Carefully remove the tempered glass side panel by unscrewing the retaining thumbscrews, typically located at the rear of the case. Gently slide the panel off and set it aside on a soft, flat surface to prevent scratches.
2.2 Устаноўка мацярынскай платы
- Install the I/O shield into the designated opening at the rear of the case.
- Align your Micro ATX or BTF motherboard with the standoffs inside the case. Ensure all standoffs match the motherboard's mounting holes.
- Замацуйце матчыну плату з дапамогай шруб, якія ўваходзяць у камплект. Не перацягвайце.
2.3 Устаноўка блока сілкавання (БП).
The MK6 RGB supports bottom-mount power supplies up to 23.5 cm in length.
- Устаўце блок харчавання ў адведзены для яго адсек у ніжняй задняй частцы корпуса.
- Secure the PSU to the case using screws from the rear panel.
2.4 Усталёўка назапашвальніка
The case accommodates up to two 3.5" HDDs or three 2.5" SSDs.
- 3.5-цалевыя жорсткія дыскі: Locate the drive cage, typically near the PSU shroud. Mount the HDDs using the provided trays or screws.
- 2.5-цалевыя SSD-назапашвальнікі: SSDs can be mounted on dedicated brackets behind the motherboard tray or within the drive cage.
2.5 Усталёўка відэакарты (GPU)
The MK6 RGB supports graphics cards up to 41 cm in length and includes a rubberized graphics card holder for support.
- Зніміце неабходныя вечкі слотаў PCIe з задняй панэлі корпуса.
- Устаўце відэакарту ў адпаведны слот PCIe на матчынай плаце.
- Secure the graphics card with screws. Adjust the graphics card holder to provide additional support if needed.
2.6 Усталёўка сістэмы астуджэння
The case comes with three pre-installed 120mm addressable RGB PWM fans. Two fans are inverted on the side for intake, and one is at the rear for exhaust. The case supports up to eight fans in total.
- Additional Fans: Install additional 120mm or 140mm fans in available mounting positions (top, bottom, side) as required for optimal airflow.
- Liquid Cooling Radiators: The case supports a 360mm radiator and an additional 240mm radiator. Mount radiators to the designated areas (e.g., top, side) using appropriate screws.
2.7 Арганізацыя кабеляў
Выкарыстоўвайце адтуліны для пракладкі кабеляў і кропкі мацавання за паддонам матчынай платы для іх арганізацыі. Гэта паляпшае цыркуляцыю паветра і эстэтыку.

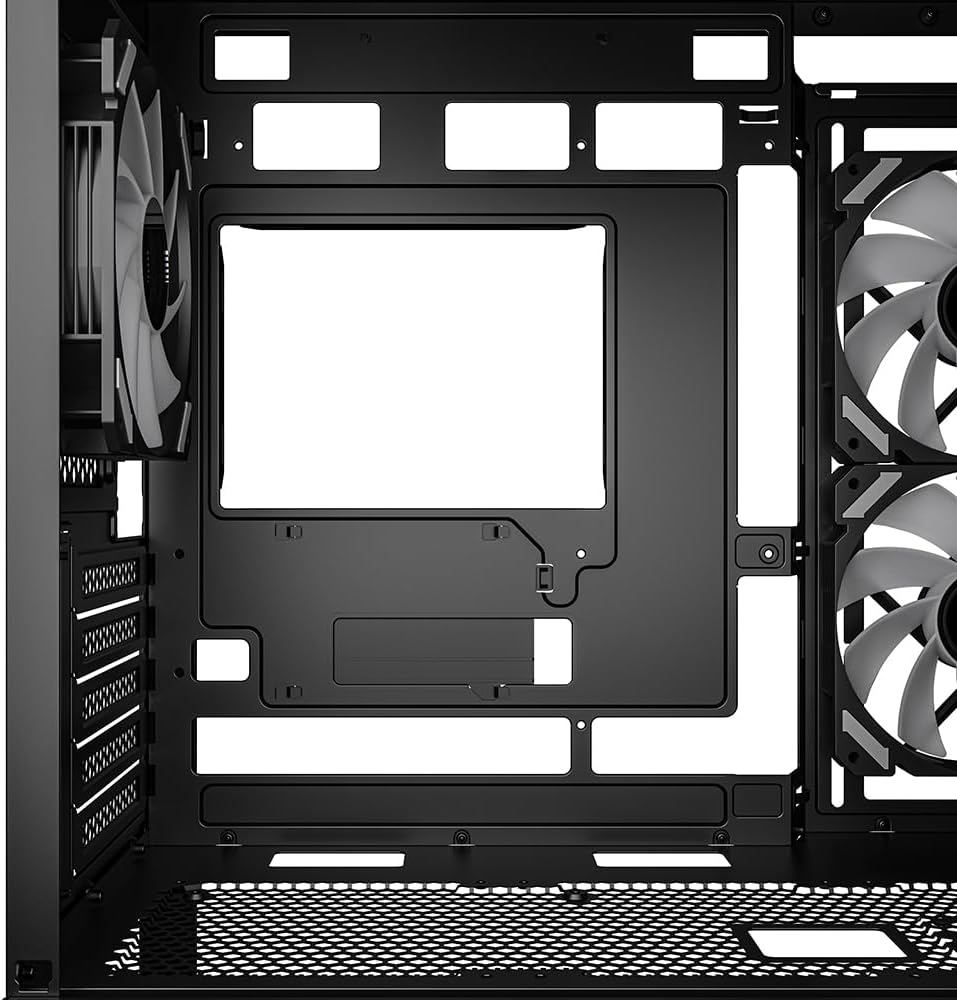
Малюнак 1: Унутраны view of the Sharkoon MK6 RGB PC case, highlighting the pre-installed fans and drive bay locations.

Малюнак 2: Унутраны view showing the motherboard tray and various cutouts for efficient cable management.

Малюнак 3: Унутраны view illustrating the available mounting points for liquid cooling radiators.

Малюнак 4: Унутраны view displaying the adjustable graphics card holder for enhanced GPU support.
3. Інструкцыя па эксплуатацыі
3.1 Уключэнне
After all components are installed and cables are connected, close the side panel. Connect your monitor, keyboard, mouse, and power cable to the PC. Press the power button on the front panel to start your system.
3.2 Кіраванне RGB-падсветкай
The MK6 RGB includes an RGB controller that provides connections for up to four LED elements and up to four PWM fans. The pre-installed fans are connected to this controller.
- Default Modes: The RGB lighting will typically cycle through default patterns upon startup.
- Праграмнае кіраванне: If connected to a compatible motherboard, RGB lighting can be controlled via the motherboard's RGB synchronization software. Refer to your motherboard manual for specific instructions.
- Кіраванне ўручную: Some cases may feature a dedicated button on the front panel to cycle through RGB modes. Consult the case's quick start guide for this feature.
3.3 Падключэнне пярэдняй панэлі
The front panel features modern TRRS and USB-C ports for broad compatibility with various devices. Connect your peripherals and storage devices as needed.

Малюнак 5: Спераду view of the Sharkoon MK6 RGB PC case, showcasing the tempered glass panel and visible RGB fans.
4. Тэхнічнае абслугоўванне
Рэгулярнае тэхнічнае абслугоўванне дапамагае забяспечыць аптымальную прадукцыйнасць і даўгавечнасць кампанентаў вашага ПК.
4.1 Ачыстка пылавога фільтра
The case features dust filters to prevent dust accumulation. Regularly clean these filters to maintain good airflow.
- Locate and remove the dust filters (e.g., top, bottom, front).
- Clean the filters using compressed air or by rinsing them with water. Ensure they are completely dry before reinstallation.
4.2 Чыстка загартаванага шкла
Use a soft, lint-free cloth and a non-abrasive glass cleaner to clean the tempered glass panels. Avoid harsh chemicals that could damage the glass or coatings.
4.3 Чыстка вентылятара
Over time, dust can accumulate on fan blades, reducing cooling efficiency. Use compressed air to gently clean the fan blades. Ensure the system is powered off before cleaning.
Малюнак 6: Верх view of the Sharkoon MK6 RGB PC case, illustrating the removable magnetic dust filter for easy cleaning.
5. Выпраўленне непаладак
У гэтым раздзеле разглядаюцца распаўсюджаныя праблемы, з якімі вы можаце сутыкнуцца.
5.1 Сістэма не ўключаецца
- Падключэнне да электрасілкавання: Пераканайцеся, што блок харчавання правільна падключаны да разеткі, а выключальнік на ім знаходзіцца ў становішчы «ON».
- Раздымы на пярэдняй панэлі: Ensure the power button cable from the front panel is correctly connected to the motherboard's front panel header.
- Унутраныя кампаненты: Check that all major components (motherboard, CPU, GPU, RAM) are securely seated and connected to the PSU.
5.2 Fans Not Spinning or RGB Not Lighting Up
- Падключэнне вентылятараў: Confirm that all fan power cables are securely connected to the motherboard or the RGB controller.
- RGB Controller Power: Ensure the RGB controller itself is receiving power, typically via a SATA power connector from the PSU.
- Software/Button: If using software control, check the software settings. If there's a physical RGB button, try cycling through modes.
5.3 Слабы паток паветра або перагрэў
- Пылавыя фільтры: Clean any clogged dust filters.
- Арыентацыя вентылятара: Ensure fans are oriented correctly for optimal airflow (intake at front/side, exhaust at rear/top).
- Кабельнае кіраванне: Палепшыце кіраванне кабелямі, каб паменшыць перашкоды для паветранага патоку.
6. Тэхнічныя характарыстыкі
| Асаблівасць | Дэталь |
|---|---|
| Назва мадэлі | MK6 RGB |
| Марка | Шаркун |
| Тып корпуса | Сярэдняя вежа |
| Сумяшчальнасць матчыных поплаткаў | Micro ATX, BTF |
| Матэрыял | Загартаванае шкло |
| Колер | Чорны |
| Памеры прадукту (ДxШxВ) | 17.13 х 8.86 х 17.52 цалі (43.5 х 22.5 х 44.5 см) |
| Вага прадмета | 13.42 фунта (6.1 кг) |
| CPU Cooler Height Clearance | Да 17 см |
| Graphics Card Length Clearance | Да 41 см |
| PSU Length Clearance | Да 23.5 см |
| Прывадныя адсекі | 2 жорсткія дыскі 3.5 цалі або 3 цвёрдацельныя назапашвальнікі 2.5 цалі |
| Папярэдне ўсталяваныя вентылятары | 3x 120mm Addressable RGB PWM Fans |
| Max Fan Support | Up to 8 fans |
| Падтрымка радыятара | 1x 360 мм, 1x 240 мм |
| Пярэднія парты I / O | TRRS, USB-C, USB 3.0 (1 port listed in specs) |
| Спосаб астуджэння | паветра |
| Тып мацавання блока харчавання | Ніжняе мацаванне |
7. Інфармацыя аб гарантыі
For detailed warranty information regarding your Sharkoon MK6 RGB PC Case, please refer to the official Sharkoon website or contact your local retailer. Warranty terms and conditions may vary by region and purchase location.
8. Тэхнічная падтрымка
If you encounter any issues or require technical assistance beyond the scope of this manual, please visit the official Sharkoon support website for FAQs, driver downloads, and contact information. You may also reach out to your point of purchase for support.