Flylinktech BD10
FLYLINKTECH 5000A Jump Starter User Manual
Model: BD10 | Brand: Flylinktech
1. Уводзіны
Thank you for choosing the FLYLINKTECH 5000A Jump Starter. This portable device is designed to provide instant power to jump-start 12V vehicles, charge electronic devices, and offer emergency lighting. Please read this manual thoroughly before use to ensure safe and optimal performance.
2. Важная інфармацыя па бяспецы
- Always ensure the jump starter is fully charged before use.
- Не спрабуйце запусціць замерзлы акумулятар ад дажджу.
- Злучыце склamps correctly: red to positive (+), black to negative (-). Reverse polarity can cause damage.
- Не злучайце чырвоны і чорны клampразам.
- Захоўваць у месцах, недаступных дзецям.
- Выкарыстоўваць у добра вентыляваным памяшканні.
- Не падвяргайце прыладу ўздзеянню экстрэмальных тэмператур або прамых сонечных прамянёў на працягу доўгага часу.
- Калі прылада моцна награваецца падчас выкарыстання, неадкладна адключыце яе ад сеткі.
- Звярніцеся да кіраўніцтва карыстальніка вашага аўтамабіля, каб даведацца пра канкрэтныя працэдуры запуску рухавіка ад дапаможнага прылады.
3. Змесціва ўпакоўкі
Праверце, ці ёсць усе прадметы ў вашай упакоўцы:
- FLYLINKTECH 5000A Jump Starter (Model BD10)
- Разумныя перамычкі
- Зарадны кабель USB-C
- Чахол для захоўвання EVA
- Кіраўніцтва карыстальніка

Image: Contents of the FLYLINKTECH 5000A Jump Starter package, including the jump starter unit, smart jumper cables, USB-C charging cable, and EVA storage case.
4. Прадукт скончыўсяview
Familiarize yourself with the components and ports of your jump starter:
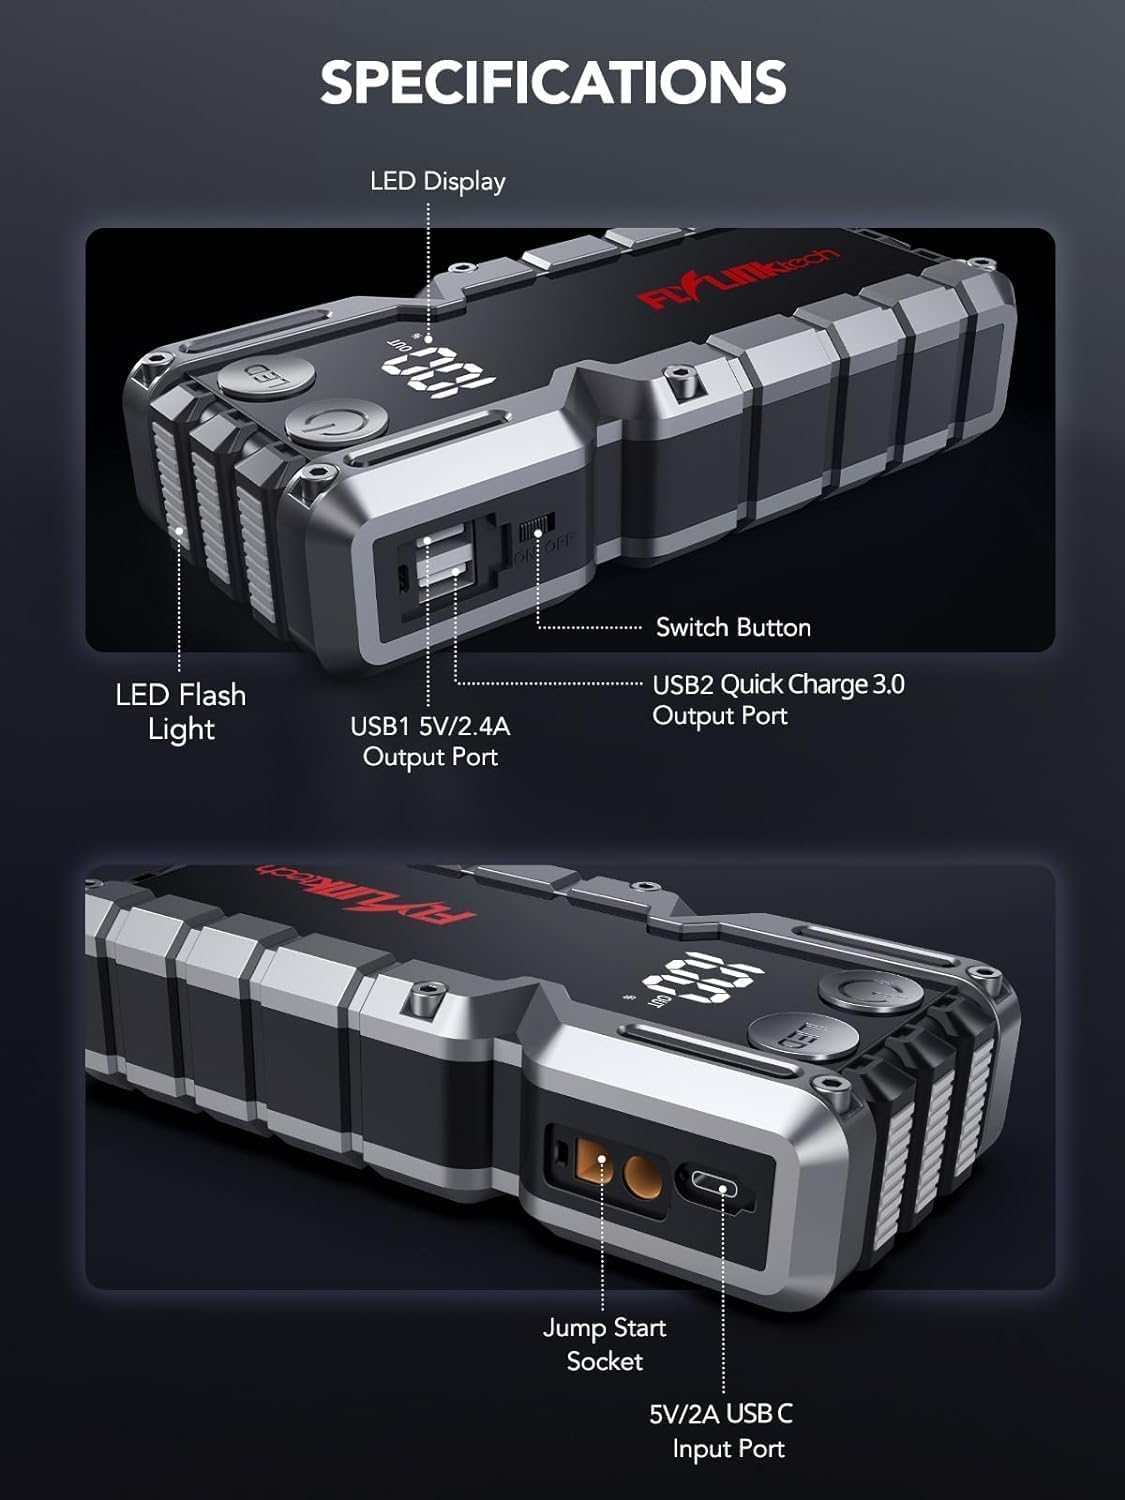
Выява: Падрабязная view of the jump starter showing the LED display, LED flashlight, power button, switch button, USB1 5V/2.4A output port, USB2 Quick Charge 3.0 output port, Jump Start Socket, and 5V/2A USB-C input port.
- Святлодыёдны дысплей: Паказвае працэнт батарэіtage.
- Святлодыёдны ліхтарык: Забяспечвае падсветку з некалькімі рэжымамі.
- Кнопка харчавання: Activates the device and controls flashlight modes.
- Кнопка пераключэння: Галоўнае кіраванне харчаваннем.
- Выхад USB1 (5 В/2.4 А): Standard USB charging port.
- USB2 Output (QC3.0): Quick Charge 3.0 port for faster charging.
- Разетка для запуску рухавіка: Connects to the smart jumper cables.
- Уваход USB-C (5 В/2 А): Used to recharge the jump starter.
5. Зарадка стартара
Перад першым выкарыстаннем цалкам зарадзіце стартар. Рэкамендуецца зараджаць прыладу кожныя 3-6 месяцаў, каб падтрымліваць акумулятар у працоўным стане.
- Падключыце зарадны кабель USB-C з камплекта да ўваходнага порта USB-C на стартары.
- Connect the other end of the USB-C cable to a 5V/2A USB wall adapter (not included) or a car charger.
- Святлодыёдны дысплей будзе паказваць працэс зарадкі. Прылада цалкам зараджана, калі дысплей паказвае 100%.

Image: The jump starter connected via USB to charge a smartphone and a tablet, demonstrating its power bank functionality.
6. Jump Starting Your Vehicle
Follow these steps carefully to safely jump-start your 12V vehicle:
- Падрыхтуйце стартар: Ensure the jump starter is at least 50% charged. Turn off your vehicle's ignition and all accessories (headlights, radio, etc.).
- Падключыце разумныя кабелі для перамычкі: Insert the blue plug of the smart jumper cables into the Jump Start Socket on the jump starter. Ensure a firm connection. The indicator light on the smart clamp will flash red and green.
- Падключэнне да акумулятара аўтамабіля:
- Прымацаваць чырвоны (+) clamp да станоўчага вываду акумулятара вашага аўтамабіля.
- Прымацаваць чорны (-) clamp да адмоўнага вываду акумулятара вашага аўтамабіля.
Once connected correctly, the indicator light on the smart clamp стане суцэльна зялёным.
- Запусціце аўтамабіль: Go into your vehicle and start the engine. If the vehicle does not start immediately, wait 30 seconds and try again. If it still doesn't start, press the "BOOST" button on the smart clamp for 3 seconds until the green light turns solid, then try starting the car again within 30 seconds.
- Зняць кабелі: Once the engine starts, immediately remove the smart jumper cables from the vehicle battery, then disconnect them from the jump starter.

Image: Visual guide for jump-starting: 1. Insert jump clamp into booster. 2. Connect clamps to car battery. 3. Start your car. 4. Remove clamps.

Image: The smart clamps connected to the jump starter, illustrating the 10-layer safety protections including short circuit, reverse charge, over charge, reverse polarity, over discharge, over current, reverse connection, and high temperature protection.
7. Выкарыстанне ў якасці паўэрбанка
The jump starter can also be used to charge your electronic devices.
- Connect your device's USB charging cable to either the USB1 (5V/2.4A) or USB2 (QC3.0) output port on the jump starter.
- Пускавая прылада аўтаматычна пачне зараджаць вашу прыладу.
- The LED display will show the remaining battery capacity of the jump starter.

Image: The jump starter functioning as a portable power bank, with two USB output ports (5V/2.4A and Quick Charge 3.0) actively charging a smartphone and a tablet.
8. Выкарыстанне святлодыёднага ліхтарыка
The built-in 600-lumen LED flashlight has three modes for various situations:
- Каб уключыць/выключыць: Press and hold the LED button for 3 seconds.
- Каб пераключаць рэжымы: Once the light is on, short press the LED button to switch between:
- Пастаянна ўключана: Для агульнага асвятлення.
- Рэжым SOS: Flashes the international SOS signal for emergencies.
- Рэжым строб: Rapid flashing for warning or signaling.

Image: The jump starter with its LED flashlight active, illustrating the three available modes: standard flashlight, SOS signal, and strobe light for emergencies.
9. Тэхнічнае абслугоўванне
- Уборка: Wipe the unit with a soft, dry cloth. Do not use harsh chemicals or abrasive materials.
- захоўванне: Store the jump starter in its EVA case in a cool, dry place away from direct sunlight. Ensure it is charged to at least 50% before storing for extended periods. Recharge every 3-6 months.
- Сыход за батарэяй: The internal lithium-ion battery is designed for long life. Avoid fully discharging the unit frequently.

Water-resistant design.

Rugged ABS shell for drop resistance.

Operates in extreme temperatures (-4°F to 140°F).
10. Выпраўленне непаладак
| праблема | Магчымая прычына | Рашэнне |
|---|---|---|
| Vehicle won't start after connecting. | Jump starter battery too low; incorrect clamp connection; vehicle battery completely dead. | Пераканайцеся, што стартар цалкам зараджаны. Праверце клір.amp connections (red to +, black to -). Press the "BOOST" button on the smart clamp for 3 seconds and try again. |
| Разумны клamp indicator light is red/flashing. | Зваротная палярнасць; кароткае замыканне; перагрэў. | Адключыце склamps and re-connect correctly. Check for any short circuits. Allow unit to cool down if overheated. |
| Пускавая прылада не зараджаецца. | Faulty charging cable or adapter; loose connection. | Ensure USB-C cable and adapter are working and connected securely. Try a different cable or adapter. |
| Не працуе святлодыёдны ліхтарык. | Not activated correctly; low battery. | Press and hold the LED button for 3 seconds to activate. Ensure the jump starter has sufficient charge. |
11. Тэхнічныя характарыстыкі
| Асаблівасць | Дэталь |
|---|---|
| Пікавы ток | 5000А |
| Ёмістасць батарэі | 18000mAh (66.6Wh) |
| Пачаць Voltage | 12В |
| Сумяшчальнасць рухавіка | Да 9.0 л бензіну / 8.0 л дызельнага паліва |
| Выхад USB 1 | 5 В/2.4 А |
| Выхад USB 2 | QC3.0 |
| Уваход USB-C | 5 В/2 А |
| Святлодыёдны ліхтарык | 600-Lumen (Constant, SOS, Strobe) |
| Працоўная тэмпература | Ад -4°F да 140°F (ад -20°C да 60°C) |
| Памеры | 4.2 х 9 х 19 см |
| Вага | 540 г (1.19 фунта) |
| Ахова бяспекі | 10-Layer (Short Circuit, Reverse Polarity, Over-Current, etc.) |
12. Гарантыя і падтрымка
The FLYLINKTECH 5000A Jump Starter comes with an industry-leading Гарантыя 3 год з даты пакупкі. Гэтая гарантыя распаўсюджваецца на вытворчыя дэфекты і гарантуе надзейную працу.
For technical support, warranty claims, or any questions regarding your product, please contact FLYLINKTECH customer service through the retailer's platform or visit our official webсайт.
Калі ласка, захавайце пацвярджэнне пакупкі для пацверджання гарантыі.
Ask a question about this manual
Ask about setup, troubleshooting, compatibility, parts, safety, or missing instructions. Manuals+ will review the question and use this page’s manual context to help answer it.