1. Уводзіны
This manual provides detailed instructions for the installation, operation, and maintenance of your Xigmatek Aqua V AIR Arctic Mid-Tower PC Case. Please read this manual thoroughly before beginning any installation to ensure proper setup and safe operation. Retain this manual for future reference.
2. Інфармацыя па бяспецы
Падчас усталёўкі і эксплуатацыі выконвайце наступныя меры бяспекі:
- Заўсёды адключайце блок харчавання ад разеткі перад усталёўкай або зняццем якіх-небудзь кампанентаў.
- Насіце антыстатычны бранзалет, каб прадухіліць пашкоджанне адчувальных кампанентаў электрастатычным разрадам (ESD).
- Handle components carefully. Avoid touching pins or circuit boards directly.
- Забяспечце належную вентыляцыю вакол корпуса ПК, каб прадухіліць перагрэў.
- Захоўвайце дробныя дэталі і інструменты далей ад дзяцей.
- Do not attempt to modify the case or its components, as this may void your warranty and pose safety risks.
3. Змесціва ўпакоўкі
Праверце наяўнасць усіх прадметаў у камплекце:
- Xigmatek Aqua V AIR Arctic Mid-Tower PC Case
- Камплект аксесуараў (шрубы, распоркі, кабельныя сцяжкі)
- Кіраўніцтва карыстальніка (гэты дакумент)
If any items are missing or damaged, contact your retailer or Xigmatek support.
4. Прадукт скончыўсяview
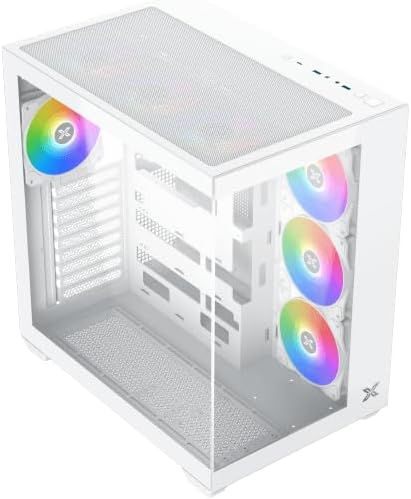
The Xigmatek Aqua V AIR Arctic is a mid-tower PC case designed for high-performance gaming configurations. It features tempered glass panels for component visibility and optimized airflow with pre-installed ARGB fans.

Малюнак 4.1: Пярэдні левы бок view of the Xigmatek Aqua V AIR Arctic PC case, showcasing the tempered glass front and side panels, and the pre-installed ARGB fans.

Малюнак 4.2: Задняя частка view of the PC case, showing the I/O shield cutout, expansion slots, and rear fan mount.
Малюнак 4.3: Пад вуглом зверху ўніз view, highlighting the top mesh panel for additional cooling and the internal layout.
5. Настройка і ўстаноўка
Follow these steps to install your PC components into the Xigmatek Aqua V AIR Arctic case.
5.1. Падрыхтоўка справы
- Пастаўце корпус на роўную, устойлівую паверхню.
- Remove the tempered glass side panel by unscrewing the thumb screws at the rear and carefully sliding it off. Place it on a soft, non-abrasive surface to prevent scratches.
- Remove the opposite steel side panel by unscrewing the thumb screws and sliding it off.
5.2. Устаноўка мацярынскай платы
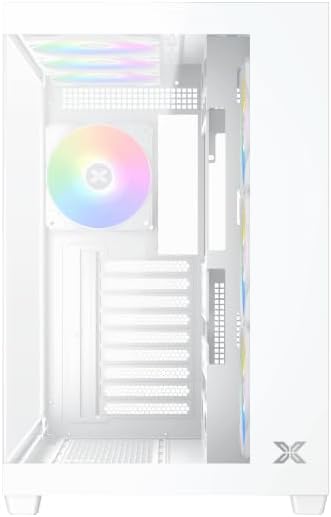
Малюнак 5.1: Інтэр'ер view of the case, illustrating the motherboard mounting area and cable routing cutouts.
- Усталюйце экран уводу/вываду ў выраз у задняй частцы корпуса.
- Align your motherboard with the pre-installed standoffs. Ensure the standoffs match your motherboard's form factor (ATX, Micro ATX).
- Secure the motherboard using the provided screws from the accessory kit. Do not overtighten.
5.3. Усталёўка блока сілкавання (БС)
- Locate the PSU mounting bracket at the bottom rear of the case.
- Slide your PSU into the designated compartment from the rear of the case.
- Secure the PSU to the case using the screws provided with your power supply.
5.4. Усталёўка назапашвальніка
The case supports multiple storage drives:
- 2.5-цалевыя SSD-назапашвальнікі: Mount directly to the SSD trays located behind the motherboard tray. Secure with screws.
- 3.5-цалевыя жорсткія дыскі: Install into the drive cage located beneath the PSU shroud. Slide the drive into the tray and secure with screws.
5.5. Graphics Card (GPU) and Expansion Card Installation
- Зніміце неабходныя вечкі слотаў пашырэння на задняй панэлі корпуса.
- Устаўце відэакарту або іншыя карты пашырэння ў адпаведныя слоты PCIe на матчынай плаце.
- Замацуйце карты з дапамогай прадастаўленых шруб.
5.6. Кіраванне кабелем

Малюнак 5.2: View behind the motherboard tray, illustrating the ample space and tie-down points for effective cable management.
Выкарыстоўвайце адтуліны для пракладкі кабеляў і кропкі мацавання за паддонам матчынай платы, каб арганізаваць кабелі. Гэта паляпшае цыркуляцыю паветра і эстэтыку.
- Connect all necessary power cables from the PSU to the motherboard, GPU, and storage drives.
- Connect front panel cables (USB, audio, power/reset switches, LED indicators) to the corresponding headers on your motherboard. Refer to your motherboard manual for specific header locations.
- Connect the ARGB fan cables to the integrated fan controller or directly to your motherboard's ARGB headers if available.
5.7. Апора вентылятара і радыятара
The Xigmatek Aqua V AIR Arctic comes with 7 pre-installed 120mm ARGB fans. Additional cooling options are available:
- Спераду: Supports up to 3 x 120mm or 2 x 140mm fans / 240mm, 280mm, 360mm radiators.
- Верх: Supports up to 3 x 120mm or 2 x 140mm fans / 240mm, 280mm, 360mm radiators.
- Ззаду: Supports 1 x 120mm fan.
- Унізе: Supports up to 3 x 120mm fans.
Ensure proper fan orientation for optimal airflow (intake at front/bottom, exhaust at rear/top).
6. Аперацыйная
Once all components are installed and cables are connected, replace the side panels. Connect your monitor, keyboard, mouse, and power cable. Press the power button on the front panel to start your system.
The pre-installed ARGB fans can be controlled via the integrated controller (if present) or through compatible motherboard software, allowing customization of lighting effects and fan speeds.
7. Тэхнічнае абслугоўванне
Рэгулярнае тэхнічнае абслугоўванне дапамагае забяспечыць аптымальную прадукцыйнасць і даўгавечнасць кампанентаў вашага ПК.
- Ачыстка ад пылу: Periodically clean dust filters (top, front, bottom) to maintain good airflow. Use compressed air to remove dust from inside the case and components.
- Знешняя ачыстка: Працярыце вонкавыя паверхні мяккай, damp тканінай. Пазбягайце абразіўных ачышчальнікаў або растваральнікаў.
- Праверка кабеляў: Час ад часу правярайце пракладку кабеляў, каб пераканацца, што яны не перашкаджаюць вентылятарам або патоку паветра.
8. Выпраўленне непаладак
Калі ў вас узніклі праблемы, звярніцеся да наступных распаўсюджаных крокаў па ліквідацыі непаладак:
- Сістэма не ўключаецца:
- Пераканайцеся, што блок харчавання ўключаны і правільна падключаны да разеткі.
- Verify all power cables (24-pin ATX, 8-pin CPU, PCIe, SATA) are securely connected.
- Праверце падключэнне выключальніка харчавання на пярэдняй панэлі да матчынай платы.
- Няма вываду на дысплей:
- Ensure the monitor cable is connected to the graphics card (not the motherboard I/O if using a dedicated GPU).
- Пераўсталюйце відэакарту і модулі аператыўнай памяці.
- Fans not spinning or ARGB not working:
- Check fan power connections to the motherboard or fan controller.
- Verify ARGB connections to the controller or motherboard headers.
- Ensure any fan control software or BIOS settings are correctly configured.
For more complex issues, consult your component manuals or contact Xigmatek technical support.
9. Тэхнічныя характарыстыкі
| Асаблівасць | Дэталь |
|---|---|
| Назва мадэлі | Aqua V AIR Arctic |
| Нумар мадэлі | EN45837 |
| Тып корпуса | Сярэдняя вежа |
| Сумяшчальнасць матчыных поплаткаў | ATX, Micro ATX |
| Матэрыял | Steel Alloy, Tempered Glass |
| Колер | Белы |
| Папярэдне ўсталяваныя вентылятары | 7 вентылятары 120 мм ARGB |
| Максімальная даўжыня GPU | 410 мм |
| Парты USB | 3 |
| Вага | 8.8 кілаграма |
10. Гарантыя і падтрымка
Xigmatek products are manufactured to high quality standards. For warranty information, please refer to the warranty card included with your product or visit the official Xigmatek website. For technical support or inquiries, please contact Xigmatek customer service through their official channels.
Афіцыйны Webсайт: www.xigmatek.com