1. Уводзіны
This manual provides essential information for the safe and effective operation of your ACMER P2 20W Laser Engraver and Cutter. Please read these instructions thoroughly before assembly, operation, or maintenance. The ACMER P2 is a high-precision laser machine designed for engraving and cutting various materials, featuring a 20W laser output for enhanced performance.

Image 1.1: The ACMER P2 20W Laser Engraver and Cutter, showcasing its main components and examples of engraved and cut materials.
2. Інфармацыя па бяспецы
The ACMER P2 is a Class IV laser product. Direct exposure to the laser beam can cause severe eye and skin damage. Always adhere to the following safety guidelines:
- Абарона вачэй: Always wear appropriate laser safety goggles that block the laser's wavelength during operation.
- Працоўная зона: Operate the machine in a well-ventilated area to dissipate fumes and smoke generated during engraving/cutting. Ensure the area is free from flammable materials.
- Кантроль: Ніколі не пакідайце машыну без нагляду падчас працы.
- Аварыйная прыпынак: Familiarize yourself with the emergency stop button and its location. Activate it immediately in case of any malfunction or hazard.
- Бяспека матэрыялаў: Only engrave or cut materials approved for laser processing. Avoid materials that produce toxic fumes or are highly reflective.
- Замак бяспекі дзяцей: Utilize the child safety lock feature to prevent unauthorized use.
- Tilt and Flame Detection: The machine is equipped with a 15° tilt sensor and a flame sensor that automatically stop operation and alarm in case of movement or fire.

Выява 2.1: Канецview of the ACMER P2's safety features, including flame detector, gyroscope tilt detector, observable shield, child safety lock, emergency stop switch, and alarm lights and buzzers.
The ACMER P2 has been tested according to IEC 60825-1 standards and holds Class 4 laser certification.

Малюнак 2.2: Прыкладamples of certifications for the ACMER P2, including CE and Machinery Directive Attestation of Conformity.
3. Настройка
The ACMER P2 is designed for straightforward assembly. All necessary tools and detailed instructions are included with the product.
3.1 Зборка
- Распакуйце ўсе кампаненты і звярніцеся да ўпаковачнага ліста.
- Follow the step-by-step assembly guide provided in the box to construct the frame and attach the laser module.
- Ensure all connections are secure and cables are properly routed to prevent interference with moving parts.
3.2 Усталёўка праграмнага забеспячэння і падключэнне
The ACMER P2 is compatible with various professional engraving software and mobile applications.
- Праграмнае забеспячэнне, якое падтрымліваецца: LaserGRBL, LightBurn, and the ACMER mobile app.
- Аперацыйныя сістэмы: Supports Windows, macOS, iOS, and Android.
- Перадача дадзеных: Connect the machine via Wi-Fi, USB cable, or use a TF card for offline operation.
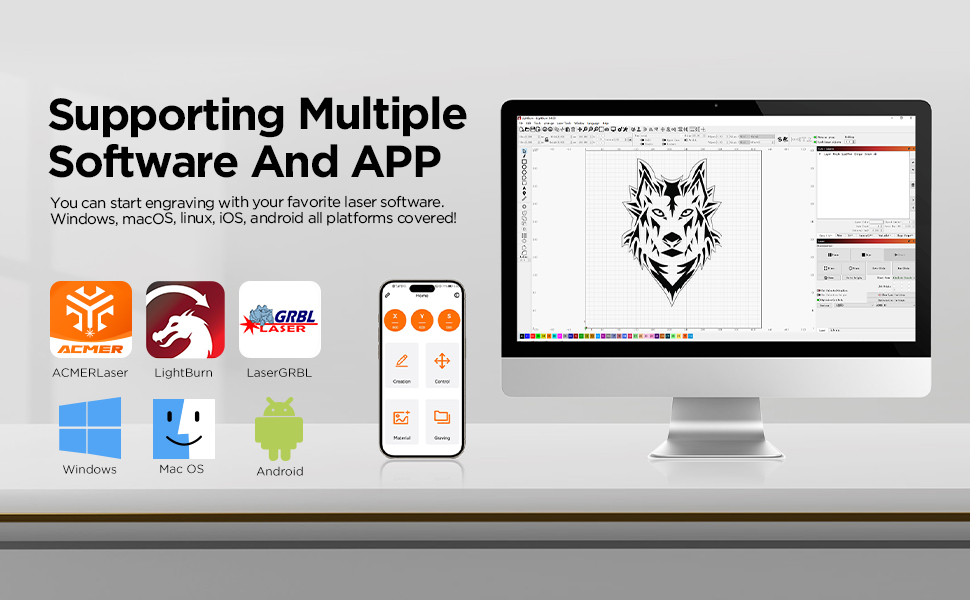
Image 3.1: The ACMER P2 supports multiple software platforms including LaserGRBL, LightBurn, and the ACMER APP, compatible with Windows, macOS, iOS, and Android.
4. Інструкцыя па эксплуатацыі
Follow these steps for safe and effective operation of your laser engraver.
4.1 Power On and Initial Checks
- Ensure all safety precautions are in place, including wearing laser safety goggles.
- Connect the power supply and turn on the machine.
- Open the safety lock before operation.
4.2 Падрыхтоўка і размяшчэнне матэрыялу
The ACMER P2 can engrave and cut a wide range of materials within its 420x400mm working area.
- Падтрымліваюцца матэрыялы: Wood, bamboo, paper, acrylic, leather, PCB board, anodized aluminum, and various metals.
- Place the material flat on the working surface, ensuring it is stable and within the engraving area.
- Adjust the laser focus according to the material thickness and type.
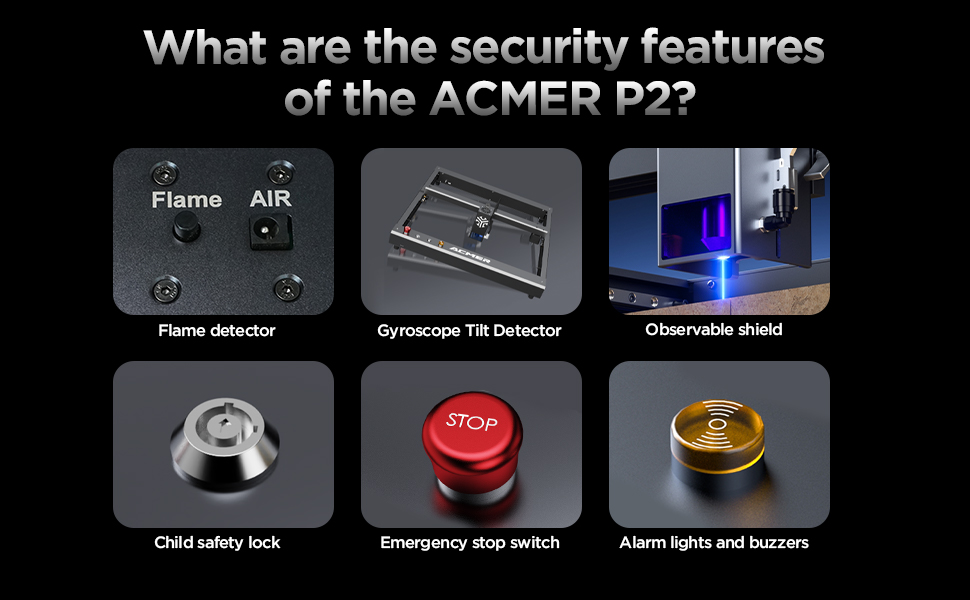
Image 4.1: The ACMER P2 20W laser engraver demonstrating its cutting capabilities on materials such as 25mm plywood, 20mm acrylic, and 8mm MDF.
4.3 Працэс гравіроўкі і рэзкі
- Load your design into the chosen software (LaserGRBL, LightBurn, or ACMER APP).
- Set the appropriate parameters for laser power, speed, and passes based on the material and desired outcome.
- Initiate the engraving or cutting process. Monitor the machine closely.
- The 20W laser module features an ultra-fine compressed spot size of 0.08mm x 0.06mm for high precision.
- The maximum engraving speed is up to 30,000mm/min.

Image 4.2: Illustration of the ACMER P2's 20W powerful diode laser module, highlighting its advanced laser synthesis compression technology and ultra-fine 0.08x0.1mm compressed spot size for detailed engraving.

Image 4.3: A comparison illustrating the ACMER P2 20W's engraving speed, reaching up to 30,000mm/min, significantly faster than traditional frame machines.
5. Тэхнічнае абслугоўванне
Regular maintenance ensures optimal performance and extends the lifespan of your ACMER P2.
- Ачыстка лазернай лінзы: Periodically clean the laser lens with a soft, lint-free cloth and lens cleaning solution to maintain beam quality.
- Guide Rails: Inspect the industrial guide rails for dust or debris. Clean them as needed to ensure smooth and precise movement.
- Генеральная ўборка: Keep the machine free from dust and material residue. Use a soft brush or compressed air for hard-to-reach areas.
- Абнаўленні прашыўкі: Check the official ACMER website or app for any available firmware updates to ensure your machine has the latest features and improvements.
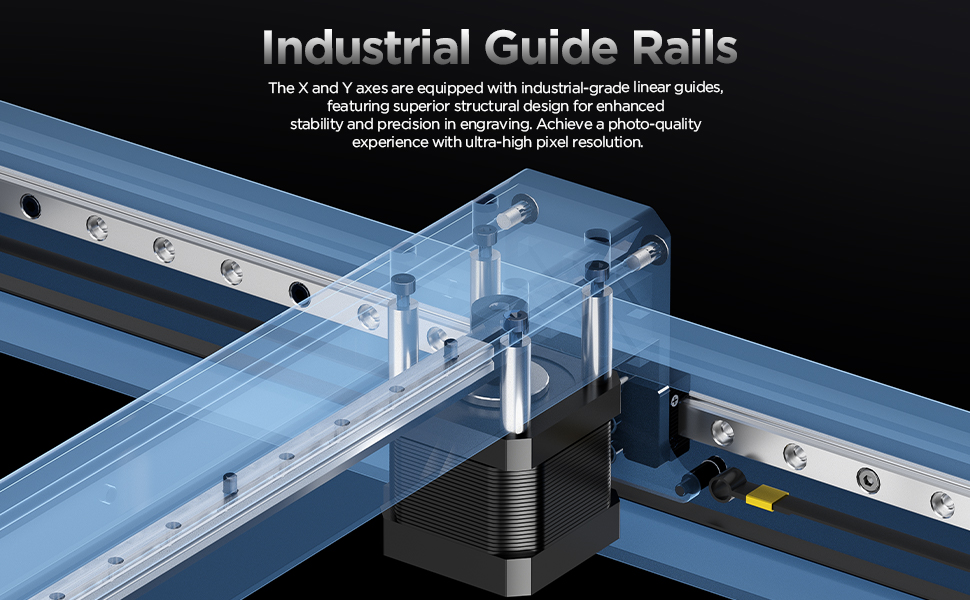
Малюнак 5.1: Падрабязны view of the ACMER P2's industrial-grade linear guides on the X and Y axes, designed for enhanced stability and precision in engraving.
6. Выпраўленне непаладак
У гэтым раздзеле разглядаюцца распаўсюджаныя праблемы, з якімі вы можаце сутыкнуцца. Для больш складаных праблем звярніцеся ў службу падтрымкі кліентаў.
| праблема | Магчымая прычына | Рашэнне |
|---|---|---|
| Лазер не страляе | Safety lock engaged, power issue, software settings incorrect. | Ensure safety lock is open. Check power connections. Verify laser power settings in software. |
| Нізкая якасць гравіроўкі/рэзкі | Няправільная факусоўка, няправільныя налады магутнасці/хуткасці, брудны аб'ектыў, праблемы з матэрыялам. | Adjust laser focus. Optimize power and speed settings for the material. Clean the laser lens. Ensure material is suitable. |
| Machine not connecting to computer/app | USB cable faulty, Wi-Fi issues, driver problems, software not recognizing device. | Try a different USB cable or port. Reconnect Wi-Fi. Reinstall drivers. Restart software and machine. |
| Машына нечакана спыняецца | Tilt sensor activated, flame sensor activated, emergency stop pressed. | Check for machine movement or fire. Reset the machine after addressing the cause. |
7. Тэхнічныя характарыстыкі
| Асаблівасць | Спецыфікацыя |
|---|---|
| мадэль | ACMER P2 |
| Выходная магутнасць лазера | 20 Вт (20,000 мВт) |
| Лазерны клас | IV клас |
| Зона гравіроўкі | 420 х 400 мм |
| Памер плямы | 0.08 мм х 0.06 мм |
| Max Engraving Speed | 30,000 мм/мін |
| Дакладнасць руху | 0.01 мм |
| Repeatable Positioning Accuracy | 0.001 мм |
| Памеры прадукту | 26.38 х 28.35 х 7.48 цалі |
| Вага прадмета | 27.7 фунта |
| Сувязь | Wi-Fi, USB, TF Card (Offline) |
| Праграмнае забеспячэнне, якое падтрымліваецца | LaserGRBL, LightBurn, ACMER APP |
| Падтрымліваюцца АС | Windows, macOS, iOS, Android |
8. Гарантыя і падтрымка
ACMER is committed to providing reliable products and excellent customer service.
- Гарантыйны тэрмін: The ACMER P2 comes with a 12-month warranty from the date of purchase.
- Падтрымка кліентаў: Our support team is available 24/7 to assist you with any questions or issues.
- Кантактная інфармацыя: For support, please refer to the contact details provided in your product packaging or visit the official ACMER webсайт.

Image 8.1: ACMER offers 24/7 online support for customer assistance.