МАЦАВАННЕ ДЛЯ КОВАНКІ HY9462-B
FORGING MOUNT Long Reach TV Wall Mount Instruction Manual
Мадэль: HY9462-B
1. Уводзіны
This manual provides detailed instructions for the safe and proper installation, operation, and maintenance of your FORGING MOUNT Long Reach TV Wall Bracket Mount. Please read this manual thoroughly before installation and retain it for future reference.
The FORGING MOUNT TV wall mount is designed for large flat or curved screen televisions, offering full motion capabilities including tilt, swivel, and extension for optimal viewing angles. It features a robust construction and an integrated power strip for convenience.

Выява 1.1: Канецview of the FORGING MOUNT Long Reach TV Wall Mount and included accessories.
2. Важная інфармацыя па бяспецы
УВАГА: Невыкананне гэтых інструкцый можа прывесці да сур'ёзных траўмаў, пашкоджання маёмасці або анулявання гарантыі.
- Ensure the mounting surface can safely support the combined weight of the mount and your television.
- НЕ install on drywall alone. This mount requires installation into wood studs, solid concrete, or brick walls.
- Заўсёды выкарыстоўвайце прыбор для пошуку драўляных стойкаў, каб дакладна знайсці іх.
- Verify the VESA pattern and weight of your TV are within the specified limits of this mount.
- Выкарыстоўвайце толькі абсталяванне, прадастаўленае або пазначанае вытворцам.
- Калі вы не ўпэўненыя ў якім-небудзь этапе працэсу ўстаноўкі, звярніцеся да кваліфікаванага спецыяліста па ўсталёўцы.
- Не дапускайце дзяцей і хатніх жывёл падчас ўстаноўкі.
3. Змесціва ўпакоўкі
Carefully unpack the box and ensure all parts are present and undamaged. If any parts are missing or defective, contact customer support immediately.
3.1 Mount Components
- Зборка насценнай пласціны з шарнірнымі кранштэйнамі
- TV Bracket Rails (2x)
- Integrated Power Strip with Power Cord
3.2 камплектаў абсталявання
The hardware pack includes various screws, washers, and spacers to accommodate different TV models and wall types. A drilling template and a bubble level are also included.
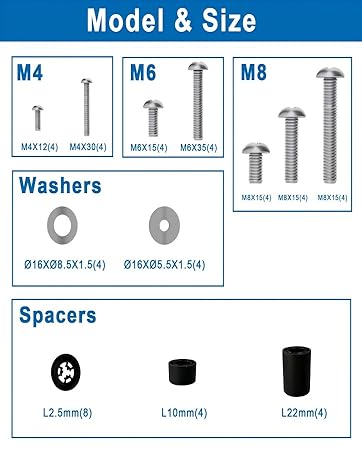
Image 3.1: Included mounting hardware (screws, washers, spacers).
Refer to the included hardware guide for specific screw sizes (M4, M6, M8) and their applications.
4. Праверка сумяшчальнасці
Before proceeding with installation, ensure your television and wall type are compatible with this mount.
Памер і вага тэлевізара 4.1
- Памер экрана: Fits most 50 to 100 inch flat or curved TVs.
- Ёмістасць вагі: Падтрымлівае тэлевізары вагой да 90 кг (198 фунты).
4.2 VESA Pattern
This mount supports VESA patterns from 200x100mm to 800x600mm. Measure the horizontal and vertical distance between the mounting holes on the back of your TV to determine its VESA pattern.
4.3 Тыпы сцен
The mount is designed for installation on:
- 16-inch Wood Studs
- Суцэльныя бетонныя сцены
- Цагляныя сцены
IMPORTANT: DO NOT mount this product on drywall alone. Drywall cannot support the weight of the mount and a large television.

Image 4.1: Visual guide for TV size, VESA compatibility, and suitable wall types.

Image 4.2: Detailed compatibility check for TV size, VESA, and wall types.
5. Кіраўніцтва па ўстаноўцы
Follow these steps carefully for a secure installation. It is recommended to have at least two people for installation, especially when lifting the TV.
5.1 Неабходныя інструменты (не ўключаны)
- Пошукавікі для стойк (для ўстаноўкі драўляных стойк)
- Drill with appropriate drill bits (wood or masonry)
- Выкрутка для галоўкі Філіпс
- Гаечны ключ
- Аловак
- Вымяральная стужка
5.2 Мацаванне кранштэйнаў для тэлевізара
- Пакладзеце тэлевізар экранам уніз на мяккую, чыстую паверхню, каб пазбегнуць драпін.
- Identify the correct diameter and length of screws (M4, M6, or M8) that fit your TV's mounting holes. Use washers and spacers as needed to ensure the screws do not bottom out and the brackets sit flush.
- Attach the two vertical TV bracket rails to the back of your TV using the selected screws, washers, and spacers. Ensure the brackets are centered and securely tightened.
5.3 Мантаж насценнай пласціны
For Wood Stud Installation:
- Use a stud finder to locate the edges and center of two adjacent wood studs. Mark the center of the studs at the desired height for your TV.
- Place the drilling template against the wall, aligning it with your marked stud centers and desired TV height. Use the included bubble level to ensure it is perfectly horizontal.
- Mark the pilot hole locations through the template.
- Drill pilot holes into the wood studs at the marked locations.
- Attach the wall plate assembly to the wall using the lag bolts and washers provided. Tighten securely, but do not overtighten.
For Concrete/Brick Wall Installation:
- Mark the desired height and horizontal position for the wall plate. Use the included bubble level to ensure it is perfectly horizontal.
- Place the drilling template against the wall and mark the pilot hole locations.
- Drill pilot holes into the concrete or brick wall using a masonry drill bit.
- Устаўце бетонныя анкеры ў прасвідраваныя адтуліны, пераканаўшыся, што яны знаходзяцца на адным узроўні з паверхняй сцяны.
- Attach the wall plate assembly to the wall using the lag bolts and washers provided, screwing them into the anchors. Tighten securely.
5.4 Падвешванне тэлевізара
- With assistance, carefully lift the TV and hook the TV bracket rails onto the wall plate.
- Пераканайцеся, што тэлевізар надзейна замацаваны на сцяне.
- Engage the safety locking screws or mechanisms on the TV brackets to prevent accidental dislodgement.
5.5 Integrated Power Strip Installation
The integrated power strip can be mounted in one of four positions on the wall plate for convenient access. Choose the position that best suits your setup.

Image 5.1: Four possible mounting locations for the integrated power strip.
Secure the power strip using the provided small screws. Plug the power strip's cord into a wall outlet. You can then connect your TV, game console, or other devices to the 2 AC outlets and 2 USB ports.
6. Кіраванне мацаваннем
Your FORGING MOUNT provides flexible viewing options. Adjustments should be made smoothly and carefully.
6.1 Выцягванне і ўцягванне
Gently pull or push the TV to extend it up to 42.6 inches from the wall or retract it back to a low-profile 2.8 цаляў.
6.2 Рэгуляванне павароту
The mount allows for a 180-degree swivel, enabling you to direct the TV screen towards different viewing areas in the room.

Image 6.1: Demonstrating the mount's ability to swivel a 75-inch TV 90 degrees.
6.3 Рэгуляванне нахілу
Adjust the tilt angle from +5 degrees to -15 degrees to reduce glare or achieve a more comfortable viewing angle. This is typically a tool-free adjustment.
6.4 Рэгуляванне ўзроўню
After installation, you can fine-tune the TV's horizontal level by +/-3 degrees to ensure it is perfectly straight.
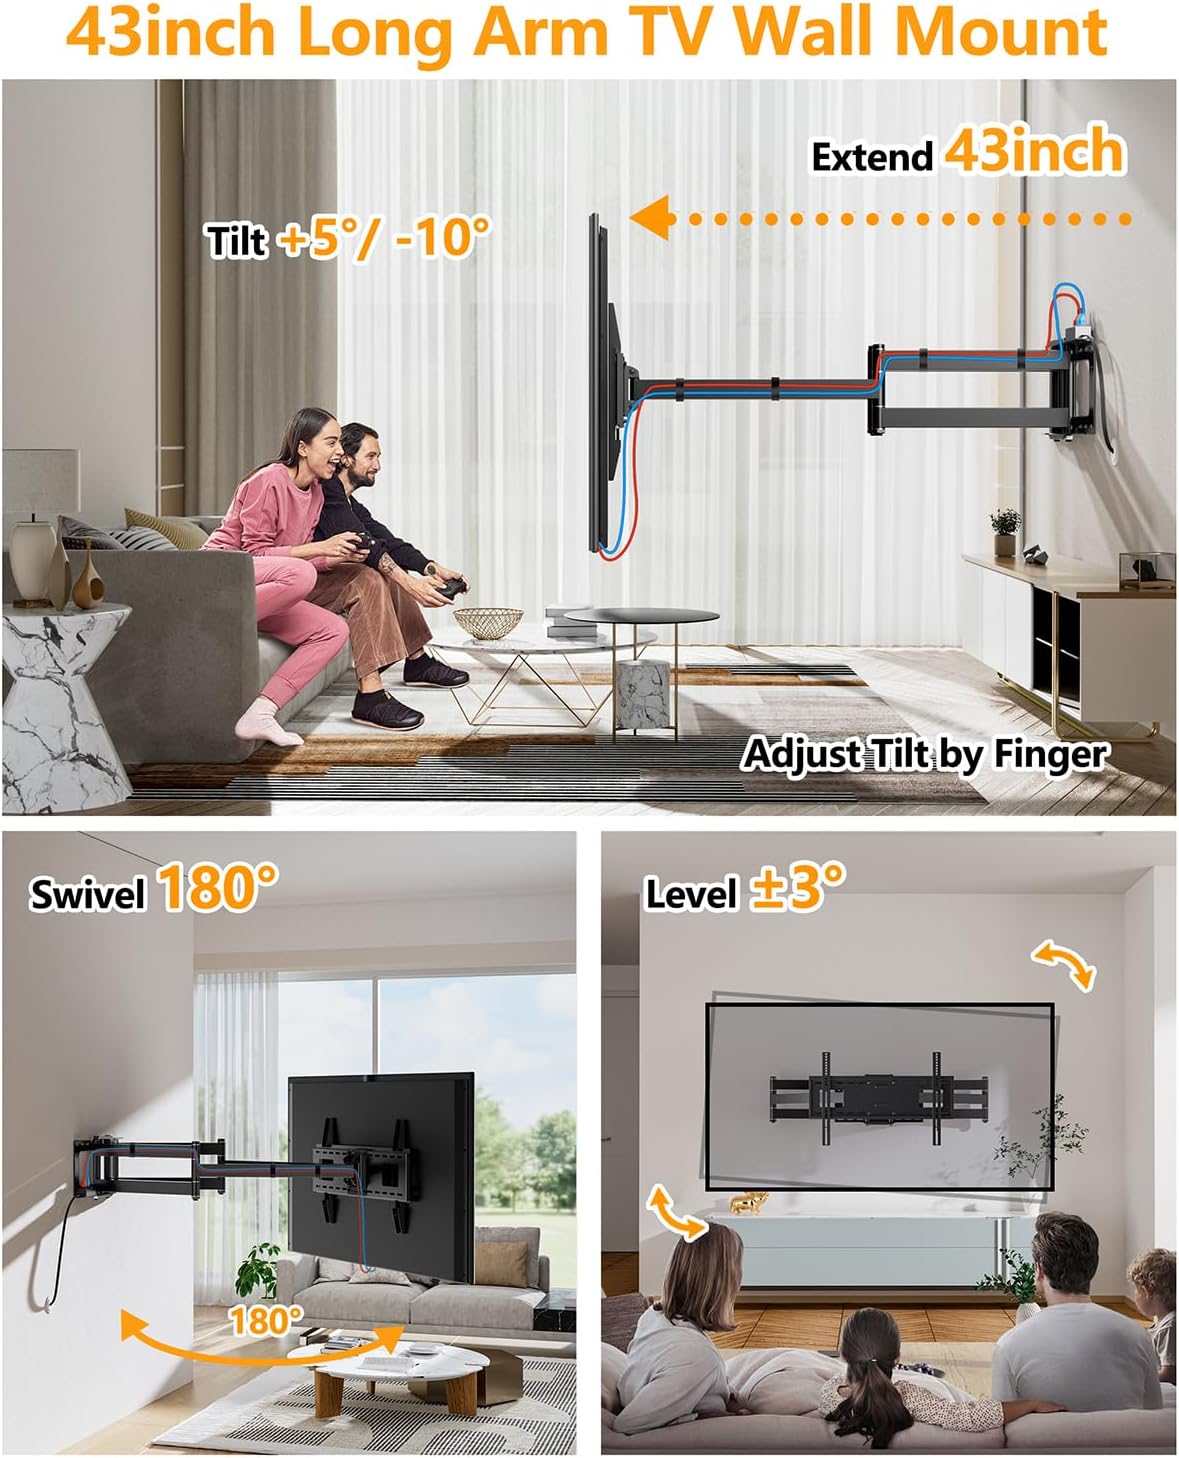
Image 6.2: Visual representation of the mount's tilt, swivel, and level adjustment features.
7. Тэхнічнае абслугоўванне
- Перыядычна правярайце ўсе шрубы і злучэнні, каб пераканацца, што яны надзейна закручаныя.
- Чысціце мацаванне мяккай сухой тканінай. Пазбягайце абразіўных ачышчальнікаў або растваральнікаў.
- If the articulating arms become stiff, a small amount of silicone-based lubricant can be applied to the pivot points. Avoid petroleum-based lubricants.
8. Выпраўленне непаладак
| праблема | Магчымая прычына | Рашэнне |
|---|---|---|
| Тэлевізар пасля ўсталёўкі стаіць няроўна. | Initial leveling was not precise. | Use the +/-3 degree level adjustment feature to fine-tune the TV's position. |
| Mount feels stiff when extending/swiveling. | Joints may require lubrication or are new. | Нанесці невялікую колькасць змазкі на аснове сілікону на кропкі павароту. Рух павінен стаць больш плаўным з выкарыстаннем. |
| Падаўжальнік харчавання не працуе. | Not plugged into wall outlet, or circuit breaker tripped. | Ensure the power strip's cord is securely plugged into a functioning wall outlet. Check your home's circuit breaker. |
| Mount appears unstable. | Няправільная ўстаноўка або няшчыльныя крапежныя элементы. | Immediately remove the TV. Re-check all wall mounting bolts and TV bracket screws for tightness. Ensure installation was on a suitable wall type (wood stud, concrete, brick) and not drywall alone. If issues persist, consult a professional. |
9. Тэхнічныя характарыстыкі
| Асаблівасць | Дэталь |
|---|---|
| Нумар мадэлі | HY9462-B |
| Сумяшчальныя памеры тэлевізараў | 50 - 100 цалі |
| Ёмістасць вагі | 198 фунтаў (90 кг) |
| Сумяшчальнасць VESA | 200x100 мм да 800x600 мм |
| Тып мацавання | Насценнае мацаванне |
| Тып руху | Articulating, Tilt, Swivel |
| Кут нахілу | +5° / -15° |
| Кут павароту | 180° |
| Рэгуляванне ўзроўню | +/-3° |
| Пашырэнне ад сцяны | ад 2.8 цаляў (у складзеным выглядзе) да 42.6 цаляў (у высунутым) |
| Матэрыял | Легаваная сталь |
| Колер | Чорны |
| Інтэграваны падаўжальнік харчавання | 2 AC Outlets, 2 USB Ports, 6.68 ft Power Cord |
| Вага прадмета | 31.4 фунта |
| Памеры ўпакоўкі | 44 х 11 х 4 цалі |
10. Інфармацыя аб гарантыі
FORGING MOUNT products are manufactured with quality and durability in mind. This product comes with a limited warranty against defects in materials and workmanship under normal use. Please refer to the warranty card included in your package or visit the official FORGING MOUNT webсайт для атрымання падрабязных гарантыйных умоў.
Пацвярджэнне пакупкі патрабуецца для ўсіх прэтэнзій па гарантыі.
11. Падтрымка кліентаў
If you have any questions regarding the installation, operation, or parts of your FORGING MOUNT TV wall mount, please do not hesitate to contact our professional product support team.
- Webсайт: Visit the FORGING MOUNT Store on Amazon
- электронная пошта: Глядзіце ўпакоўку прадукту або гарантыйны талон для атрымання кантактнай інфармацыі.
Please have your model number (HY9462-B) and purchase date ready when contacting support.
Ask a question about this manual
Ask about setup, troubleshooting, compatibility, parts, safety, or missing instructions. Manuals+ will review the question and use this page’s manual context to help answer it.