1. Уводзіны
This instruction manual provides essential information for the safe and efficient operation, maintenance, and troubleshooting of your 3i P10 Ultra Robot Vacuum and Mop Combo. Please read this manual thoroughly before using the product and retain it for future reference.
2. Інфармацыя па бяспецы
Заўсёды выконвайце асноўныя меры бяспекі пры выкарыстанні электрапрыбораў, каб знізіць рызыку пажару, паражэння электрычным токам або траўмаў. Гэты прыбор прызначаны толькі для хатняга выкарыстання.
- Не дазваляйце дзецям кіраваць робатам. Сачыце за дзецьмі і хатнімі жывёламі падчас працы робата.
- Пераканайцеся, што магутнасць Voltage адпавядае налепцы з характарыстыкамі на зараднай док-станцыі.
- Не выкарыстоўвайце робата на вільготных паверхнях або ў месцах са стаячай вадой.
- Remove loose cables, small objects, and fragile items from the cleaning path before operation.
- Do not use the robot to pick up large or sharp objects, flammable materials, or liquids.
- Only use manufacturer-specified accessories and replacement parts.
- Калі сеткавы шнур пашкоджаны, яго павінен замяніць вытворца або кваліфікаваны сэрвісны агент, каб пазбегнуць небяспекі.
3. Прадукт скончыўсяview
3.1 Уключаныя кампаненты
Пакет уключае наступныя рэчы:
- 1 х робат-пыласос
- 1 х базавая станцыя
- 2 х накладкі для швабры
- 2 х бакавых шчотак
- 1 x 800ml Cleaning Solution
- 1 х здымная база
- 1 х Шнур харчавання
- 1 х Кіраўніцтва карыстальніка
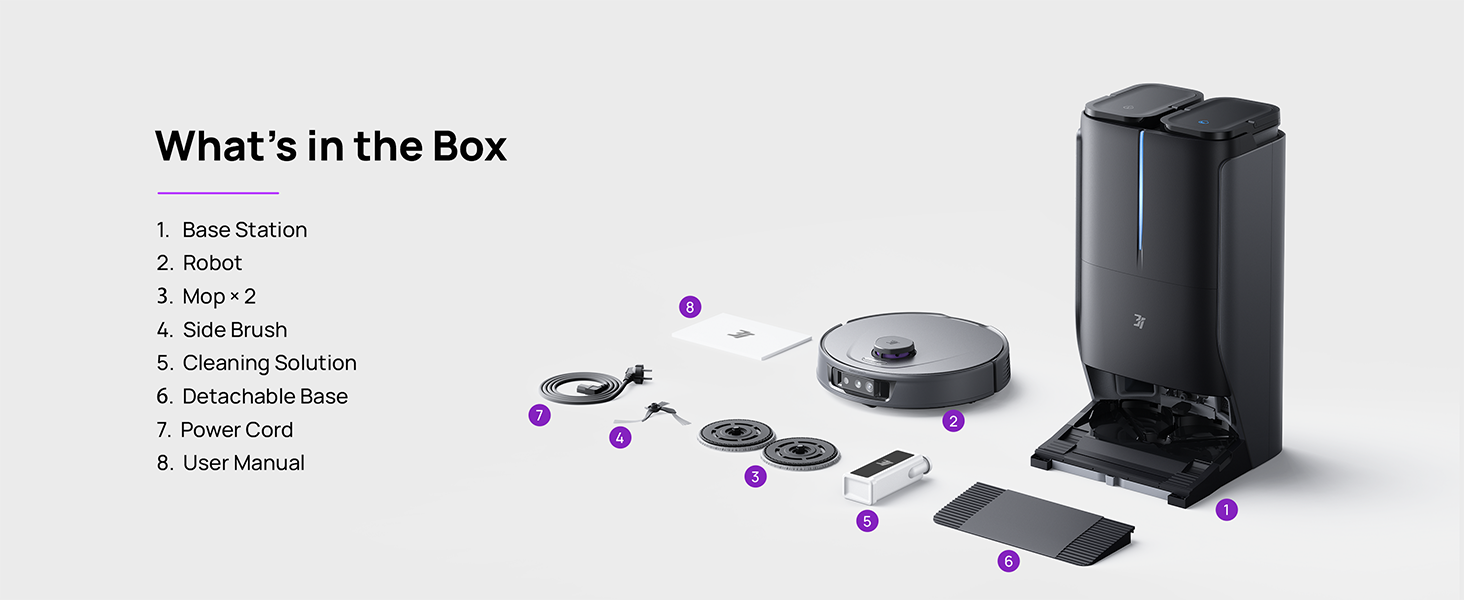
Figure 3.1: Contents of the 3i P10 Ultra package.
3.2 Robot Vacuum Features
- UltraReach Mop: The auto-extending mop system cleans edges and corners thoroughly. Dual mops spin at 220 RPM for effective stain removal.
- 18,000 Pa Suction: Provides powerful suction for deep cleaning on various floor types, including carpets and hard floors. Features smart carpet detection to boost suction and lift mops.
- All-in-One Automated Station: Offers automatic hot-water mop washing, hot air drying, solution adding, and hands-free dust collection for up to 70 days.
- Пашыраная навігацыя: Utilizes LiDAR for 3D mapping, dual 3D structured light, and an AI camera for obstacle avoidance, threshold crossing, and collision resistance.
- AI-Powered DirtScan: Identifies over 100 household objects and messes, adapting cleaning methods for optimal results, even in low light conditions.
- Hair Management: Equipped with anti-tangle brushes and a TangleCut blade to prevent hair from wrapping around components.
- Разумнае планаванне маршруту: Learns home layouts for efficient cleaning routes. Supports scheduled cleaning, no-go zones, and app control. Compatible with Alexa and Google Assistant.
- Падключэнне Wi-Fi: Supports both 2.4G and 5G Wi-Fi networks.

Малюнак 3.2: Верх view of the 3i P10 Ultra Robot Vacuum.

Figure 3.3: The 3i P10 Ultra Base Station.
4. Настройка
4.1 Распакоўка і размяшчэнне
- Акуратна дастаньце ўсе кампаненты з упакоўкі.
- Choose a suitable location for the base station. Ensure it is placed against a wall, on a hard, level surface, with at least 0.5 meters (1.6 feet) of clear space on both sides and 1.5 meters (4.9 feet) in front. Avoid areas with direct sunlight or strong Wi-Fi interference.
- Падключыце шнур харчавання да базавай станцыі і ўстаўце яе ў разетку.
4.2 Падрыхтоўка робата
- Install the side brushes by pressing them into their slots until they click.
- Attach the mop pads to the mop holders on the robot.
- Place the robot onto the base station to charge. Ensure the charging contacts align. The robot will announce its charging status.
4.3 Усталёўка і падключэнне праграмы
- Download the 3i app from your mobile device's app store (iOS or Android).
- Open the app and follow the on-screen instructions to create an account and add your 3i P10 Ultra robot.
- Ensure your phone is connected to a 2.4GHz or 5GHz Wi-Fi network during the pairing process.
5. Інструкцыя па эксплуатацыі
5.1 Пачатковая ўборка і картаграфаванне
For the first use, allow the robot to complete a full cleaning cycle to create a map of your home. This map is crucial for advanced features.

Figure 5.1: Precision 3D Mapping in the 3i App.
5.2 Запуск цыкла ачысткі
- Праз робата: Press the power button on the robot once to start or pause cleaning.
- Праз прыкладанне: Open the 3i app, select the desired cleaning mode (Vacuum, Mop, Vac & Mop, AI Auto, Custom), and tap 'Start'.
- Праз галасавое кіраванне: Use compatible voice assistants (Alexa, Google Assistant) with commands like "Hey Google, start vacuuming."

Figure 5.2: Using voice control to operate the 3i P10 Ultra.
5.3 функцыі прыкладання
The 3i app provides extensive control and customization options:
- Налады ачысткі: Schedule cleaning, select rooms, set no-go zones, customize carpet cleaning.
- Налады карты: View 3D maps, quick mapping, multi-floor maps, edit rooms and furniture.
- Station Settings: Customize dust collection, mop washing, auto-drying, and TangleCut.
- Іншыя налады: Do Not Disturb mode, Smart Route Planning, Pet Recognition, Child Lock.
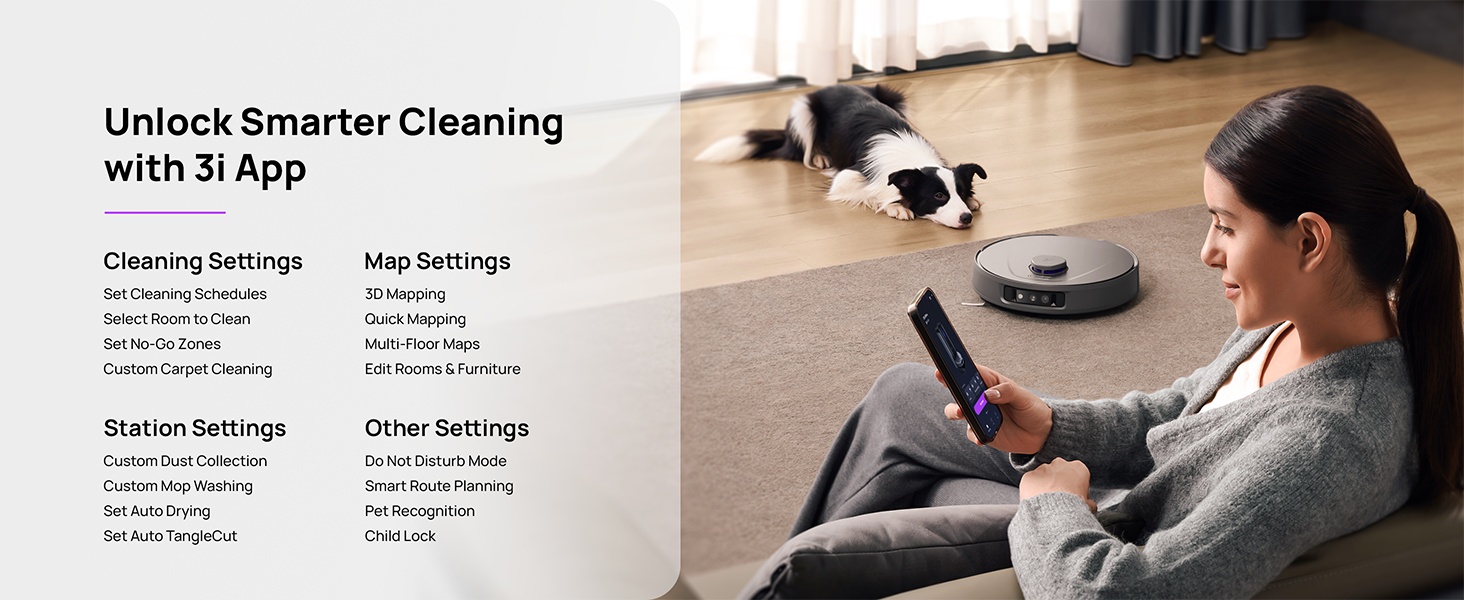
Figure 5.3: The 3i App interface for smart cleaning.
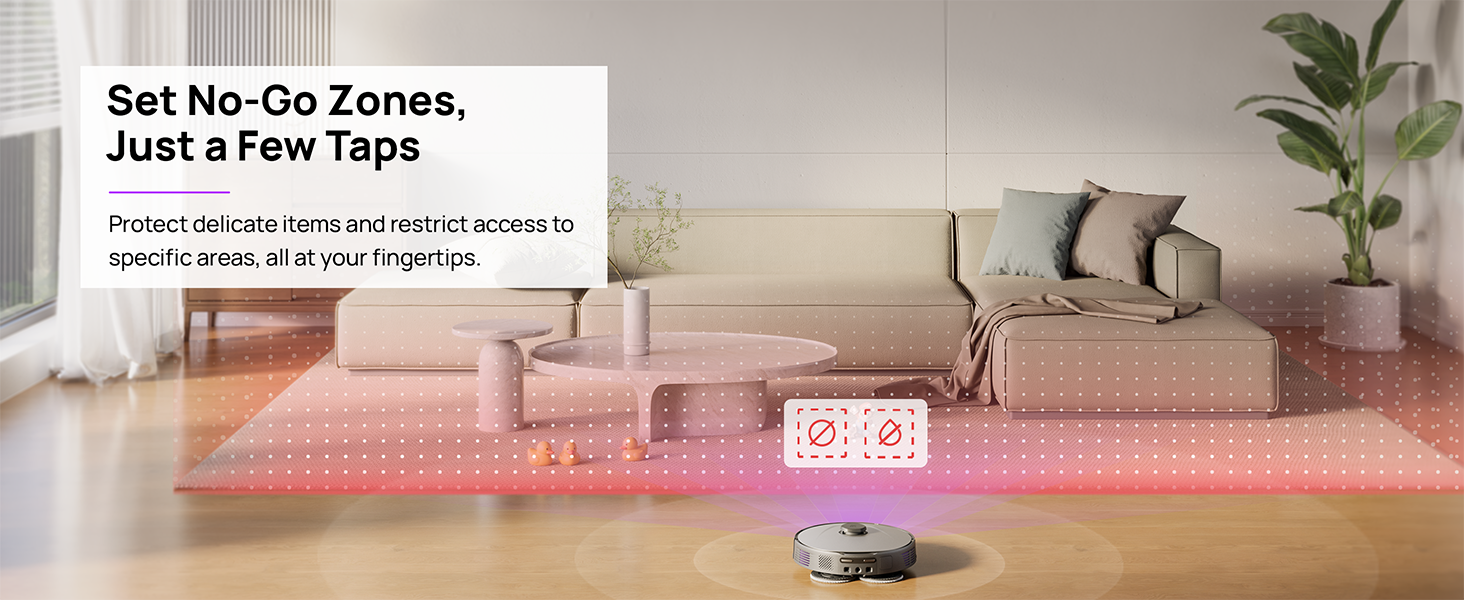
Figure 5.4: Setting No-Go Zones in the 3i App.
6. Тэхнічнае абслугоўванне
Regular maintenance ensures optimal performance and extends the lifespan of your 3i P10 Ultra.
6.1 Тэхнічнае абслугоўванне базавай станцыі
- Апаражненне смеццевага бака: The base station automatically empties the robot's dustbin into a 3L bag. Replace the dust bag approximately every 70 days, or as indicated by the app.
- Мыццё і сушка швабрай: The base station automatically washes mop pads with 140°F / 60°C hot water and dries them with hot air (131°F / 55°C) after each cleaning cycle. Ensure the clean and dirty water tanks are properly installed.
- Water Tank Refilling: The extra-large 4L clean water tank automatically refills the robot. Refill the clean water tank as needed. The base station also collects dirty water into a separate wastewater tank. Empty the wastewater tank regularly.
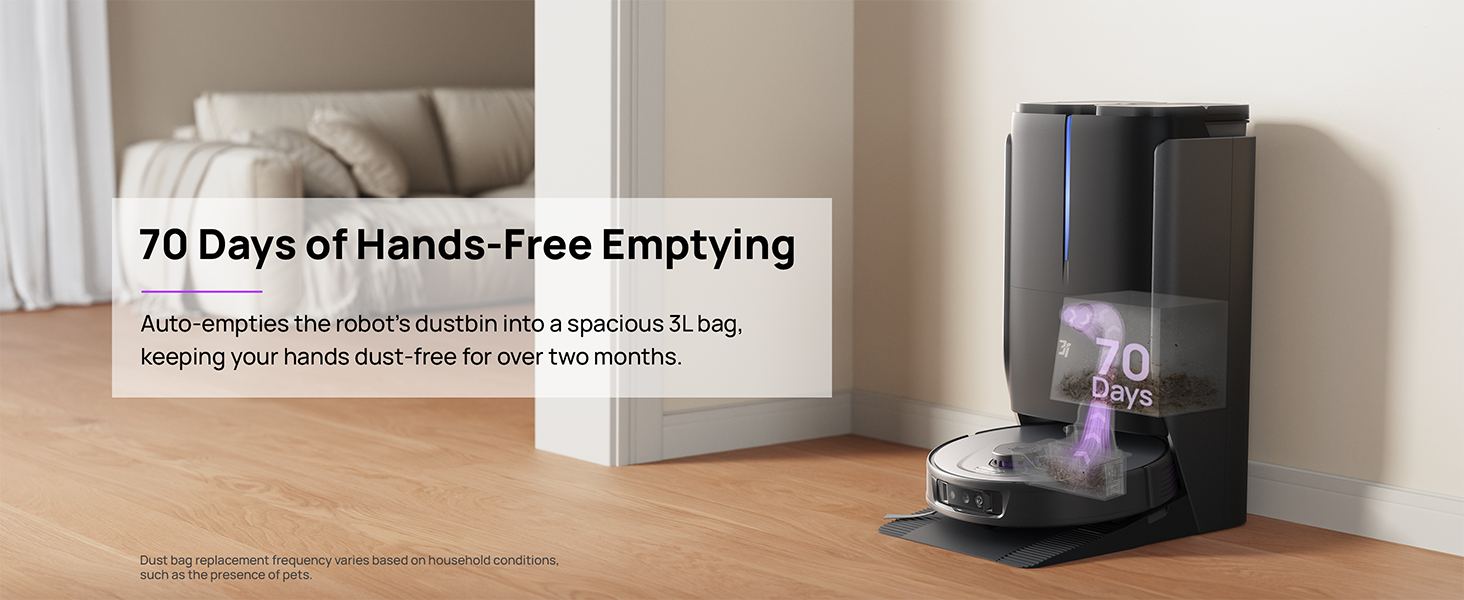
Figure 6.1: Automatic dustbin emptying at the base station.
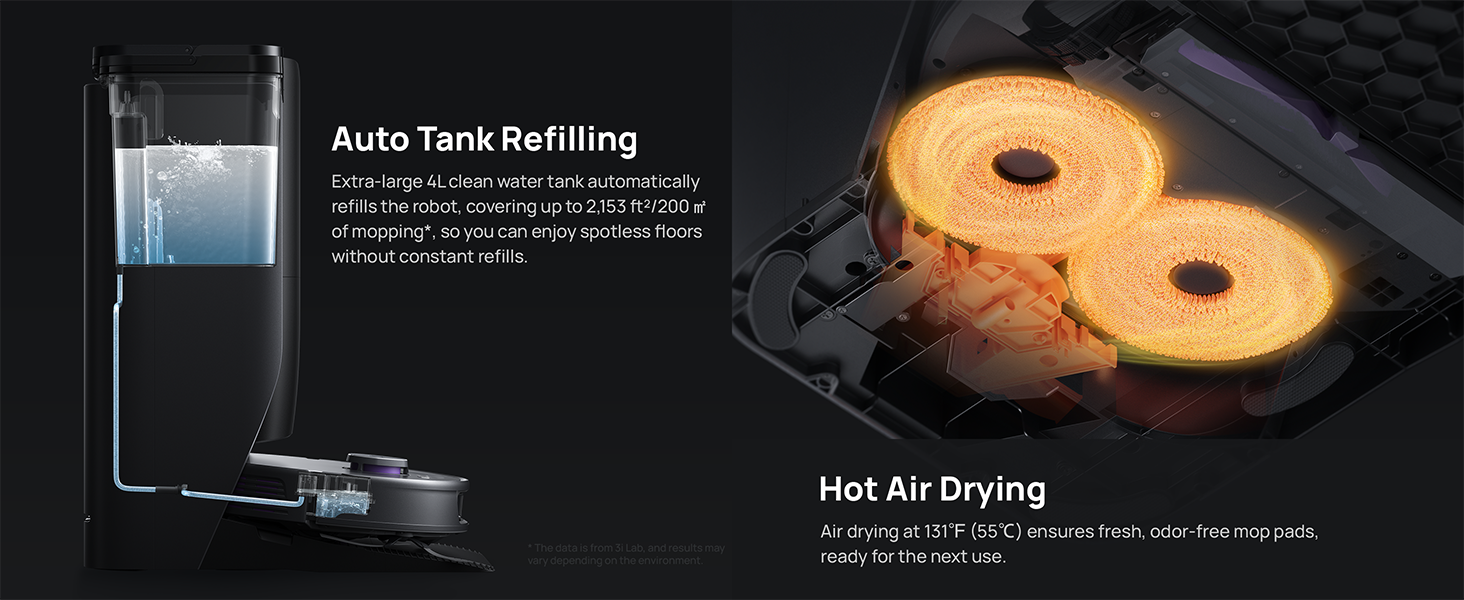
Figure 6.2: Auto tank refilling and hot air drying process.
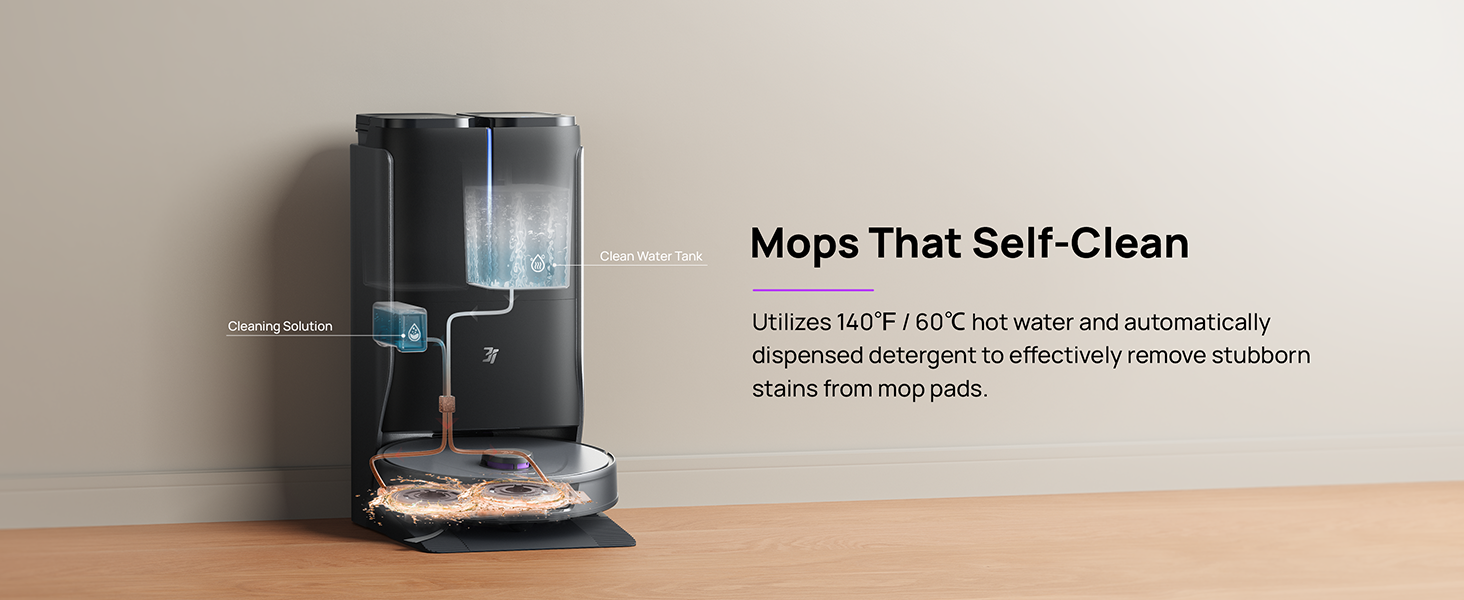
Figure 6.3: Mop self-cleaning function.
6.2 Robot Component Maintenance
- Асноўная шчотка: Regularly check the main brush for tangled hair or debris. Use the cleaning tool provided to remove any obstructions. The TangleCut blade helps prevent excessive tangling.
- Бакавыя шчоткі: Inspect side brushes for wear or damage. Clean them periodically and replace if necessary.
- Каўбаскі для швабры: Although self-cleaned, inspect mop pads for excessive wear or stubborn stains. Replace them when their cleaning effectiveness diminishes.
- Фільтр: The filter is washable. Remove and rinse it under running water. Allow it to air dry completely before reinstalling.
- Датчыкі: Wipe all sensors (LDS, anti-drop, wall-following, charging contacts) with a clean, dry cloth to ensure proper function.
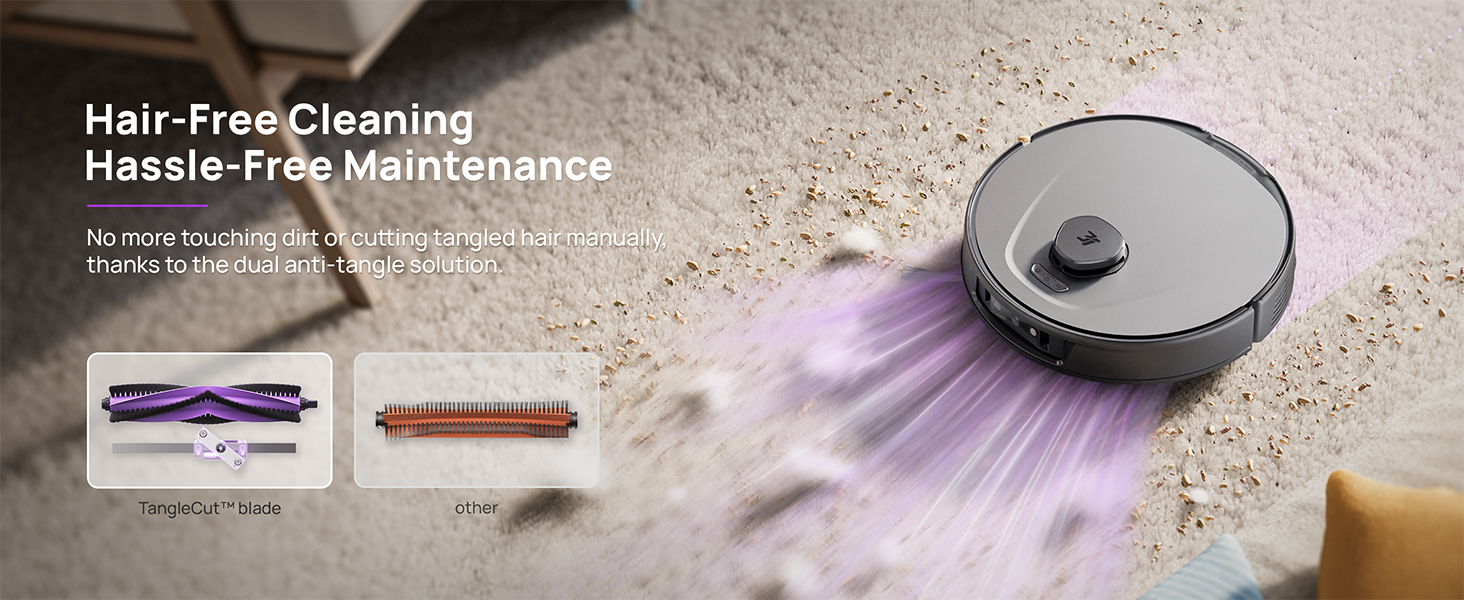
Figure 6.4: Hair-free cleaning with anti-tangle design.
7. Выпраўленне непаладак
If you encounter issues with your 3i P10 Ultra, refer to the following common problems and solutions:
| праблема | Магчымая прычына | Рашэнне |
|---|---|---|
| Робат не ўключаецца. | Нізкі ўзровень зарада батарэі; кнопка харчавання націснута няправільна. | Place robot on charging dock; Press and hold power button for 3 seconds. |
| Робат не можа знайсці зарадную док-станцыю. | Dock is obstructed or too far; Poor Wi-Fi signal. | Ensure dock is in an open area; Check Wi-Fi connection. |
| Эфектыўнасць уборкі нізкая. | Dustbin full; Brushes tangled; Filter clogged; Mop pads dirty. | Empty dustbin; Clean brushes; Clean/replace filter; Clean/replace mop pads. |
| Робат часта захрасае. | Перашкоды на падлозе; Забруджаныя датчыкі. | Clear floor of obstacles; Clean all sensors. |
| Праблемы з падключэннем да праграмы. | Няправільны пароль Wi-Fi; праблемы з маршрутызатарам; робат не ў сетцы. | Verify Wi-Fi password; Restart router; Restart robot; Re-pair device in app. |
For further assistance, please refer to the 3i app's help section or contact customer support.
8. Тэхнічныя характарыстыкі
| Асаблівасць | Дэталь |
|---|---|
| Марка | 3i |
| Назва мадэлі | 3i P10 Ultra робат-пыласос |
| Памеры прадукту (робат) | 13.78 см Д х 13.78 см Ш х 3.94 см В |
| Памеры вырабу (станцыя) | 12.2 см Д х 18.43 см Ш х 23.39 см В |
| Вага прадмета | 37.3 фунта |
| Тэрмін службы батарэі | 180 хвілін |
| Тып фільтра | Мыецца |
| Рэкамендацыя па паверхні | Carpet, Marble, Wood, Tile |
| Магутнасць ўсмоктвання | 18,000 Па |
| Сістэма навігацыі | LDS LiDAR, Dual 3D Structured Light, AI Camera |
| Падтрымка Wi-Fi | 2.4G і 5G |

Figure 8.1: Dimensions of the 3i P10 Ultra Robot and Base Station.
9. Гарантыя і падтрымка
For warranty information, please refer to the warranty card included with your product or visit the official 3i website. For technical support, troubleshooting beyond this manual, or to inquire about replacement parts, please contact 3i customer service through the contact information provided on their official website or within the 3i app.