1. Уводзіны
This manual provides essential instructions for the safe and efficient operation of your Panda PAN80SWR1 Portable Washing Machine. This 2.0 Cu.ft fully automatic compact top-load washer is designed for small living spaces such as apartments, condos, RVs, vacation homes, and dormitories. It connects easily to a standard kitchen faucet and drains into a sink, eliminating the need for permanent plumbing installations. Please read this manual thoroughly before using the appliance and retain it for future reference.
2. Інфармацыя па бяспецы
Заўсёды выконвайце асноўныя меры бяспекі пры выкарыстанні электрапрыбораў, каб знізіць рызыку пажару, паражэння электрычным токам або траўмаў людзей.
- Ensure the washing machine is connected to a properly grounded 110V three-prong outlet.
- Не выкарыстоўвайце машыну, калі пашкоджаны шнур харчавання або вілка.
- Keep children away from the appliance during operation. The Child Lock feature should be activated when children are present.
- Не сцірайце рэчы, забруджаныя лёгкаўзгаральнымі або выбуховымі рэчывамі.
- Never reach into the washing machine while it is operating.
- Перад выкананнем любога тэхнічнага абслугоўвання або чысткі адключыце электрасілкаванне.
- Не ўстанаўлівайце і не захоўвайце прыладу ў месцах, дзе яна будзе падвяргацца ўздзеянню непагадзі або замярзанню.
3. Прадукт скончыўсяview
3.1 Памеры прадукту
The Panda PAN80SWR1 washing machine is designed for compact spaces. Refer to the image below for detailed dimensions.

3.2 Панэль кіравання
The control panel allows you to select wash programs, water temperature, and other functions. Familiarize yourself with the buttons and indicators.

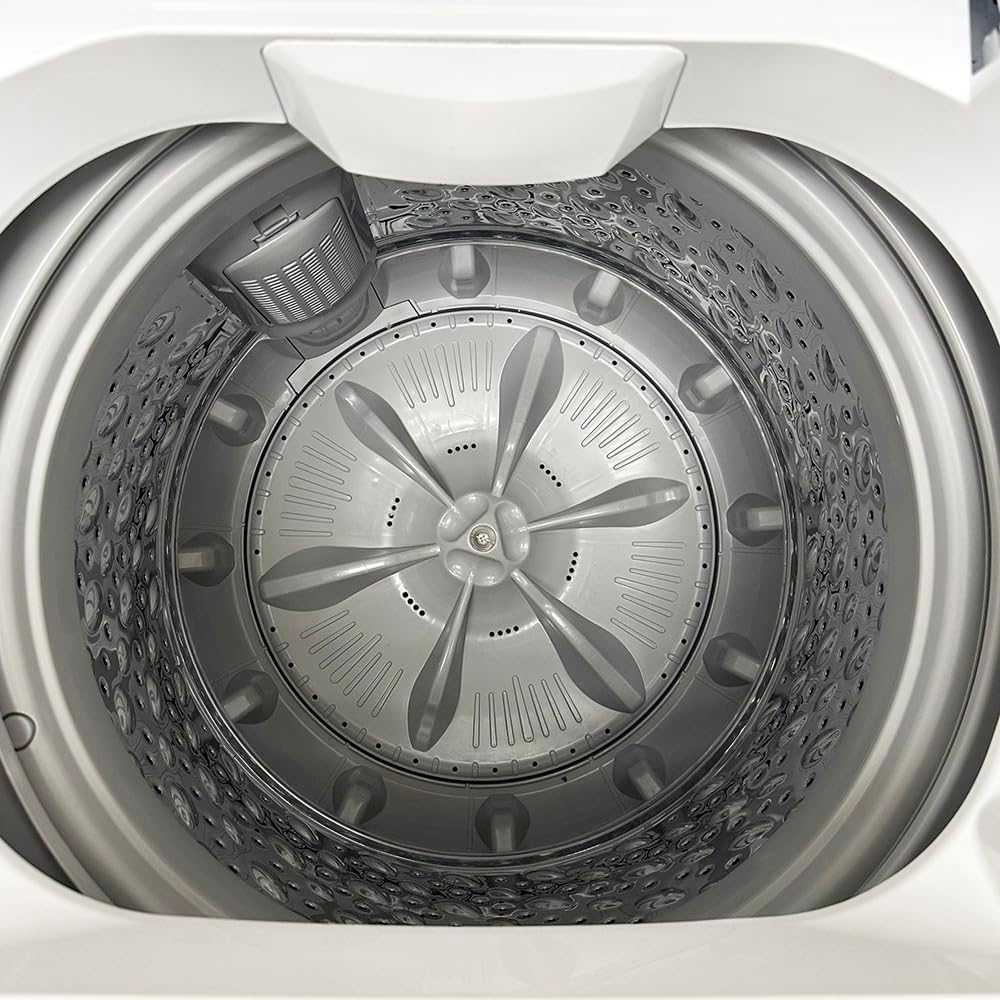
3.3 Interior and Components
The washing machine features a durable stainless steel tub and a transparent viewвечка.


4. Настройка
4.1 Распакоўка і размяшчэнне
- Акуратна выдаліце ўсе ўпаковачныя матэрыялы.
- Place the washing machine on a firm, level surface. The machine has two built-in rollers on the back bottom for easier movement.
- Пераканайцеся, што вакол машыны дастаткова месца для вентыляцыі і працы.
4.2 Water Inlet Connection
The washer can be connected to a standard kitchen or bathroom faucet using the included quick connect adapter kit. Two identical hoses are provided for hot and cold water supplies, though only one is typically used for cold water connection in portable setups.

- Attach the faucet adapter to your kitchen or bathroom faucet. If using internal threads, remove the black rubber washer from the adapter.
- Connect the quick adapter to the faucet adapter.
- Connect one end of the inlet hose to the quick adapter.
- Connect the other end of the inlet hose to the 'COLD' inlet valve at the back of the washing machine.
- If only using cold water, block the 'HOT' inlet valve using the provided cap.
- Turn on the cold water faucet to check for leaks.
4.3 Злучэнне зліўнага шланга
- Attach the drain hose securely to the drain outlet on the back of the machine.
- Position the other end of the drain hose into a sink or a suitable drain. Ensure the hose is secured to prevent it from dislodging during the drain cycle.
4.4 Падключэнне харчавання
- Plug the power cord into a grounded 110V three-prong electrical outlet.
- Не выкарыстоўвайце падаўжальнікі або адаптары.
5. Інструкцыя па эксплуатацыі
5.1 Загрузка бялізны
- Open the transparent lid.
- Load clothes loosely into the tub, ensuring not to overload. The maximum capacity is 15.6 lbs.
- Надзейна зачыніце вечка.
5.2 Даданне мыйнага сродкі
- Add the appropriate amount of high-efficiency (HE) detergent directly into the tub with the clothes.
- Avoid using excessive detergent to prevent oversudsing.
5.3 Selecting Wash Programs
Press the 'On/Off' button to power on the machine. Use the 'Program' button to cycle through the available wash programs:
- Нармальны: Для штодзённай мыцця бялізны.
- цяжкі: Для моцна забруджаных рэчаў.
- Далікатны: For fragile garments.
- Хутка: For lightly soiled items or small loads.
- Грувасткі: For large items like blankets or jackets.
- Толькі кручэнне: To extract excess water from clothes.
5.4 Рэгуляванне тэмпературы вады
Press the 'Temp' button to select the desired water temperature:
- гарачы: For white and heavily soiled items.
- Цёплы: For colored items and moderately soiled laundry.
- холадна: For delicate items and dark colors.
5.5 Using Delay Start
The Delay Start function allows you to set a delayed start time for your wash cycle.
- Select your desired wash program and temperature.
- Press the 'Delay' button repeatedly to set the desired delay time in hours.
- Press 'Start/Pause' to activate the delay timer. The machine will start automatically after the set time.
5.6 Функцыя блакіроўкі ад дзяцей
To prevent accidental operation by children, activate the Child Lock.
- To activate: Press and hold the 'Temp' and 'Program' buttons simultaneously for three seconds. The 'Control Lock' indicator will illuminate.
- To deactivate: Press and hold the 'Temp' and 'Program' buttons simultaneously for three seconds again. The 'Control Lock' indicator will turn off.
5.7 Запуск цыкла мыцця
- After loading laundry, adding detergent, and selecting your desired program and settings, press the 'Start/Pause' button to begin the wash cycle.
- The transparent lid allows you to monitor the wash cycle progress.
6. Тэхнічнае абслугоўванне
6.1 Знешняя ачыстка
- Працярыце вонкавыя паверхні мяккай, damp тканіна.
- Не выкарыстоўвайце абразіўныя ачышчальнікі або растваральнікі.
6.2 Чыстка ванны
- Periodically run a 'Bulky' cycle with hot water and a washing machine cleaner (or a cup of white vinegar) to clean the tub and remove detergent residue.
- Leave the lid open after each use to allow the tub to air dry and prevent odors.
6.3 Ачыстка зліўнога фільтра
- Locate the drain filter access at the bottom rear of the machine (refer to Image 4).
- Unscrew the filter cover and carefully remove the filter.
- Clean any lint, debris, or foreign objects from the filter under running water.
- Reinsert the filter and screw the cover back on tightly.
- Clean the drain filter regularly to ensure efficient drainage.
7. Выпраўленне непаладак
| праблема | Магчымая прычына | Рашэнне |
|---|---|---|
| Машына не запускаецца | Power cord not plugged in; Lid not closed; 'On/Off' button not pressed; Child Lock active. | Ensure power cord is securely plugged in; Close the lid completely; Press 'On/Off' button; Deactivate Child Lock. |
| Няма водазабору | Water faucet closed; Inlet hose kinked; Water pressure too low; Incorrect inlet hole connected. | Open water faucet; Straighten inlet hose; Ensure adequate water pressure; Connect hose to 'COLD' inlet. |
| Вада не зліваецца | Drain hose kinked or blocked; Drain filter clogged; Drain hose positioned too high. | Straighten or clear drain hose; Clean drain filter; Ensure drain hose is at an appropriate height (below 39 inches). |
| Празмерная вібрацыя/шум | Machine not level; Load unbalanced; Shipping bolts not removed (if applicable). | Adjust leveling feet; Redistribute laundry evenly; Refer to setup instructions for shipping bolt removal. |
| Уцечкі вады | Hose connections loose; Drain hose not secured; Excessive suds. | Tighten all hose connections; Secure drain hose in sink/drain; Reduce detergent amount. |
8. Тэхнічныя характарыстыкі
| Асаблівасць | Дэталь |
|---|---|
| Нумар мадэлі | PAN80SWR1 |
| Ёмістасць | 2.0 Cu.ft (15.6 lbs) |
| Памеры (Д x Ш x В) | 57.2 х 55.9 х 94.6 см (22.5 х 22 х 37.25 цалі) |
| Хуткасць рухавіка | 780 XNUMX абаротаў у хвіліну |
| тtage | 110В |
| Праграмы для мыцця | Normal, Heavy, Delicate, Quick, Bulky, Spin Only |
| Налады тэмпературы вады | Hot, Warm, Cold |
| Уключаныя кампаненты | Drain Hose, Inlet Hoses, Quick Connect Adapter Kit |
| Матэрыял ванны | Нержавеючая сталь |
9. Гарантыя і падтрымка
For warranty information or technical support, please refer to the documentation provided with your purchase or contact Panda customer service. Keep your purchase receipt for warranty claims.