1. Уводзіны
The TECKNET TK-WA701 Door/Window Alarm System is designed to enhance the security of your home or property. This versatile device functions as both an alarm and a chime, providing alerts when a door or window is opened. It features adjustable volume levels and is suitable for various applications, including homes, apartments, garages, and for ensuring kids' safety.
2. Змесціва ўпакоўкі
- 3 x TECKNET TK-WA701 Alarm Units
- 3 x Magnetic Strips
- Клейкія мантажныя калодкі
- Кіраўніцтва карыстальніка
3. Прадукт скончыўсяview
Each TECKNET TK-WA701 unit consists of an alarm main body and a magnetic strip. The main body houses the speaker, indicator light, ON/OFF switch, and a Volume/Mode button.
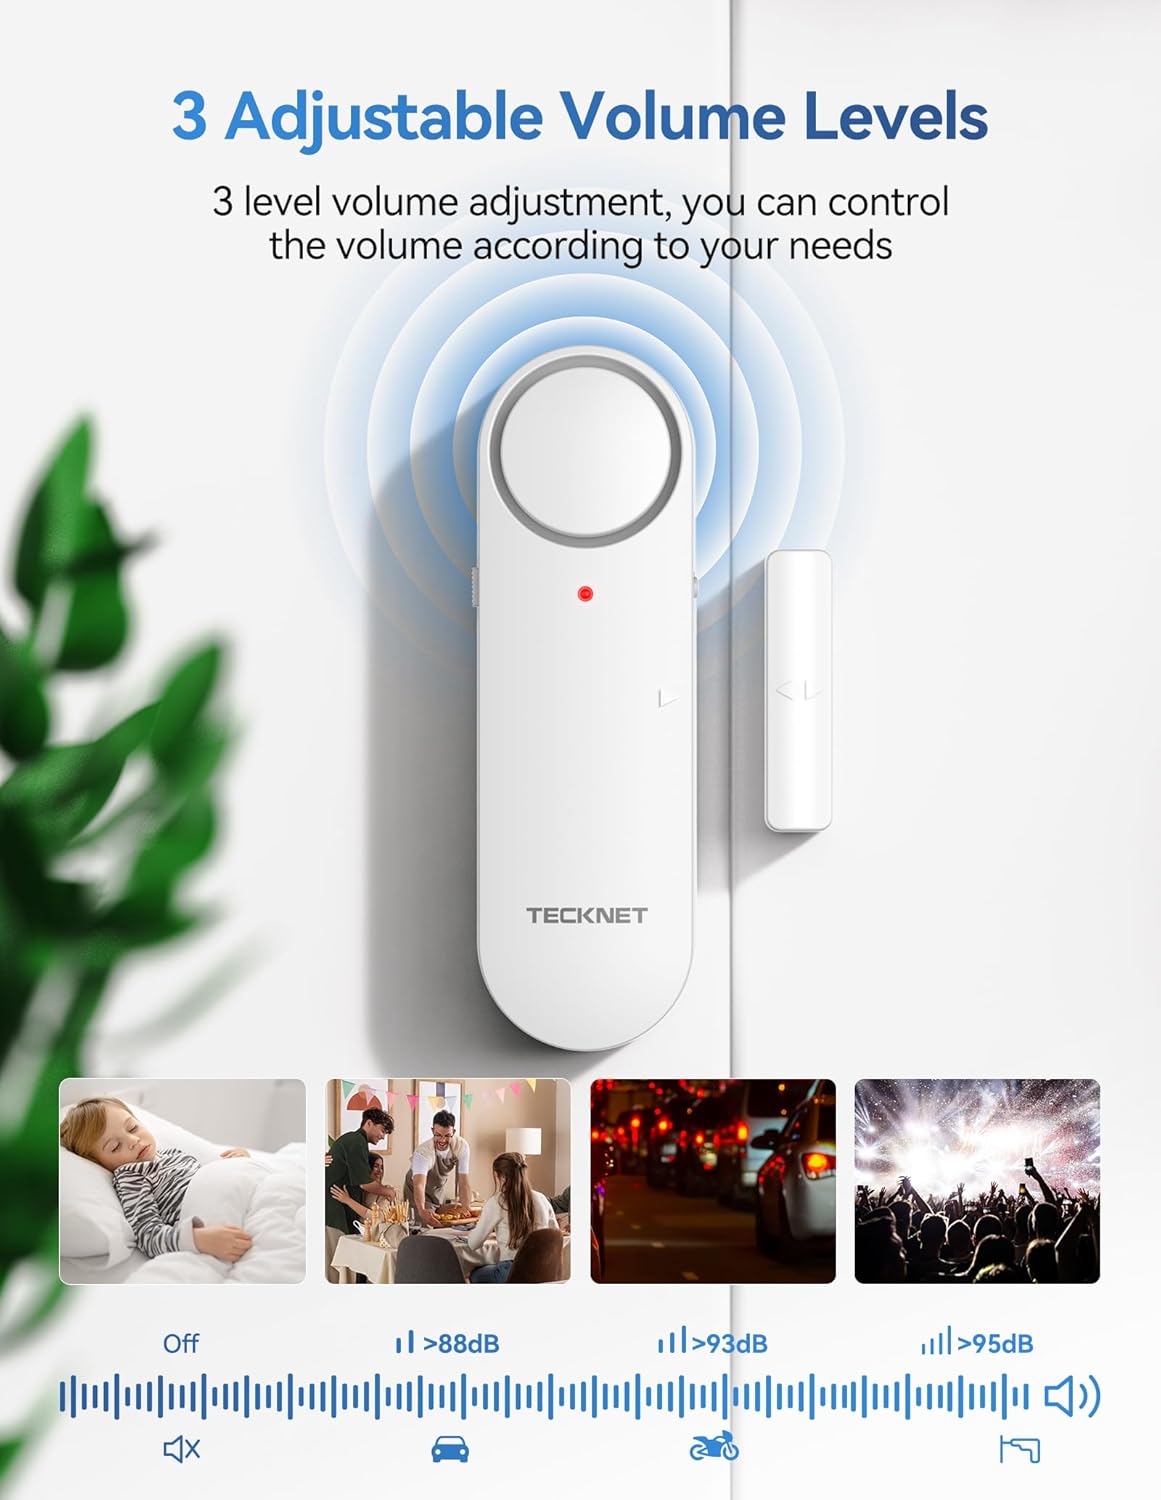
Figure 1: Components of the TECKNET TK-WA701 Alarm Unit
- Дакладчык: Emits alarm or chime sounds.
- Індыкатар: LED light for status indication.
- Магнітная паласа: Triggers the alarm when separated from the main unit.
- Пераключальнік уключэння/выключэння: Located on the side for powering the unit on or off.
- Volume/Mode Button: Used to switch between alarm and chime modes, and adjust volume levels.
4. Настройка
4.1 Устаноўка батарэі
- Gently slide off the back cover of the main alarm unit.
- Insert two (2) AAA batteries into the battery compartment, ensuring correct polarity (+/-).
- Устаўце заднюю крышку на месца, пераканаўшыся, што яна надзейна зашчапілася.

Figure 2: Battery Installation and Initial Setup Steps
4.2 Мантаж сігналізацыі
- Clean the desired installation surface (door, window frame, cabinet) thoroughly to ensure it is free of dust and grease. Allow it to dry completely.
- Peel off the protective film from the adhesive pads on the back of both the main alarm unit and the magnetic strip.
- Attach the main alarm unit to the fixed part of the door/window frame.
- Attach the magnetic strip to the moving part of the door/window, aligning the arrows on both components.
- Ensure the gap between the main alarm unit and the magnetic strip is less than 2 cm (0.78 inches) when the door/window is closed. A larger gap may prevent proper function.

Figure 3: Correct Installation Method and Gap Requirement
5. Інструкцыя па эксплуатацыі
5.1 Уключэнне/выключэнне
Locate the ON/OFF switch on the side of the main alarm unit. Slide the switch to 'ON' to activate the alarm or 'OFF' to deactivate it.
5.2 Switching Modes (Alarm/Chime)
Press and hold the Volume/Mode button for 3 seconds to switch between Alarm mode and Chime mode. In Alarm mode, a continuous loud sound will be emitted when triggered. In Chime mode, a single chime sound will be heard when triggered.

Figure 4: 3-Mode Switch (Alarm, Chime, OFF)
5.3 Рэгуляванне гучнасці
The alarm features 3 adjustable volume levels: Low, Medium, and High. Briefly press the Volume/Mode button to cycle through the volume settings. This allows you to customize the alert sound to your environment.

Figure 5: 3-Level Adjustable Volume
5.4 Triggering the Alarm/Chime
When the main alarm unit and the magnetic strip are separated by more than 2 cm (0.78 inches), the device will trigger according to the selected mode (Alarm or Chime).
Video 1: Demonstration of TECKNET Door Alarms When Opened 2-in-1 Alarm & Chime functionality.
6. Тэхнічнае абслугоўванне
6.1 Замена батарэі
When the alarm sound becomes weak or the indicator light does not illuminate, it is time to replace the batteries. Follow the battery installation steps (Section 4.1) to replace the two (2) AAA batteries in each unit.

Figure 6: TECKNET Door/Window Alarm System in a home setting.
6.2 Ачыстка
Wipe the alarm units with a soft, dry cloth. Do not use abrasive cleaners or solvents, as these may damage the surface or internal components.
7. Выпраўленне непаладак
- Сігналізацыя не спрацоўвае: Ensure the ON/OFF switch is in the 'ON' position. Verify that the magnetic strip is aligned with the main unit and the gap is less than 2 cm. Check battery levels.
- Weak or no sound: Replace the batteries with new AAA batteries. Ensure the volume is not set to the lowest level or 'OFF' in chime mode.
- Ілжывыя трывогі: Check the stability of the mounting. Ensure the magnetic strip and main unit are securely attached and do not shift.
8. Тэхнічныя характарыстыкі
| Асаблівасць | Дэталь |
|---|---|
| Марка | ТЭКНЕТ |
| Нумар мадэлі | TK-WA701 |
| Колер | Белы |
| Крыніца харчавання | Харчаванне ад батарэі |
| Тып батарэі | 2 AAA batteries required per unit (Alkaline recommended) |
| Метад кантролю | Push Button, ON/OFF Switch |
| Тып мацавання | Мацаванне на дзверы (клейкае) |
| Sensor Technology | Кантактны датчык |
| Сумяшчальнасць з разумным домам | Not Smart Home Compatible |
| Вага прадмета | 141 Grams (per unit) |
| Колькасць адзінак | 3.0 Граф |
9. Гарантыя і падтрымка
TECKNET provides a 36-month warranty for this product. If you encounter any problems when using the product, please feel free to contact our professional customer service team for assistance. Warranty registration may be required.
For customer support, please visit the official TECKNET webсайт або звярніцеся да кантактнай інфармацыі, указанай на ўпакоўцы прадукту.