
1. Уводзіны
This manual provides instructions for the DIYtoolifz 150 PSI Cordless Tire Inflator Air Compressor. Designed for portability and ease of use, this tool is compatible with Dewalt 20V lithium-ion batteries (battery not included). It features a digital pressure gauge, automatic shut-off, and a multi-mode LED light for various inflation needs and emergency situations.
2. Інфармацыя па бяспецы
Always read and understand all safety warnings and instructions before operating this device. Failure to follow warnings and instructions may result in electric shock, fire, and/or serious injury.
- This product is a bare tool; battery and charger are sold separately.
- Забараняецца працаваць у выбуханебяспечнай атмасферы, напрыклад, у прысутнасці гаручых вадкасцей, газаў або пылу.
- Трымайце дзяцей і старонніх асоб далей падчас працы з напампоўшчыкам.
- Заўсёды апранайце ахоўныя акуляры пры працы з нагнетальнікам.
- Do not over-inflate. Follow recommended pressure levels for items being inflated.
- Disconnect the battery pack from the inflator before making any adjustments, changing accessories, or storing the tool.
3. Змесціва ўпакоўкі
Праверце, ці ўсе пералічаныя ніжэй прадметы ўваходзяць у вашу ўпакоўку:
- 1 x Cordless Tire Inflator (Tool Only)
- 1 х паветраны шланг
- 1 x Air Nozzle (Tapered)
- 1 х шарыкавая іголка
- 1 x French Valve Adapter (Presta)
- 1 х Кіраўніцтва карыстальніка

Image: The package contents laid out, showing the cordless tire inflator, air hose, tapered air nozzle, ball needle, French valve adapter, and user manual.
4. Прадукт скончыўсяview
4.1. Асноўныя магчымасці
- Сумяшчальнасць з батарэяй: Works with Dewalt 18V/20V lithium-ion batteries (DCB206, DCB205, DCB204, DCB203, DCB200, etc.).
- Лічбавы манометр: Large LCD display shows real-time and preset pressure.
- Аўтаматычнае адключэнне: Stops inflation once preset pressure is reached.
- 5 Inflation Modes: Car, Motorcycle, Bicycle, Ball, and Custom (0-150 PSI adjustable).
- 3-in-1 LED Light: Bright white LED, steady red warning light, and red SOS strobe.
- All-Metal Cylinder: Ensures durability and reliable performance.
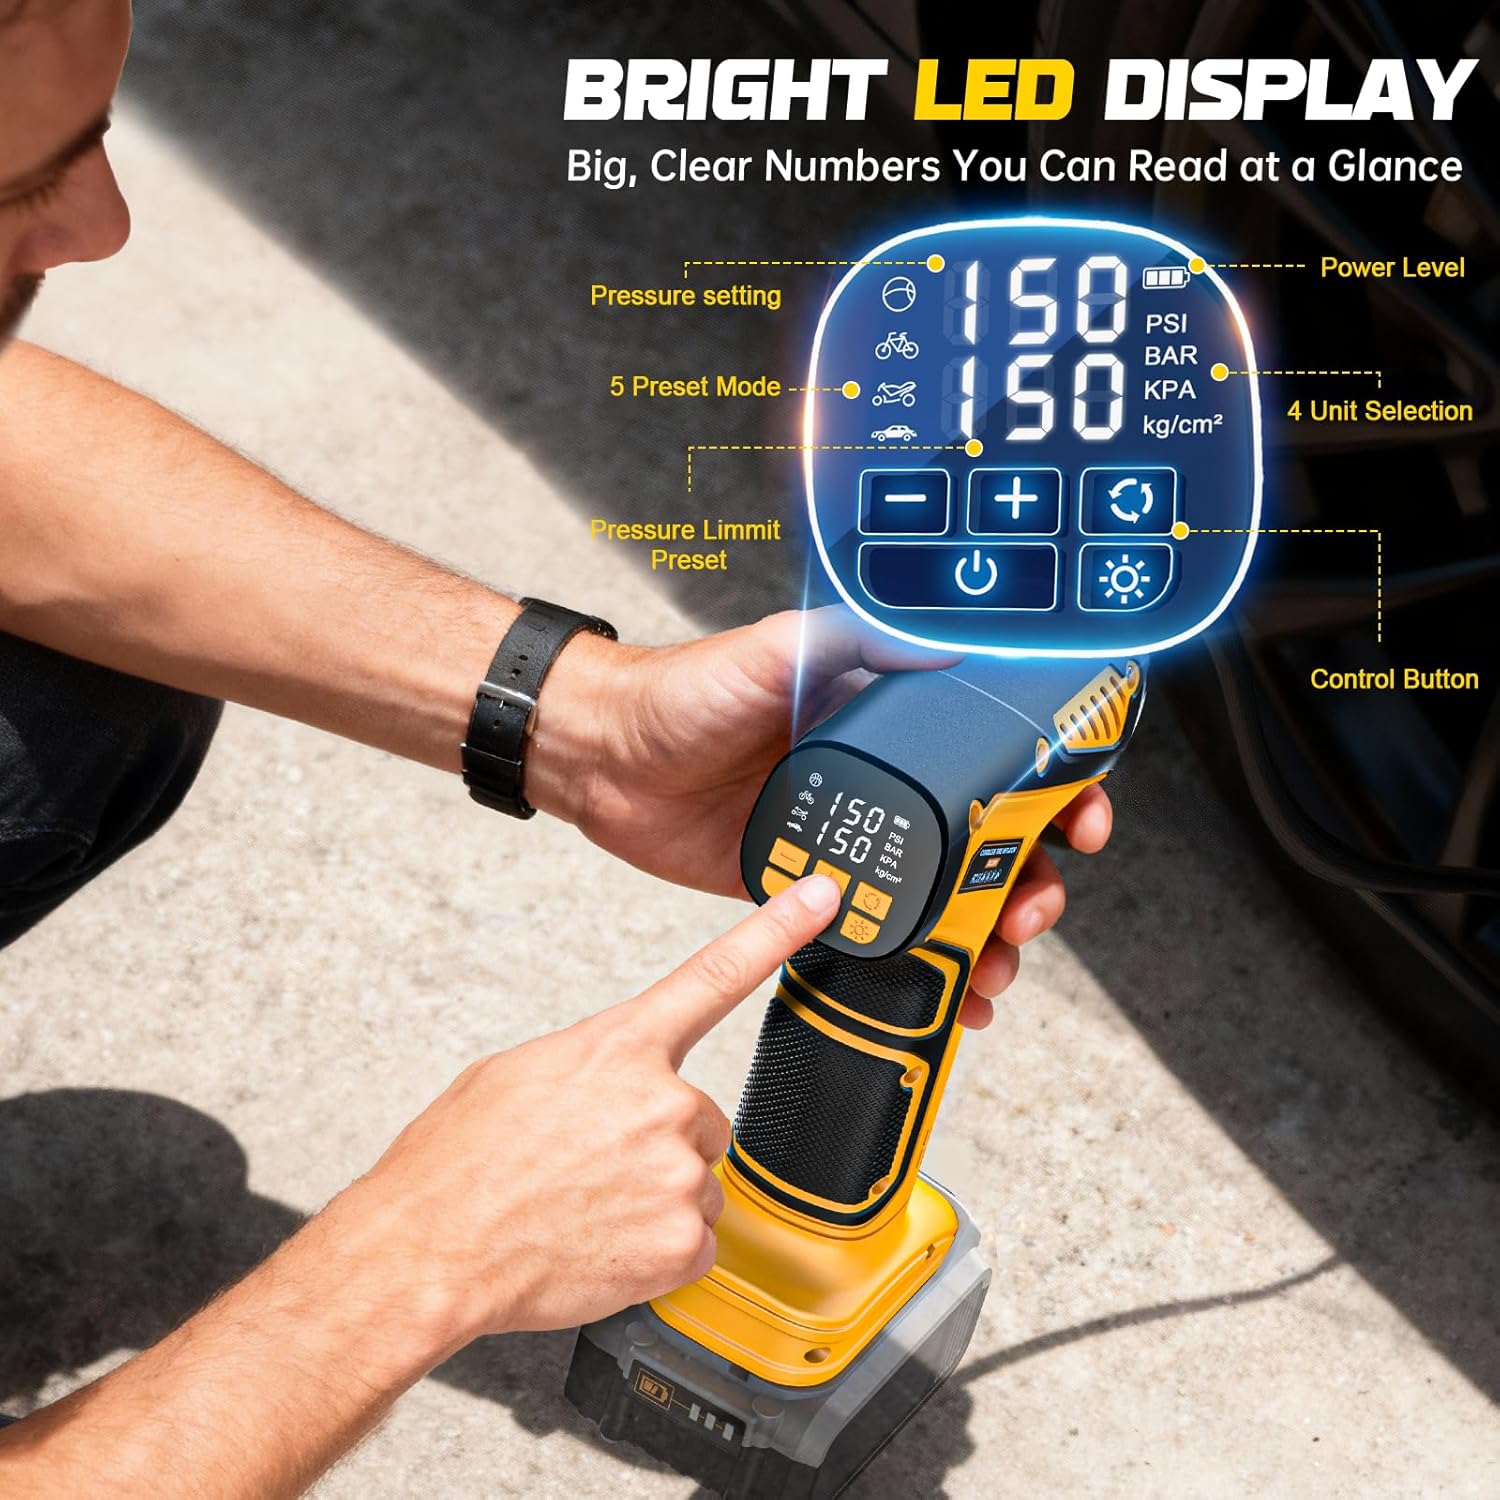
Image: The inflator's digital display, highlighting the pressure setting, 5 preset modes, power level, and 4 unit selection options (PSI, BAR, KPA, Kg/cm²).
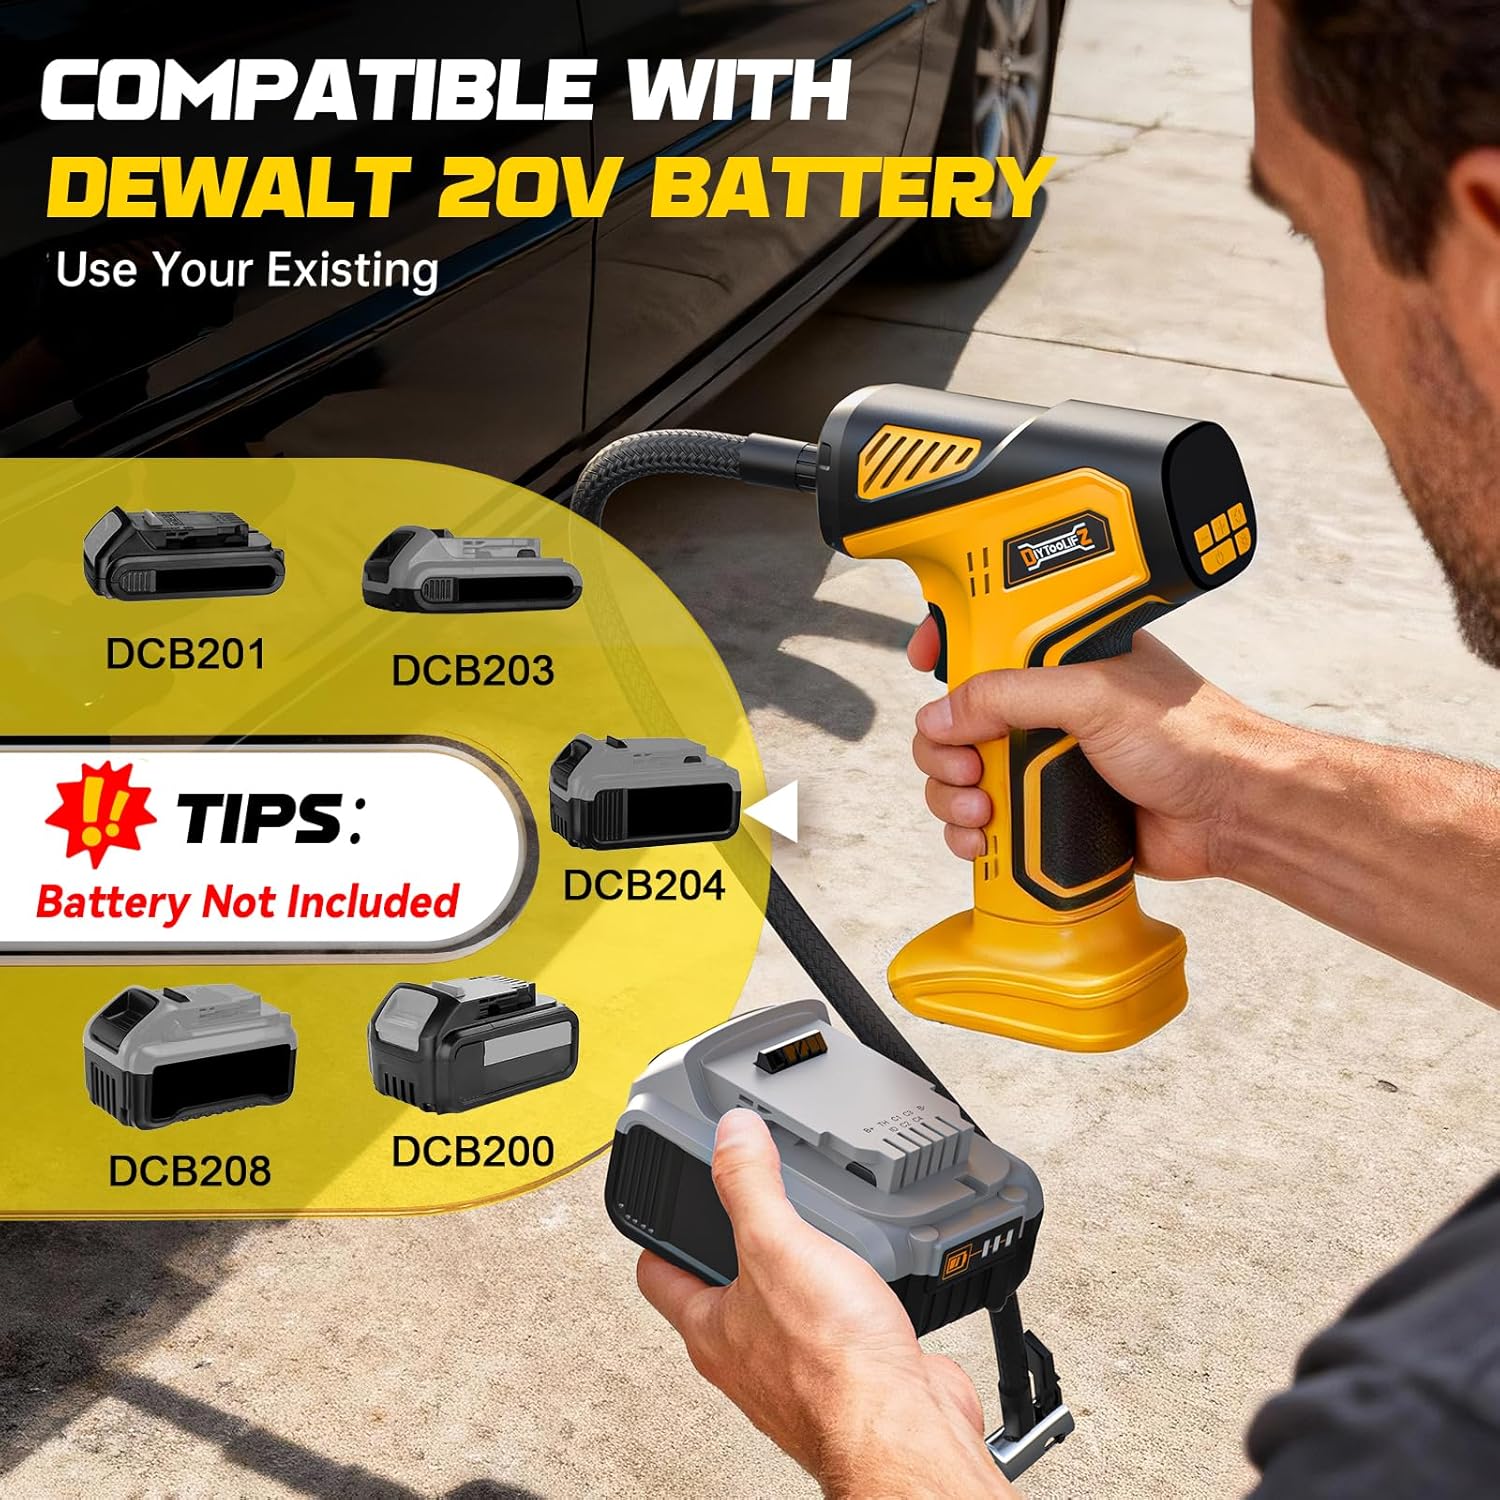
Image: The inflator shown with different Dewalt 20V battery models (DCB201, DCB203, DCB204, DCB208, DCB200), emphasizing that the battery is not included.
5. Настройка
5.1. Падключэнне акумулятара
Insert a charged Dewalt 18V/20V lithium-ion battery into the battery port at the base of the inflator until it clicks securely into place. Ensure the battery is fully seated.
5.2. Attaching the Air Hose and Nozzles
The main air hose is pre-attached. For specific inflation needs, select the appropriate nozzle from the included accessories:
- Schrader Valve (Pre-attached): For car, motorcycle, and most bicycle tires.
- French Valve Adapter (Presta): For bicycles with Presta valves. Screw onto the Schrader valve.
- Шаравая іголка: For sports balls. Screw onto the Schrader valve.
- Tapered Air Nozzle: For inflatable toys, air mattresses, etc. Push onto the Schrader valve.

Image: An illustration showing the different types of nozzles and adapters included, such as the car tire nozzle, French valve adapter, air nozzle, and ball needle, for various inflation applications.
6. Інструкцыя па эксплуатацыі
6.1. Уключэнне/выключэнне харчавання
Націсніце і ўтрымлівайце кнопку харчавання (⏻) for 3 seconds to turn the inflator ON. The LCD screen will illuminate. To turn OFF, press and hold the power button again.
6.2. Setting Desired Pressure and Units
Once powered on, the LCD will display the current pressure and the last set target pressure. Use the '+' and '-' buttons to adjust the target pressure. Press the unit button (АДЗІНКА) to cycle through pressure units: PSI, BAR, kPa, and Kg/cm².

Выява: Ясна view of the inflator's control panel with buttons for power, unit selection, and pressure adjustment, along with the digital display.
6.3. Selecting Inflation Modes
Націсніце кнопку рэжыму (РЭЖЫМ) to cycle through the 5 preset inflation modes:
- Рэжым аўтамабіля: Typically 20-80 PSI.
- Рэжым матацыкла: Typically 20-60 PSI.
- Рэжым ровара: Typically 20-145 PSI.
- Рэжым мяча: Typically 4-16 PSI.
- Карыстальніцкі рэжым: Adjustable from 0-150 PSI.

Image: Visual representation of the five inflation modes (Car, Motorcycle, Bicycle, Ball, Custom) and their respective pressure ranges.
6.4. Inflation Process (Automatic Shut-Off)
Connect the air hose securely to the item you wish to inflate. Once the desired pressure is set, press the start button (СТАРТ). The inflator will begin pumping and automatically stop when the target pressure is reached, preventing over-inflation.

Image: The inflator actively inflating a tire, with a graphic indicating the "Auto Stop" function when the preset pressure is achieved.
6.5. Using the 3-in-1 LED Light
Націсніце кнопку святла (💡) to activate the LED light. Cycle through the modes with successive presses:
- Bright White LED: For illuminating the work area.
- Steady Red Warning Light: For roadside visibility.
- Red SOS Strobe: Для аварыйнай сігналізацыі.

Image: The inflator's LED light in action, showing its three modes: a bright white light for illumination, a steady red warning light, and a flashing red SOS light for emergencies.
7. Тэхнічнае абслугоўванне
- Keep the inflator clean and free of dust and debris.
- Store the inflator and accessories in a dry place away from direct sunlight and extreme temperatures.
- Regularly check the air hose and nozzles for any signs of wear or damage. Replace if necessary.
- Пераканайцеся, што кантакты батарэі чыстыя.
8. Выпраўленне непаладак
| праблема | Магчымая прычына | Рашэнне |
|---|---|---|
| Інфлятар не ўключаецца. | Батарэя ўстаўлена няправільна або разраджана. | Пераканайцеся, што акумулятар цалкам усталяваны. Зарадзіце або заменіце акумулятар. |
| Нагнетальнік працуе, але паветра не выходзіць. | Air hose or nozzle not properly connected. | Праверце ўсе злучэнні на герметычнасць. |
| Няправільныя паказанні ціску. | Loose connection or faulty sensor. | Ensure hose is tightly connected. Contact customer support if issue persists. |
9. Тэхнічныя характарыстыкі
| Асаблівасць | Дэталь |
|---|---|
| Марка | DIYtoolifz |
| мадэль | 150 PSI Cordless Tire Inflator |
| Максімальны працоўны ціск | 150 PSI |
| тtage | 20 Volts (Compatible with Dewalt 18V/20V batteries) |
| Крыніца харчавання | Працуе ад батарэі (батарэя не ўваходзіць у камплект) |
| Узровень шуму | 58 дэцыбел |
| Памеры прадукту | 2.8 см Д х 5.6 см Ш х 8.1 см В |
| Вага прадмета | 1.54 фунта |
| Асаблівасці | Automatic Shut-Off, LED Light, Lightweight, Portable, Quick Inflation |
10. Гарантыя і падтрымка
For warranty information or technical support, please contact DIYtoolifz customer service at support@diytoolifz.com. Please provide your product model number and purchase date when contacting support.