Уводзіны
This manual provides detailed instructions for the installation, operation, and maintenance of your UYODM 10W Solar Panel, designed to provide continuous power to the Blink Outdoor 4 Floodlight Camera. Please read this manual thoroughly before use to ensure proper functionality and safety.
Прадукт скончаныview
Асноўныя характарыстыкі:
- Выходная магутнасць 10 Вт: Provides continuous power to prevent camera and floodlight from running out of battery, equivalent to three conventional 3W solar panels.
- Канструкцыя IP67 з устойлівым да ўздзеяння: Constructed from monocrystalline silicon and ABS Plastic, ensuring durability and resistance to water, dust, cold, and impact. Operates between 32°F to 122°F (0°C to 50°C).
- 16.5FT (5m) Long Cable: Offers flexible installation options, allowing optimal placement of the solar panel for maximum sunlight exposure.
- 360° Adjustable Mount: Features an aluminum alloy solid ball rotation design for precise positioning and angle adjustment.
Змест пакета:
- 1 x 10W Solar Panel (with 16.5ft/5m Cable)
- 1 x 360° Plastic Mount
- 1 x Set of Installation Screws & Wall Anchors
- 1 х кабельныя заціскі
- Note: Floodlight Camera is NOT included.
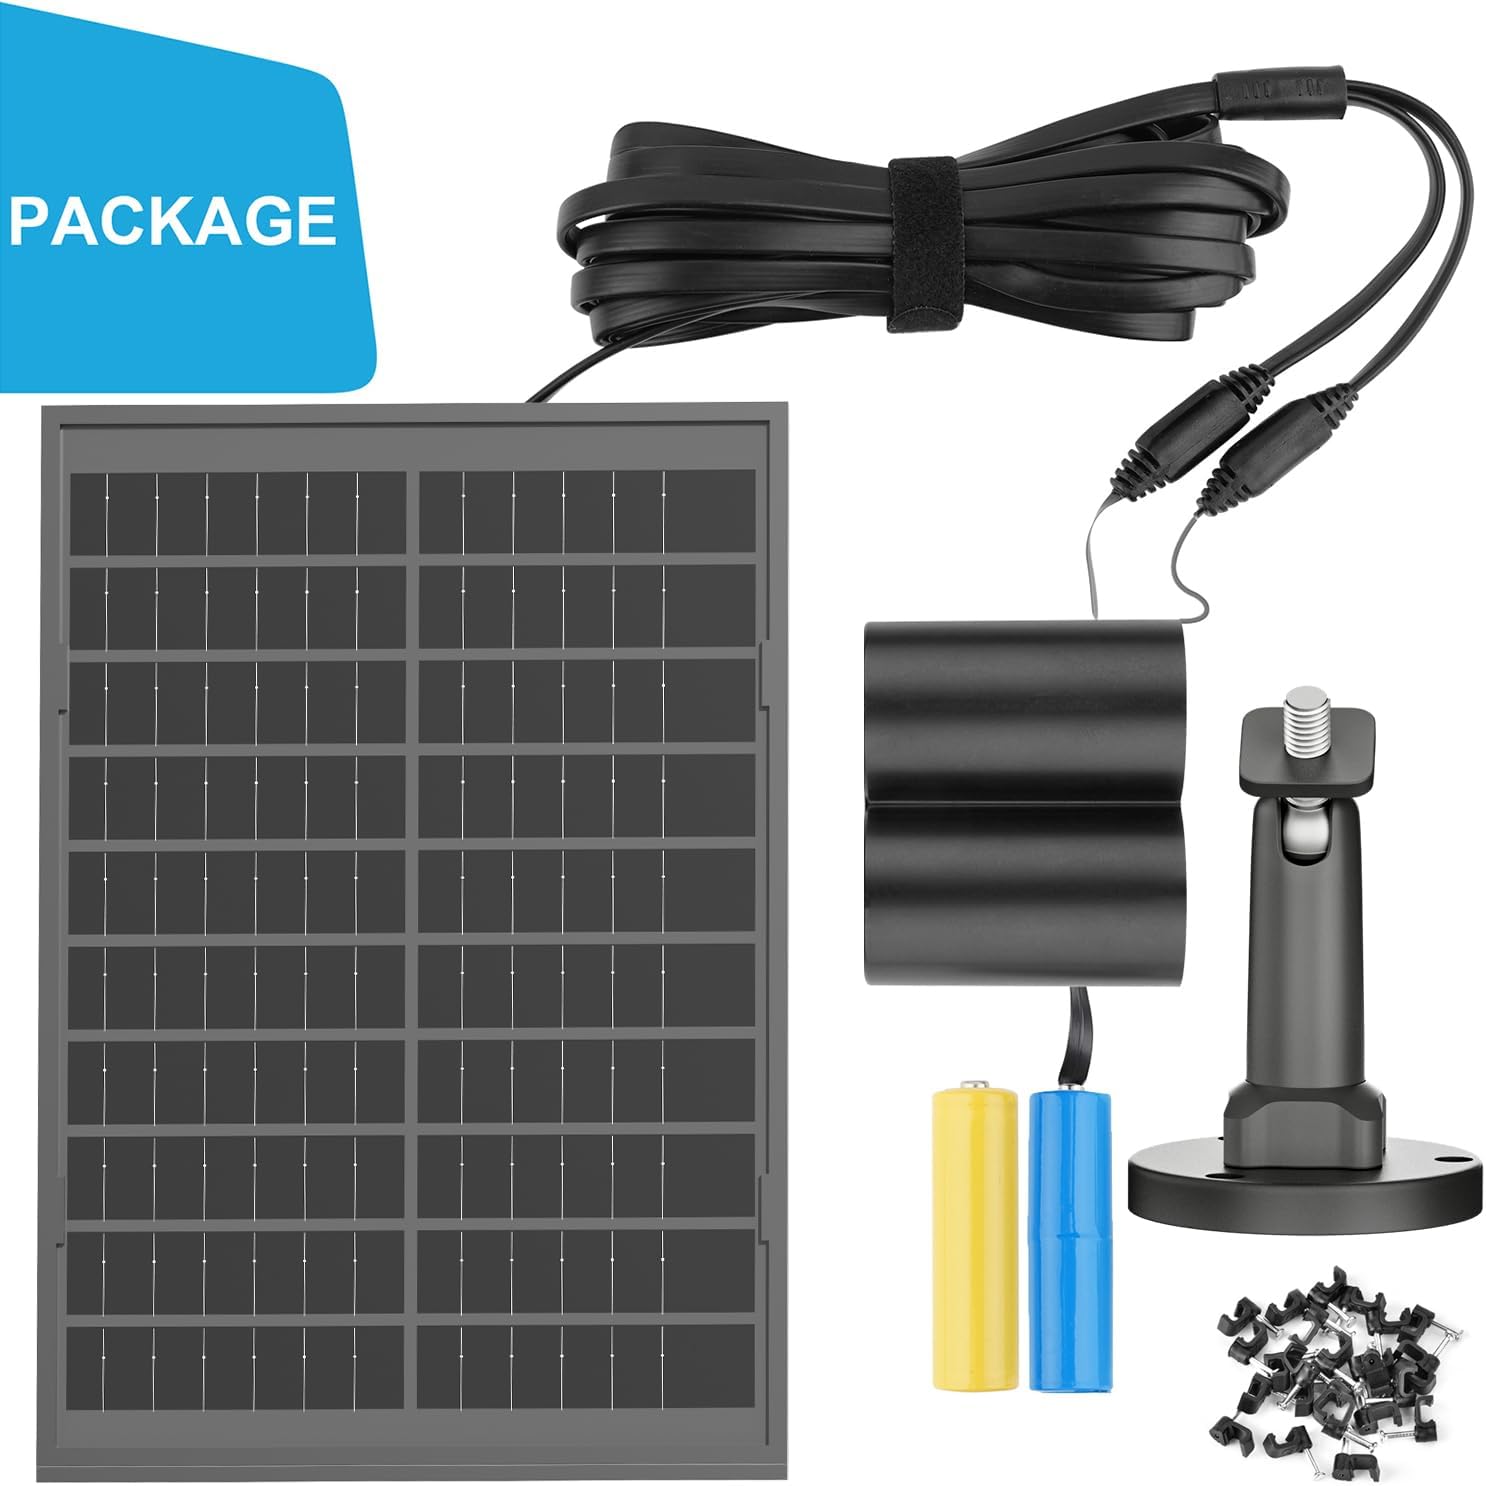
Figure 1: Included components of the UYODM 10W Solar Panel kit.
Інфармацыя па бяспецы
- Ensure all connections are secure and waterproof, especially in outdoor environments.
- Do not attempt to disassemble or modify the solar panel or its components.
- Keep the solar panel clean from debris, snow, or ice to maintain optimal performance.
- Install the solar panel in a location that receives maximum direct sunlight and is easily accessible for maintenance.
- Use appropriate safety gear (e.g., gloves, eye protection) during installation.
Настройка і ўстаноўка
1. Initial Charging (Recommended)
Before the first use, it is recommended to charge the internal batteries of your Blink Floodlight Camera for 12 hours to ensure optimal performance. This can be done using the camera's standard charging method.
Video 1: Demonstrates the initial charging process for the Blink Floodlight Camera batteries. (Relevant segment: 0:00-0:07)
2. Disarm Blink App Before Installation
Before proceeding with the physical installation, it is necessary to disarm your Blink camera system in the Blink App. This prevents potential issues with the floodlight camera's functionality during setup. After installation, you can restore the "Armed" status.
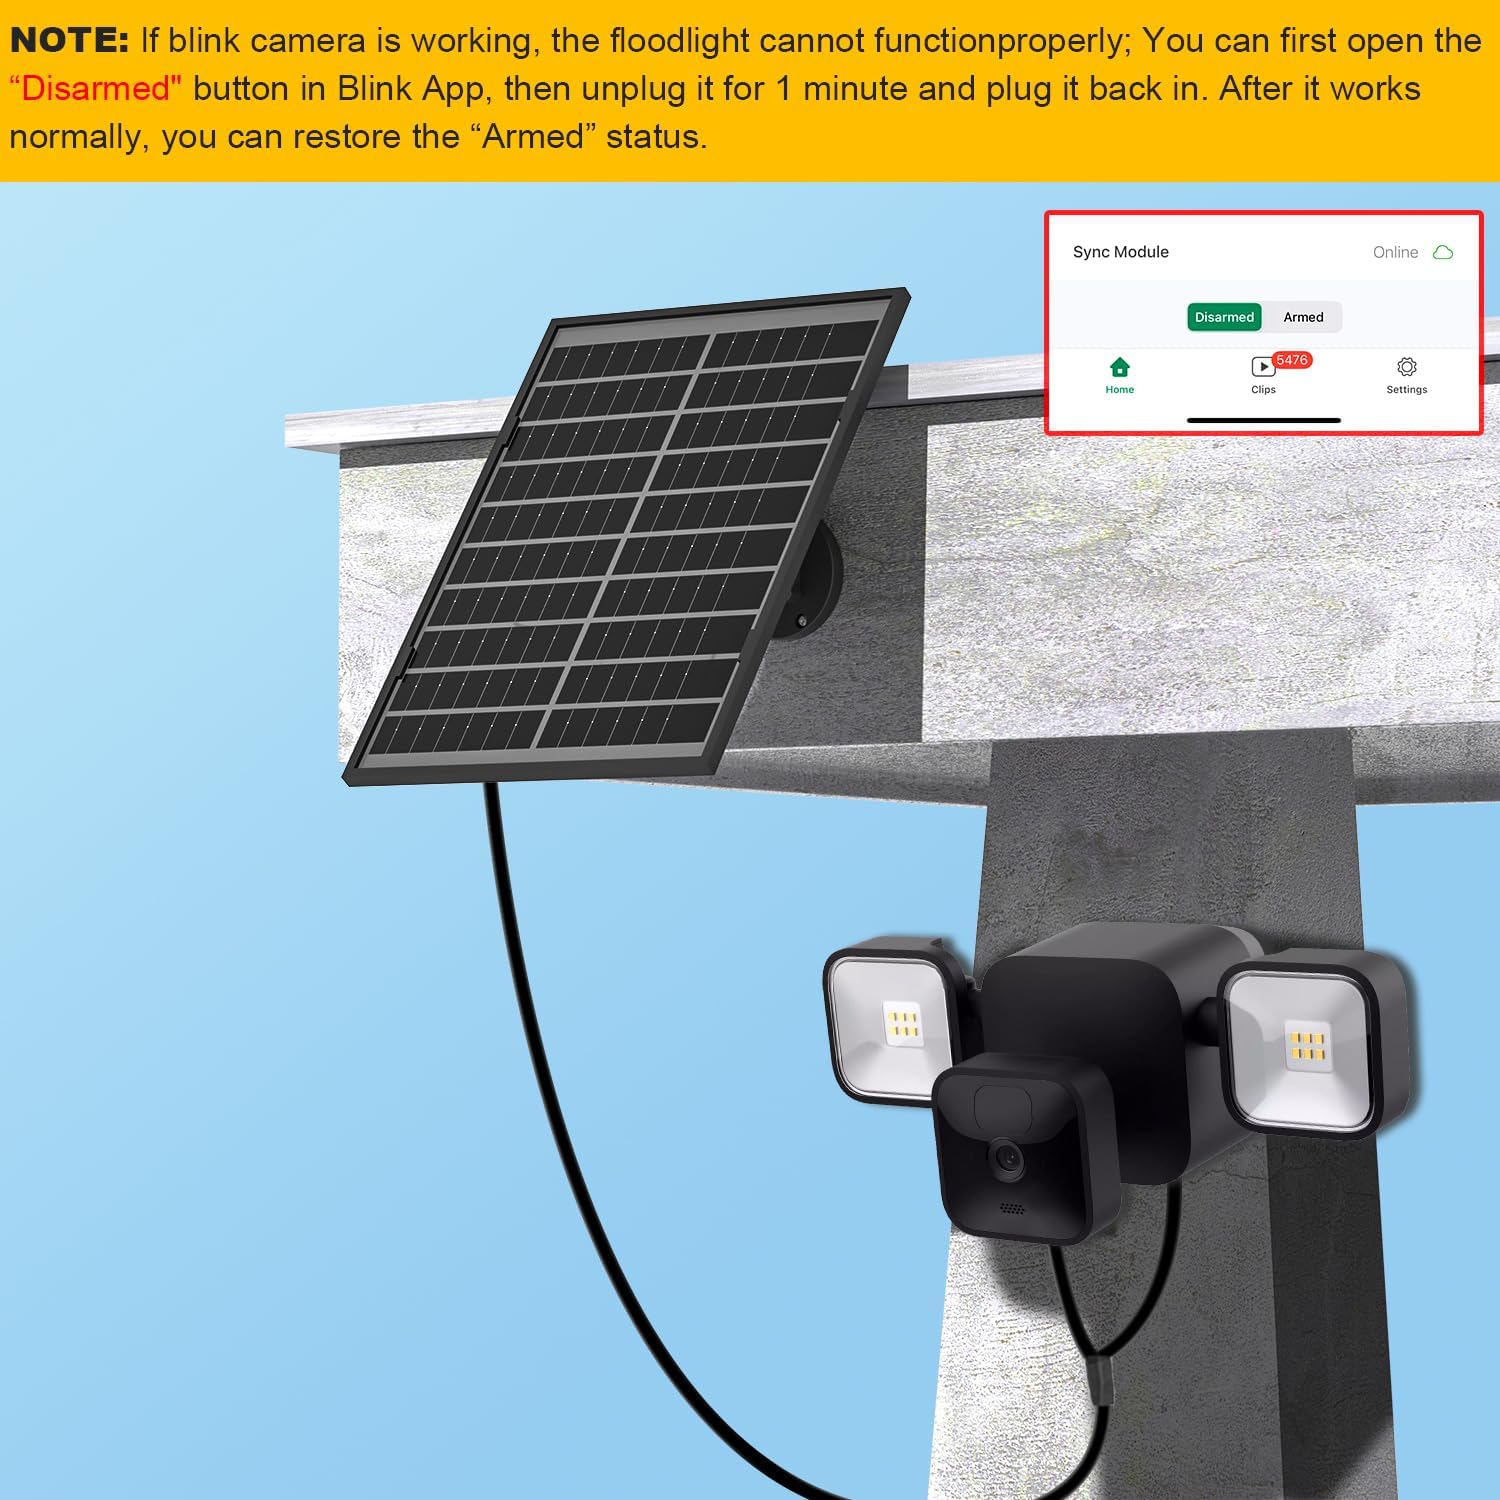
Figure 2: Screenshot of the Blink App showing the "Disarmed" button. Disarm before installation.
3. Assemble the Floodlight Camera and Solar Panel
- Open the battery compartment of your Blink Outdoor 4 camera.
- Устаўце батарэйкі, выконваючы палярнасць (+/-).
- Connect the solar panel's power cable to the camera's power input port.
- Securely close the camera's battery compartment cover.
- Attach the Blink camera to the floodlight housing.

Figure 3: Step-by-step guide for inserting batteries and connecting the solar panel cable to the Blink camera.
Video 2: Detailed assembly of the Blink Floodlight Camera and connection to the solar panel. (Relevant segment: 0:12-0:49)
4. Mount the Solar Panel
- Choose an installation location that receives maximum direct sunlight throughout the day.
- Mark the drilling points for the mounting bracket on the wall.
- Прасвідруйце адтуліны і пры неабходнасці ўстаўце анкеры.
- Замацуйце мантажны кранштэйн да сцяны з дапамогай прадугледжаных шруб.
- Attach the adjustable arm to the mounting bracket.
- Mount the solar panel onto the adjustable arm.
- Connect the solar panel cable to the floodlight camera.
- Adjust the solar panel's angle to optimize sunlight exposure using the 360° adjustable mount.
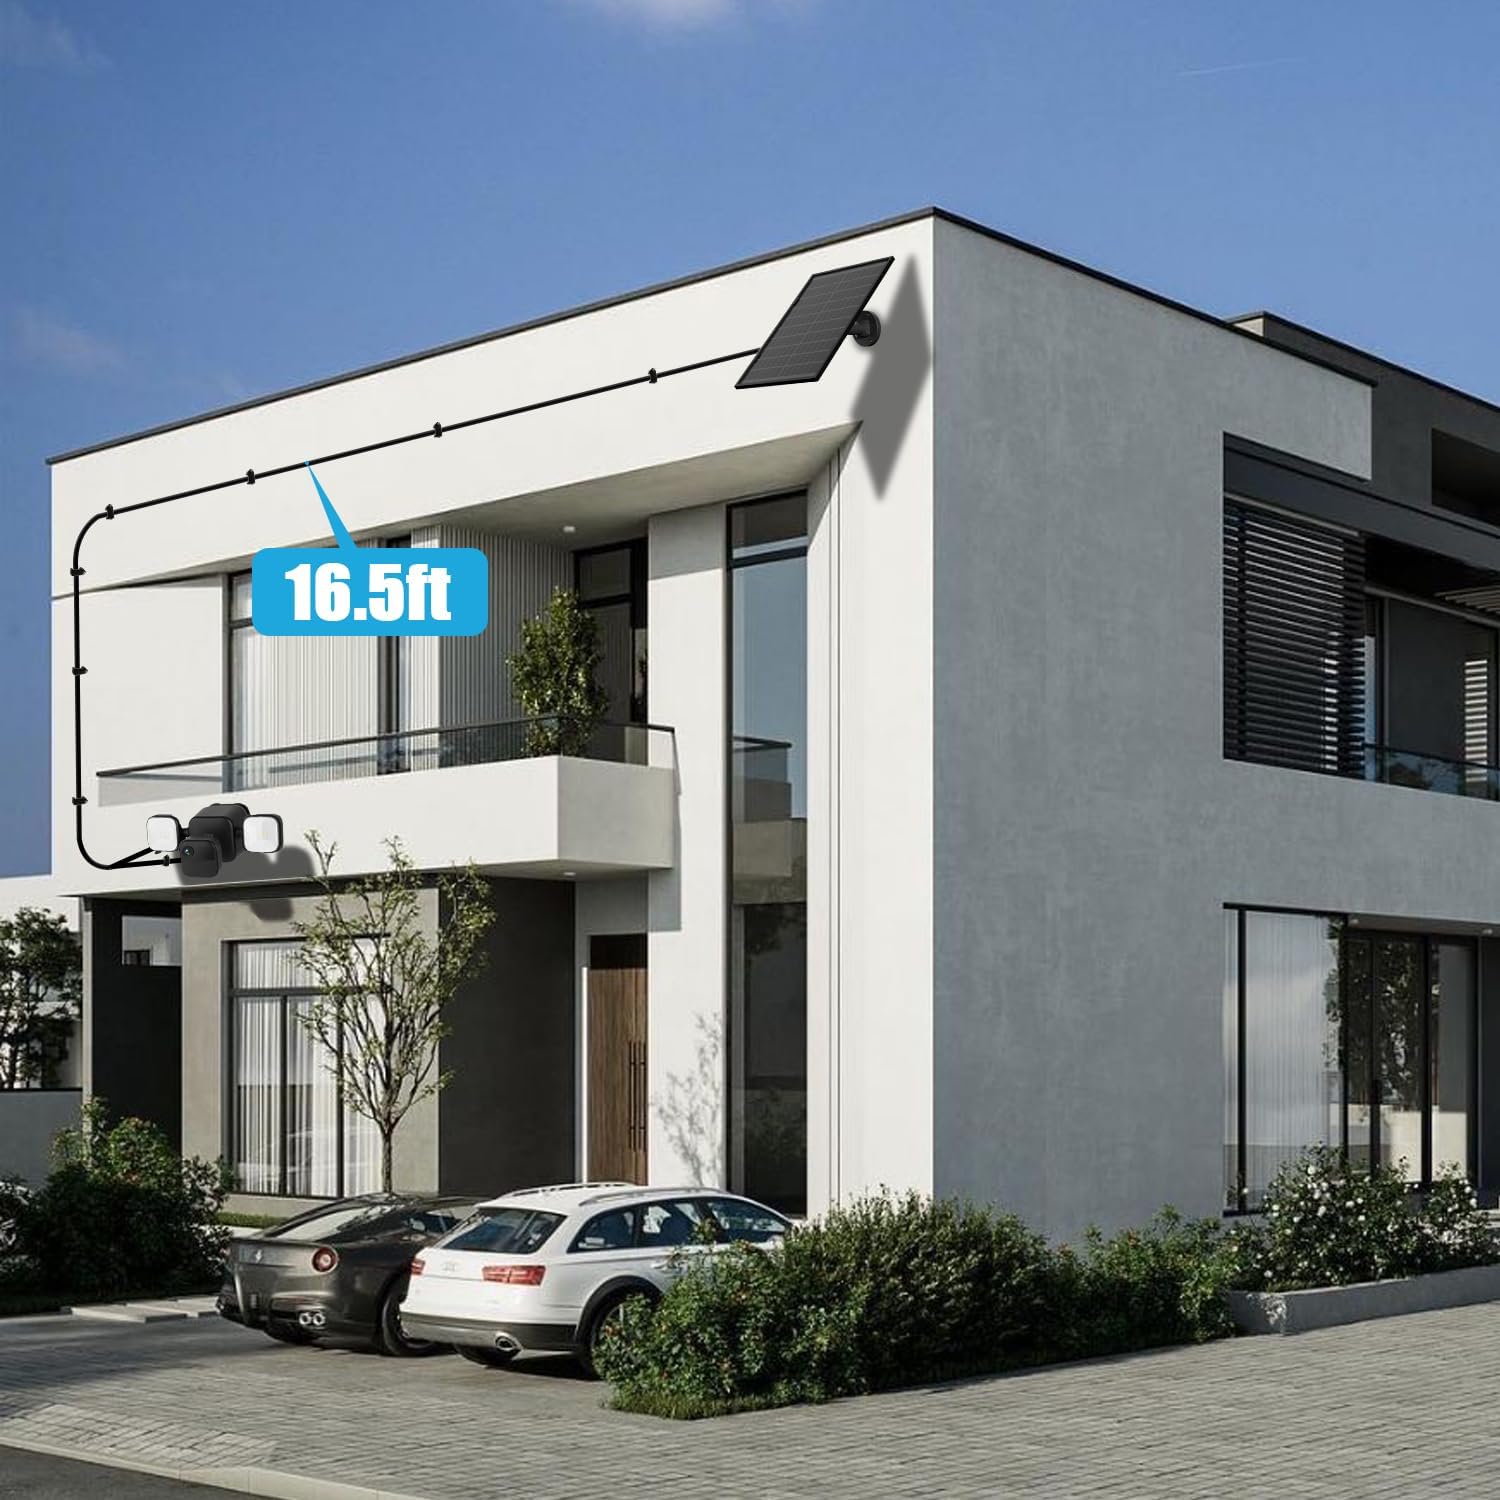
Figure 4: The UYODM 10W Solar Panel installed on an exterior wall, providing power to the Blink Floodlight Camera.

Figure 5: Illustration of the 360-degree adjustable mount, allowing flexible positioning of the solar panel.
Video 3: Step-by-step guide for mounting the solar panel and connecting it to the camera. (Relevant segment: 0:50-1:29)
Інструкцыя па эксплуатацыі
Once installed and connected, the UYODM 10W Solar Panel will automatically begin charging the batteries of your Blink Outdoor 4 Floodlight Camera when exposed to sunlight. The 10W output ensures efficient charging, providing continuous power for 365 days, even during prolonged cloudy or rainy weather conditions.
Monitor the battery status of your Blink camera through the Blink App to confirm continuous charging.
Тэхнічнае абслугоўванне
- Уборка: Перыядычна чысціце паверхню сонечнай панэлі мяккай губкайamp cloth to remove dust, dirt, or debris that may reduce efficiency. Avoid abrasive cleaners.
- Праверка злучэння: Regularly inspect the cable connections to ensure they remain secure and free from damage.
- Аптымальнае размяшчэнне: Verify that the solar panel's angle is still optimized for maximum sunlight exposure, especially after seasonal changes.
- Умовы навакольнага асяроддзя: The IP67 rating ensures protection against water and dust, but extreme weather conditions (e.g., heavy snowfall, severe storms) may temporarily affect performance.
Ліквідацыю непаладак
| праблема | Магчымая прычына | Рашэнне |
|---|---|---|
| Blink camera/floodlight not functioning properly after solar panel connection. | The Blink camera might be in an "Armed" state during connection, causing conflict with floodlight functionality. | First, open the Blink App and select the "Disarmed" button. Then, unplug the camera for 1 minute and plug it back in. Once it works normally, you can restore the "Armed" status. |
| Insufficient charging or camera battery draining quickly. | Insufficient sunlight exposure, dirty solar panel, or loose connection. | Ensure the solar panel is positioned for maximum direct sunlight. Clean the solar panel surface. Check all cable connections for security. Verify the operating temperature is within 32°F to 122°F (0°C to 50°C). |
| Solar panel not securely mounted. | Improper installation of the mounting bracket or arm. | Re-check the mounting steps, ensuring screws are tightened and the adjustable arm is firmly secured to the bracket and solar panel. |
Тэхнічныя характарыстыкі
| Спецыфікацыя | Дэталь |
|---|---|
| Марка | УЮОДМ |
| Нумар мадэлі | UY0207B |
| Вага прадмета | 2.2 фунта |
| Памеры прадукту | 1 х 1 х 1 цалі (Note: This dimension may refer to packaging or a component, actual panel dimensions are larger) |
| стыль | 10 Вт |
| Матэрыял | Plastic (Monocrystalline silicon for panel) |
| Даўжыня кабеля | 16.5 футаў / 5 м |
| Рэйтынг воданепранікальнасці | IP67 |
| Працоўная тэмпература | Ад 32°F да 122°F (ад 0°C да 50°C) |
Гарантыя і падтрымка
For warranty information or technical support, please refer to the product packaging or contact UYODM customer service directly. Contact details can typically be found on the manufacturer's official webсайт або праз вашу платформу для пакупак.