1. Важныя інструкцыі па бяспецы
Please read all instructions before using this sewing machine. This machine is intended for household use only.
DANGER - To reduce the risk of electric shock:
- Ні ў якім разе нельга пакідаць прыбор без нагляду, уключаны ў сетку.
- Заўсёды адключайце прыбор ад электрычнай разеткі адразу пасля выкарыстання і перад чысткай.
- Заўсёды адключайце вілку перад паўторным уключэннемampінж. Заменіце лямпачку таго ж тыпу магутнасцю 15 Вт (вобласць 110-120 В) або 15 Вт (вобласць 220-240 В).
WARNING - To reduce the risk of burns, fire, electric shock, or injury to persons:
- Не дазваляйце выкарыстоўваць у якасці цацкі. Неабходная пільная ўвага, калі гэты прыбор выкарыстоўваецца дзецьмі або побач з імі.
- Выкарыстоўвайце гэты прыбор толькі па прызначэнні, як апісана ў гэтай інструкцыі. Выкарыстоўвайце толькі насадкі, рэкамендаваныя вытворцам, якія змяшчаюцца ў гэтым кіраўніцтве.
- Ні ў якім разе не выкарыстоўвайце гэты прыбор, калі ў яго пашкоджаны шнур або вілка, калі ён не працуе належным чынам, калі ён упаў, быў пашкоджаны або ўпаў у ваду. Вярніце прыбор бліжэйшаму ўпаўнаважанаму дылеру або ў сэрвісны цэнтр для праверкі, рамонту, электрычнай або механічнай рэгулявання.
- Ніколі не выкарыстоўвайце прыбор з заблакаванымі паветранымі адтулінамі. Захоўвайце вентыляцыйныя адтуліны швейнай машыны і ножнага пульта ад назапашвання ворса, пылу і свабоднай тканіны.
- Трымайце пальцы далей ад усіх рухомых частак. Патрэбна асаблівая асцярожнасць вакол іголкі швейнай машынкі.
- Заўсёды выкарыстоўвайце адпаведную ігольную пласціну. Няправільная пласціна можа прывесці да паломкі іголкі.
- Не выкарыстоўвайце сагнутыя іголкі.
- Не цягніце і не штурхайце тканіну падчас шыцця. Гэта можа адхіліць іголку, у выніку чаго яна зламаецца.
- Always unplug sewing machine off ("O") when making any adjustments in the needle area, such as threading needle, changing needle, threading bobbin, or changing presser foot, and the like.
- Заўсёды адключайце швейную машыну ад электрычнай разеткі пры зняцці вечкаў, змазцы альбо пры выкананні любых іншых налад, якія тычацца карыстальнікаў, згаданых у інструкцыі па эксплуатацыі.
- Ніколі не кідайце і не ўстаўляйце прадметы ў адтуліны.
- Не выкарыстоўвайце на адкрытым паветры.
- Не дзейнічайце там, дзе выкарыстоўваюцца аэразольныя аэразольныя сродкі альбо там, дзе ўводзяць кісларод.
- Каб адключыць прыладу, павярніце ўсе элементы кіравання ў становішча «Выкл.» («O»), а затым выміце вілку з разеткі.
- Не адключайце вілку, цягнучы за шнур. Каб адключыць вілку, вазьміцеся за вілку, а не за шнур.
- Узровень гукавога ціску пры нармальных умовах працы складае 75 дБ(А).
- Always turn off the machine or unplug when the machine is not operating properly.
- Ніколі нічога не кладзіце на педаль кіравання.
- If the supply cord to the foot controller is damaged, it must be replaced by the manufacturer or its service agent or a similar qualified person in order to avoid a hazard.
- Гэты прыбор не прызначаны для выкарыстання асобамі (уключаючы дзяцей) з абмежаванымі фізічнымі, сэнсарнымі або разумовымі здольнасцямі або з адсутнасцю вопыту і ведаў, за выключэннем выпадкаў, калі яны знаходзяцца пад наглядам або праінструктаваныя адносна выкарыстання прыбора асобай, адказнай за іх бяспеку.
- За дзецьмі трэба сачыць, каб яны не гулялі з прыборам.
ЗАХАВАЙЦЕ ГЭТЫЯ ІНСТРУКЦЫІ
Image: Important Safety Instructions page from the Singer 2250 manual, detailing electrical and general safety warnings.
2. Настройка
2.1 Аксэсуары
The Singer 2250 sewing machine comes with a set of standard accessories and supports various optional accessories for different sewing tasks.
- Стандартныя аксэсуары: All purpose foot, Button sewing foot, Zipper foot, Screwdriver, Seam ripper/brush, Pack of needles, Bobbin (3), Darning plate, Spool holder.
- Optional Accessories (not supplied with machine, available from SINGER® retailers): Edge/quilting guide, Zipper foot, Straight stitch foot, Overcasting foot, Hemmer foot, Blind hem foot, Satin stitch foot, Cording/embroidery foot, Second spool pin, Spool pin felt.
2.2 Намотка шпулькі
- Place thread and corresponding spool holder onto the spool pin.
- Snap the thread into the thread guide.
- Wind the thread counterclockwise around the bobbin winder tension disc.
- Thread the bobbin as illustrated and place it on the spindle.
- Push the bobbin spindle to the right.
- Hold the thread end.
- Step on the foot control pedal to begin winding.
- Cut the thread once the bobbin is full.
- Push the bobbin spindle to the left and remove the wound bobbin.
Звярніце ўвагу: When the bobbin winder spindle is in the "bobbin winding" position, the machine will not sew and the hand wheel will not turn. To start sewing, push the bobbin winder spindle to the left (sewing position).

Image: Manual page illustrating standard and optional accessories, and a step-by-step guide for winding the bobbin.
2.3 Падключэнне да крыніцы харчавання
Ensure the machine's power switch is in the "O" (off) position. Insert the machine plug into the electrical outlet. Always use a grounded outlet.
2.4 Raising the Presser Foot Lifter
The presser foot lifter is located at the back of the needle bar area. Lift it to raise the presser foot for placing fabric, and lower it to hold the fabric in place for sewing.
3. Аперацыя
3.1 Choosing Your Pattern
The Singer 2250 features a Pattern Selector Dial to choose various stitch patterns.
- Stitches indicated in black on the diagram correspond to the Pattern Selector Dial.
- For patterns indicated with the "S" color, turn the Pattern Selector Dial to "S", then use the Stitch Length Dial to adjust the desired stitch length.
- The Pattern Selector Dial can be turned in either direction.
3.2 Stitch Length Dial
The Stitch Length Dial controls the length of straight stitches and the density of zig-zag stitches.
- For Straight Stitching: Turn the Pattern Selector Dial to the straight stitch symbol. The stitch length increases as the dial approaches "4". Use longer stitches for heavier fabrics and thicker needles, shorter stitches for lighter fabrics and finer needles.
- For Zig-Zag Stitching: Turn the Pattern Selector Dial to "~~~ ". The density of zig-zag stitches increases as the setting of the stitch length dial approaches "0". Dense zig-zag stitches are known as satin stitches.

Image: Manual page detailing how to choose stitch patterns and adjust stitch length for various sewing applications.
3.3 Запраўка ніткі ў машыну
Proper threading is crucial for smooth sewing. Follow these general steps:
- Надзеньце шпульку нітак на штыфт.
- Guide the thread through the upper thread guides.
- Прапусціце нітку праз дыскі нацяжэння.
- Правядзіце нітку ўверх праз рычаг ніткапрыцягвальніка.
- Guide the thread down through the needle bar thread guide.
- Запраўце нітку ў іголку спераду назад.
- Raise the bobbin thread by turning the handwheel towards you, catching the bobbin thread with the needle thread.
- Pull both threads under the presser foot and towards the back.
3.4 Sewing on Buttons
To sew buttons using your Singer 2250:
- Усталюйце штопальную пласціну.
- Change the all-purpose foot to the button sewing tool.
- Position the fabric and button under the foot.
- Lower the button to the desired position and lower the foot.
- Set the Pattern Selector Dial on "---" and sew a few securing stitches.
- Select one of the two narrow zig-zag patterns (between 0.5 and 1.5) and sew through both holes of the button. Turn the handwheel to check needle clearance.
- Slowly sew the button with about 10 stitches.
- Select pattern "---" again and sew a few securing stitches.
- If a shank is required, place a darning needle on top of the button and sew.
- For buttons with 4 holes, sew through the front two holes first, then sew backwards and then sew through the back two holes.
3.5 Installing the Removable Extension Table
The removable extension table provides a larger work surface and also serves as an accessory box.
- Каб усталяваць: Hold the removable extension table horizontally and push it in the direction of the arrow until it clicks into place.
- Каб выдаліць: Pull the extension table towards the left.
- The inside of the removable extension table can be used as an accessory box. To open, flip the cover down.
4. Тэхнічнае абслугоўванне
4.1 Darning Plate
The darning plate is used for specific tasks like darning or free-hand embroidery.
- Ўстаноўка: Install the darning plate as illustrated in the manual.
- Выдаленне: Для звычайнага шыцця зніміце штопальную пласціну.
- For free-motion sewing, a darning/embroidery foot (optional accessory) is recommended.
4.2 Inserting & Changing Needles
Regularly change your needle, especially if sewing problems occur. Use SINGER® Brand Needles for best results.
- Turn the power switch to off ("O").
- Паслабце іголку клamp шруба.
- Insert the new needle with the flat side of the shaft facing the back, pushing it up as far as it will go.
- Зацягнуць іголку клamp шруба.
Увага: Needles must be in perfect condition. Problems can occur with bent needles, damaged points, or blunt needles.
4.3 Changing the Bulb
To change the light bulb, ensure the machine is unplugged. Replace the bulb with the same type rated 15 watts (110-120V area) or 15 watts (220-240V area).
4.4 Ачыстка
Regularly clean the lint and dust from the bobbin case area and feed dogs using the provided brush. Ensure the machine is unplugged before cleaning.
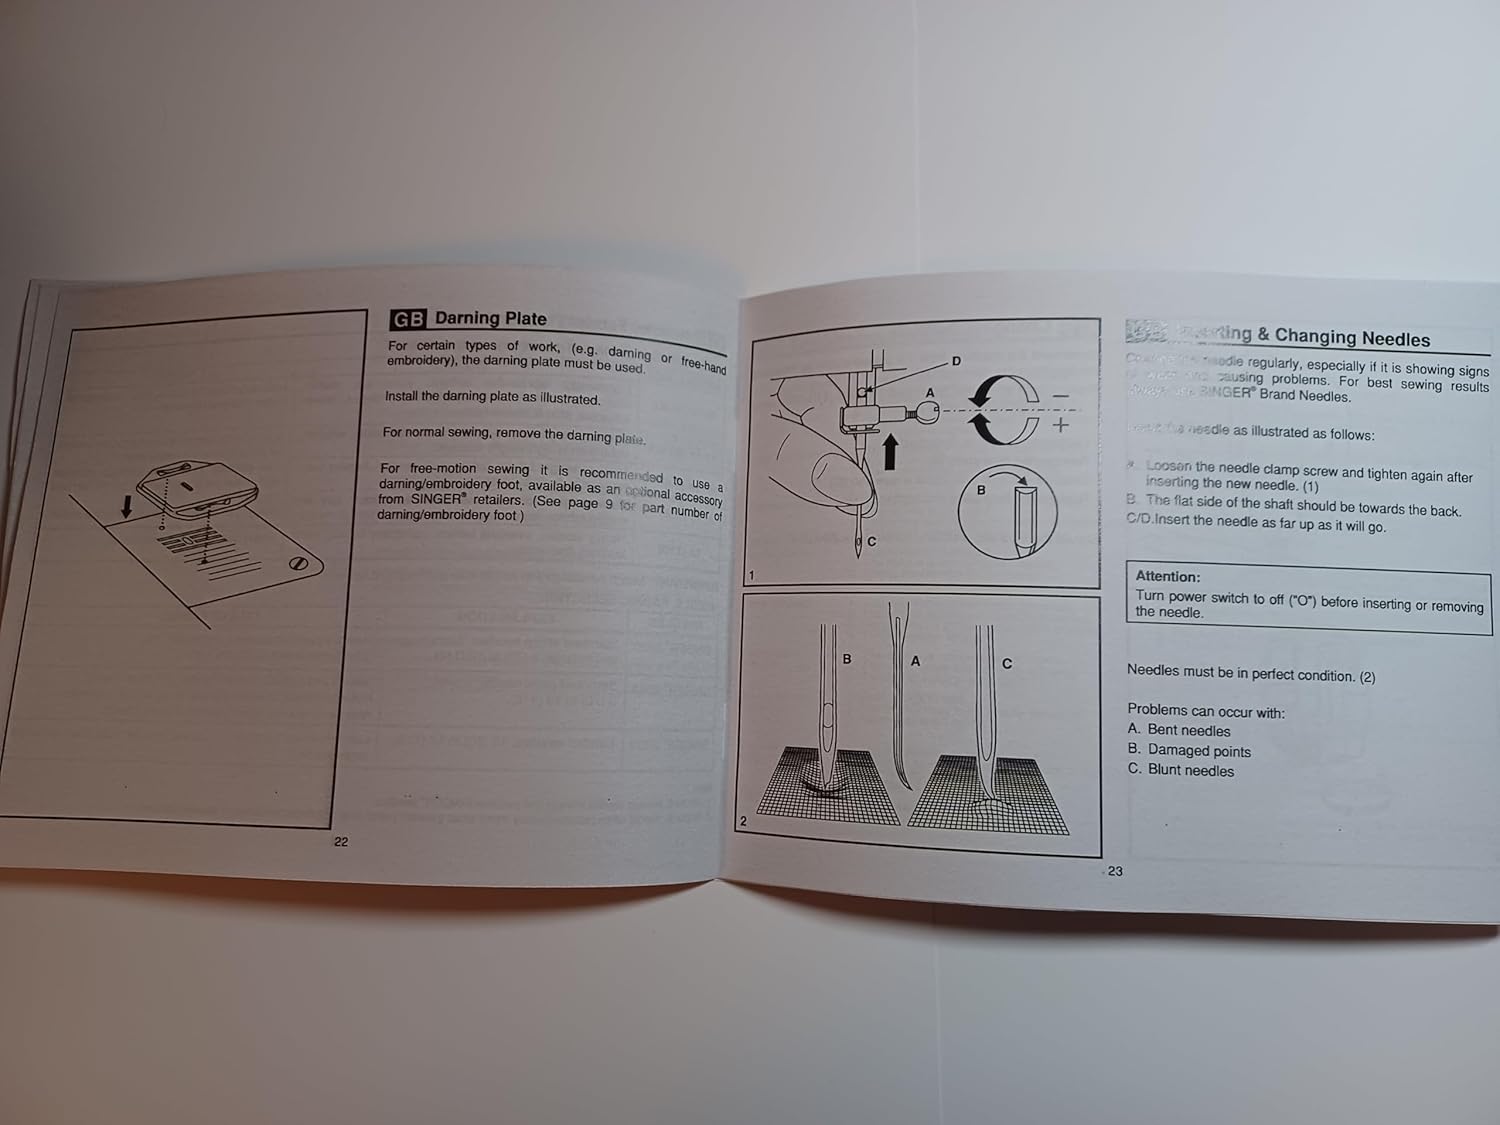
Image: Manual page illustrating procedures for sewing on buttons, installing the extension table, using the darning plate, and changing needles.
5. Выпраўленне непаладак
If you encounter issues with your Singer 2250, refer to the following common problems and solutions:
- Прапушчаныя швы: Ensure the needle is inserted correctly, not bent, and is the appropriate size for the fabric and thread. Re-thread the machine.
- Разрыў ніткі: Check for correct threading, proper tension, a bent or blunt needle, or burrs on the needle plate or bobbin case.
- Зморшчванне тканіны: Adjust tension settings, use the correct needle size, or ensure the presser foot pressure is appropriate for the fabric.
- Machine Not Feeding Fabric: Check if the feed dogs are raised. Ensure the presser foot is lowered.
- Шумная праца: Clean and lubricate the machine as per maintenance instructions. Check for loose parts or a bent needle.
For persistent problems, contact an authorized Singer service center.
6. Тэхнічныя характарыстыкі
| Памеры прадукту | 8.5 х 5.5 х 0.1 цалі |
| Вага прадмета | 3 унцыі |
| Нумар мадэлі | SINGER 2250 Manual |
| Вытворца | TabSynth Design (for reproduction manual) |
| ASIN | B0G19M5M63 |
7. Гарантыя і падтрымка
This instruction manual is a reproduction for the Singer 2250 Sewing Machine. For warranty information regarding your Singer 2250 sewing machine, please refer to the original documentation provided with your machine or contact Singer customer support directly.
For support related to the operation or maintenance of your Singer 2250, please consult this manual. If further assistance is needed, contact an authorized Singer service center or your local Singer dealer.