
1. Уводзіны
Thank you for choosing the SIHOO B300-PRO Ergonomic Office Chair. This chair is designed to provide superior comfort and support for extended periods of sitting, whether for work, gaming, or relaxation. Featuring advanced ergonomic adjustments such as 6D armrests, multi-directional lumbar support, and a breathable mesh design, the B300-PRO adapts to your body's movements and posture. This manual will guide you through the assembly, operation, and maintenance of your new chair to ensure you get the most out of its features.
2. Інфармацыя па бяспецы
- Always ensure all bolts and screws are securely tightened before using the chair.
- Не стойце на крэсле. Выкарыстоўвайце яго толькі для сядзення.
- Не перавышайце максімальную грузападымальнасць (гл. характарыстыкі).
- Keep children away from moving parts during adjustment to prevent injury.
- Avoid placing heavy objects on the armrests or backrest when not seated.
- Выкарыстоўвайце крэсла на роўнай, устойлівай паверхні, каб пазбегнуць перакульвання.
- Regularly inspect the chair for any loose parts or damage. Discontinue use if any damage is found.
3. Інструкцыя па зборцы
The SIHOO B300-PRO chair requires assembly. Please follow these instructions carefully. It is recommended to assemble the chair in a spacious area, and due to the weight of some components, having a second person assist may be beneficial. All necessary tools are included.
- Распакуйце кампаненты: Carefully remove all parts from the packaging. Verify that all components listed in the parts list are present.
- Прымацуйце колы да асновы: Устаўце колы ў адтуліны на аснове крэсла, пакуль яны не зафіксуюцца са шчоўкам.
- Устаўце газавы ліфт: Устаўце цыліндр газавага пад'ёмніка ў цэнтральную адтуліну асновы крэсла.
- Зборка механізму сядзення: Прымацуйце механізм сядзення да ніжняй часткі падушкі сядзення з дапамогай прадугледжаных шруб. Пераканайцеся, што пярэдняя частка механізму супадае з пярэдняй часткай сядзення.
- Прымацаваць падлакотнікі: Secure the armrests to the seat assembly using the designated screws.
- Прымацаваць спінку: Connect the backrest to the seat assembly. Ensure the lumbar support mechanism is correctly aligned.
- Прымацаваць падгалоўнік: Устаўце падгалоўнік у прызначаны для яго слот у верхняй частцы спінкі.
- Падлучыце сядзенне да газавага пад'ёмніка: Акуратна ўстаўце сабранае сядзенне на цыліндр газавага пад'ёмніка.
- Канчатковая праверка: Ensure all screws are tightened and all parts are securely connected before use.
Note: The assembly process typically takes around 30 minutes. Gloves are provided to protect your hands during assembly.
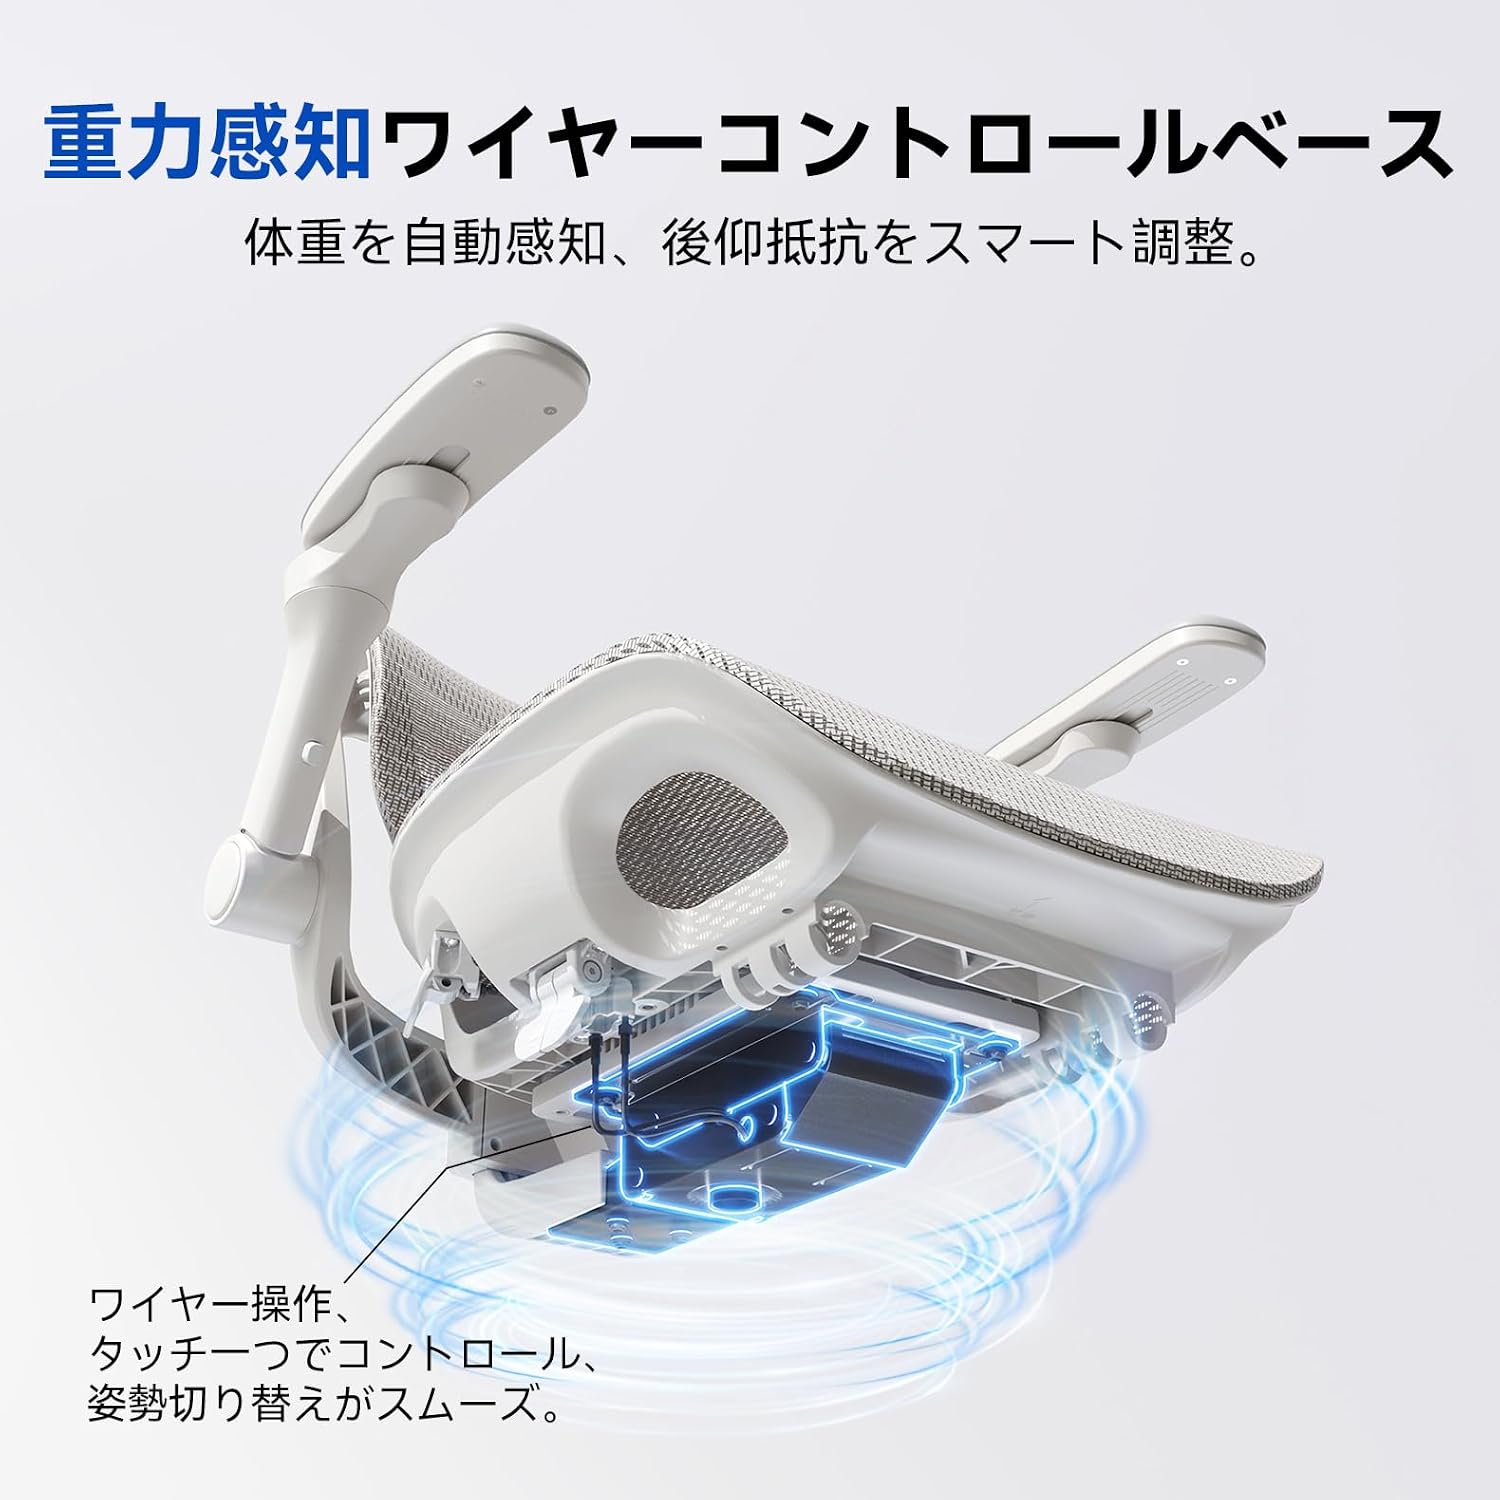
Image: All components of the SIHOO B300-PRO chair laid out for assembly, including the base, casters, gas lift, seat, backrest, armrests, and headrest.
4. Інструкцыя па эксплуатацыі
Your SIHOO B300-PRO chair offers multiple adjustment options for personalized comfort. All primary adjustments are conveniently located under the seat.
4.1. Рэгуляванне вышыні сядзення
- To raise the seat: While standing, pull the right lever (typically) upwards. The seat will rise automatically. Release the lever at the desired height.
- To lower the seat: While seated, pull the right lever upwards. The seat will lower. Release the lever at the desired height.
- The chair features a 5-stage height adjustment mechanism.
4.2. Recline Function and Lock
- To recline: Pull the left lever (typically) outwards to unlock the backrest. Lean back to the desired angle.
- To lock recline: Push the left lever inwards to lock the backrest at one of the three preset angles: 110°, 123°, or 135°.
- The smart mechanism automatically adjusts recline resistance based on your body weight.

Image: The gravity-sensing wire control base located under the seat, illustrating how a single touch controls height and recline, ensuring smooth posture changes.
4.3. Рэгуляванне падлакотнікаў у 6D
The 6D armrests offer extensive customization to support various postures and activities:
- Up/Down (4.5cm): Press the button on the side of the armrest and slide it vertically.
- Front/Back (4.5cm): Slide the armrest pad horizontally forward or backward.
- Left/Right (1.5cm): Slide the armrest pad horizontally left or right.
- Rotation (360°): Rotate the armrest pad to your preferred angle.
- Рэгуляванне шырыні: The armrests can be moved inwards or outwards to adjust the overall width.
- Recline Linkage: The armrests move in conjunction with the backrest when reclining, maintaining continuous arm support.

Image: A visual guide demonstrating the six directions of adjustment for the armrests: up/down, front/back, left/right, rotation, width, and recline linkage.
4.4. Multi-Directional Lumbar Support
The lumbar support system is designed to adapt to your lower back curve, providing targeted support:
- Up/Down (50mm): Adjust the height of the lumbar support by sliding it vertically.
- Front/Back (20mm): Adjust the depth of the lumbar support by sliding it horizontally.
- Adaptive Movement (10mm front/back, 3° left/right): The lumbar support dynamically follows your movements, filling the gap between your back and the chair to maintain spinal alignment.

Image: Detailed illustration of the 4D micro-precision lumbar support, highlighting its 50mm vertical adjustment, 20mm horizontal extension, 10mm adaptive front/back movement, and 3° left/right adaptive movement.
4.5. Рэгуляванне падгалоўніка
- Height Adjustment (11cm): Slide the headrest up or down to align with your neck and head.
- Angle Adjustment (20° bracket rotation, 45° headrest rotation): Tilt the headrest to find the most comfortable angle for your head and neck support.

Image: Illustration detailing the 3D bionic wide headrest's adjustments, including 11cm vertical slide, 20° bracket rotation, and 45° headrest rotation for comprehensive head and neck support.
4.6. Рэгуляванне глыбіні сядзення
- To adjust seat depth: Locate the lever or button under the seat (often near the front). Pull or press it and slide the seat cushion forward or backward to achieve optimal thigh support. Release the lever/button to lock the position.

Image: A composite image demonstrating how the chair adapts to different postures, including focused work, long-term desk work, relaxed reclining, and side-facing for meetings, highlighting the adaptive lumbar and seat adjustments.
5. Тэхнічнае абслугоўванне
- Уборка: Wipe the mesh and plastic parts with a damp тканіна і мяккае сродак для мыцця. Пазбягайце абразіўных ачышчальнікаў.
- Сыход за сеткай: The breathable mesh is durable. Avoid sharp objects that could tear or puncture it.
- змазка: Moving parts generally do not require lubrication. If any squeaking occurs, consult customer support.
- Зашпількі: Перыядычна правярайце ўсе шрубы і балты, каб пераканацца, што яны зацягнуты. Пры неабходнасці падцягвайце.
- Ролікі: Clean casters regularly to remove hair and debris that may hinder smooth movement.
6. Выпраўленне непаладак
| праблема | Магчымая прычына | Рашэнне |
|---|---|---|
| Крэсла не рэгулюецца па вышыні | Няспраўнасць газавага пад'ёмніка або не ўключаны рычаг. | Ensure the height adjustment lever is fully pulled. If the issue persists, the gas lift may need replacement. Contact support. |
| Спінка не адкідваецца і не фіксуецца | Recline mechanism locked or damaged. | Ensure the recline lock lever is disengaged. Check for any obstructions. If damaged, contact support. |
| Крэсла рыпіць або хістаецца | Loose fasteners or worn components. | Tighten all visible screws and bolts. If squeaking persists, identify the source and apply a small amount of silicone spray if appropriate, or contact support. |
| Ролікі коцяцца не плаўна | Смецце зачапілася за колы. | Перавярніце крэсла і выдаліце валасы, пыл або смецце з колаў. |
| Lumbar support feels too firm | Personal preference or incorrect adjustment. | Adjust the lumbar support's height and depth to find a more comfortable position. Experiment with different settings. |
7. Тэхнічныя характарыстыкі
| Марка | СІХОУ |
| мадэль | B300-PRO (Specific models: B300-PRO-M102, B300-PRO-JT-1) |
| Колер | Светла-шэры |
| Матэрыял | Polypropylene, Mesh |
| Памеры прадукту (Д х Ш х У) | 72 см х 73.5 см х 110 см |
| Вага прадмета | 19.8 кг |
| Асаблівасці | 6D Armrests, Multi-directional Lumbar Support, 5-stage Height Adjustment, 3-stage Recline Lock (110°, 123°, 135°), Breathable Mesh, Centralized Controls |
8. Гарантыя і падтрымка
The SIHOO B300-PRO office chair comes with a 3 гады гарантыі якасці. This warranty covers manufacturing defects and material flaws under normal use.
For warranty claims, technical assistance, or any questions regarding your product, please contact SIHOO customer support through the retailer where you purchased the chair or visit the official SIHOO website for contact information. Please have your purchase receipt and model number ready when contacting support.