1. Уводзіны
Thank you for choosing the Craftsman Digital 400A AC Clamp-On Ammeter, Model 82372. This instrument is designed for safe and accurate measurement of AC current without breaking the circuit, as well as AC/DC voltage, resistance, frequency, capacitance, continuity, diode, and temperature. Please read this manual thoroughly before use to ensure proper operation and to prevent potential hazards.
2. Інфармацыя па бяспецы
WARNING: To avoid electric shock or personal injury, read and understand all safety information before using this meter.
- Заўсёды прытрымлівайцеся мясцовых і нацыянальных кодэксаў бяспекі.
- Не выкарыстоўвайце вымяральны прыбор, калі ён выглядае пашкоджаным або калі вымяральныя правады пашкоджаны.
- Не наносіце больш за намінальны аб'ёмtage, як пазначана на лічыльніку, паміж клемамі або паміж любой клемай і зазямленнем.
- Будзьце асцярожныя пры працы з voltagвышэй за 30 В пераменнага току (RMS), 42 В пікавага або 60 В пастаяннага току. Гэтыя аб'ёмыtagуяўляюць небяспеку паражэння.
- Падчас вымярэнняў трымайце пальцы за ахоўнымі накладкамі на вымяральных правадах.
- Не выкарыстоўвайце лічыльнік побач з выбуханебяспечным газам, парамі або пылам.
- Перад вымярэннем току пераканайцеся, што вымяральнік настроены на правільныя функцыі і дыяпазон.
- Disconnect the test leads from the circuit before changing functions.
- Неадкладна замяніце батарэйку, калі з'явіцца індыкатар нізкага зараду батарэі.
- This meter is rated for Category III - 600V.
3. Прадукт скончыўсяview
The Craftsman Digital 400A AC Clamp-On Ammeter features a compact design for measurements in tight locations and an extra-large 4000 count LCD screen for clear readings.
3.1 Meter Components

Figure 1: Top Section of the Ammeter
This image displays the upper portion of the Craftsman Digital 400A AC Clamp-On Ammeter. Visible components include the clamp jaw for non-contact current measurement, the rotary function dial with settings for AC current (2A, 20A, 200A, 400A), resistance (Ω), DC voltage (VDC), AC voltage (VAC), and OFF. The yellow 'MAX' button and 'HOLD' button are also shown, along with the 'AUTO POWER OFF' indicator.
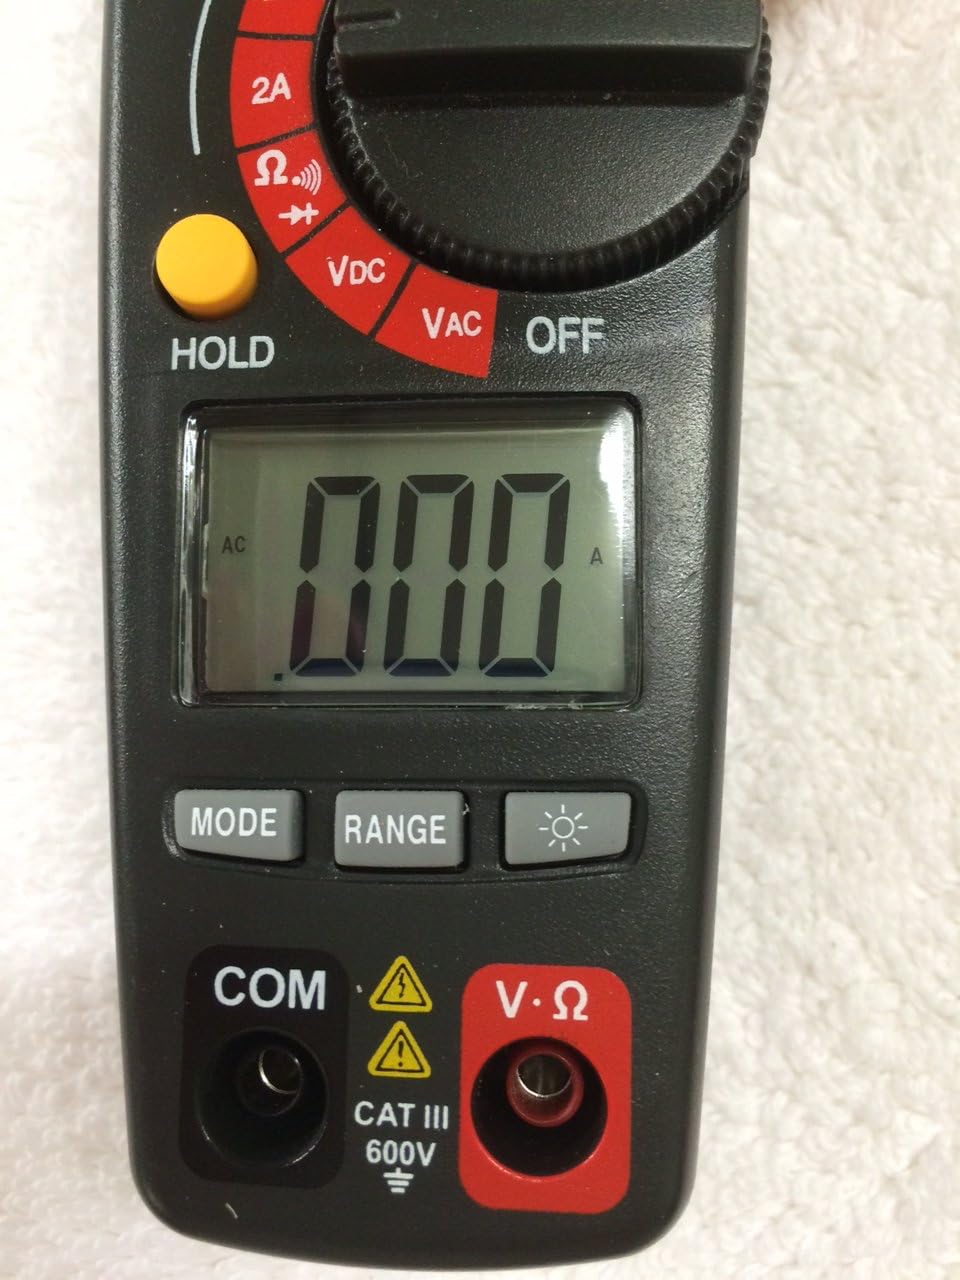
Figure 2: Bottom Section of the Ammeter
This image shows the lower part of the Craftsman Digital 400A AC Clamp-On Ammeter. Key features include the large LCD display, the 'MODE' button, 'RANGE' button, and the backlight button (indicated by a light bulb icon). Below the display are the input jacks: 'COM' (common) and 'V·Ω' (voltage/resistance) with a CAT III 600V safety rating warning.
- Clamp Сківіцы: Used for non-contact AC current measurements.
- Функцыянальны цыферблат: Selects the desired measurement function (AC Current, Voltage, Resistance, etc.) and turns the meter ON/OFF.
- ВК-дысплей: Паказвае паказанні вымярэнняў, адзінкі вымярэння і індыкатары функцый.
- Кнопка MAX: Toggles between maximum value hold and normal operation.
- Кнопка HOLD: Зафіксуе бягучае паказанне на дысплеі.
- Кнопка MODE: Selects between different functions within a dial setting (e.g., AC/DC voltage, continuity/diode).
- Кнопка RANGE: Manually selects measurement range or returns to auto-ranging.
- Кнопка падсвятлення: Уключае падсветку дысплея для паляпшэння бачнасці пры слабым асвятленні.
- Input Jacks (COM, V·Ω): Для падлучэння вымяральных кабеляў для аб'ёмуtage, resistance, continuity, diode, capacitance, and frequency measurements.
4. Настройка
4.1 Устаноўка батарэі
The meter requires batteries for operation. To install or replace batteries:
- Ensure the meter is OFF and disconnect any test leads.
- Знайдзіце вечка батарэйнага адсека на задняй панэлі глюкометра.
- Адкруціце фіксуючы(-я) шрубу(-ы) і зніміце вечка.
- Устаўце новыя батарэйкі, выконваючы правільную палярнасць (+ і -).
- Закрыйце батарэйны адсек і замацуйце яго шрубай (шрубамі).
Note: The meter features auto power off to conserve battery life.
5. Інструкцыя па эксплуатацыі
Before taking any measurements, ensure the meter is in good condition and the test leads are properly connected (if applicable).
5.1 Вымярэнне пераменнага току (Clamp функцыя)
This function allows non-contact measurement of AC current up to 400A.
- Turn the function dial to the desired AC current range (2A, 20A, 200A, or 400A).
- Націсніце клamp trigger to open the clamp сківіцы.
- Унутры клеммы павінен быць размешчаны адзін праваднік (не пучок правадоў).amp сківіцу. Пераканайцеся, што сківіца цалкам стуленая.
- Прачытайце значэнне пераменнага току на ВК-дысплеі.
Note: For accurate readings, ensure only one conductor is inside the clamp сківіцы.
5.2 Вымярэнне AC/DC Voltage
The meter measures AC/DC voltage да 600В.
- Insert the black test lead into the COM jack and the red test lead into the V·Ω jack.
- Turn the function dial to the VDC or VAC position.
- If measuring DC voltage, press the MODE button to select DC if necessary.
- Падключыце вымяральныя зонды да ланцуга або кампанента, які трэба вымераць.
- Прачытайце тtagзначэнне на ВК-дысплеі.
5.3 Вымярэнне супраціўлення (Ом)
Measures resistance in Ohms (Ω).
- Insert the black test lead into the COM jack and the red test lead into the V·Ω jack.
- Turn the function dial to the Ω position.
- Перад вымярэннем супраціўлення пераканайцеся, што ланцуг або кампанент абясточаны.
- Падключыце вымяральныя зонды да кампанента.
- Прачытайце значэнне супраціўлення на ВК-дысплеі.
5.4 Continuity and Diode Test
These functions are typically accessed via the Ω setting using the MODE button.
- Insert the black test lead into the COM jack and the red test lead into the V·Ω jack.
- Turn the function dial to the Ω position.
- Press the MODE button repeatedly until the continuity symbol (a speaker icon) or diode symbol (a triangle with a line) appears on the display.
- For continuity: Connect probes across the circuit. A continuous beep indicates a complete circuit.
- For diode: Connect probes across the diode. A forward bias voltage drop will be displayed. Reverse bias should show OL (open loop).
5.5 Measuring Frequency and Capacitance
The meter supports frequency and capacitance measurements, typically accessed through the V·Ω input and MODE button.
- Insert the black test lead into the COM jack and the red test lead into the V·Ω jack.
- Turn the function dial to the appropriate setting (often shared with voltage or resistance, requiring MODE selection).
- Press the MODE button until the frequency (Hz) or capacitance (F) symbol appears.
- Connect the test probes to the circuit or component.
- Прачытайце значэнне на ВК-дысплеі.
5.6 Temperature Measurement (Type K Thermometer)
The meter includes a Type K thermometer for surface or air temperature measurements.
- Ensure the meter is OFF and disconnect any test leads.
- Insert the Type K thermocouple probe into the designated input jacks (usually marked with 'TEMP' or shared with V·Ω, check meter markings).
- Turn the function dial to the temperature setting (often marked with °C or °F).
- Размясціце наканечнік тэрмапары на аб'екце, тэмпературу якога трэба вымераць, або побач з ім.
- Прачытайце тэмпературу на ВК-дысплеі.
5.7 Data Hold and Max Hold
- Кнопка HOLD: Націсніце кнопку HOLD, каб зафіксаваць бягучае паказанне на дысплеі. Націсніце яшчэ раз, каб адпусціць.
- Кнопка MAX: Press the MAX button to capture and display the maximum measured value. Press again to exit MAX hold.
6. Тэхнічнае абслугоўванне
6.1 Ачыстка
Працярыце лічыльнік рэкламайamp cloth and mild detergent. Do not use abrasives or solvents. Keep the clamp сківіцу без пылу і смецця.
6.2 Замена батарэі
Refer to Section 4.1 for battery installation/replacement instructions. Replace batteries when the low battery indicator appears on the display to ensure accurate readings.
6.3 Захоўванне
If the meter is not used for an extended period, remove the batteries to prevent leakage. Store the meter in a cool, dry place away from direct sunlight.
7. Выпраўленне непаладак
| праблема | Магчымая прычына | Рашэнне |
|---|---|---|
| Лічыльнік не ўключаецца. | Разраджаныя або няправільна ўсталяваныя батарэйкі. | Праверце палярнасць батарэек; заменіце батарэйкі. |
| Адлюстравана "OL" (перагрузка). | Вымярэнне перавышае абраны дыяпазон або максімальную магутнасць вымяральніка. | Select a higher range or ensure measurement is within meter's specifications. |
| Няправільныя паказанні. | Low battery, incorrect function/range, poor test lead connection, external interference. | Replace batteries, verify function/range, ensure secure connections, move away from strong magnetic fields. |
| No reading for AC current. | Некалькі праваднікоў у CLamp jaw, DC current being measured. | Ensure only one AC conductor is in the clamp. This meter measures AC current only. |
8. Тэхнічныя характарыстыкі
| Асаблівасць | Спецыфікацыя |
|---|---|
| Марка | Рамеснік |
| мадэль | 82372 |
| Тып вымярэння | Ammeter (Clamp-На) |
| Дыяпазон пераменнага току | Да 400А |
| AC/DC Voltagе далёкасць | Да 600В |
| Супраціў | так |
| Частата | так |
| Ёмістасць | так |
| Тэст бесперапыннасці | так |
| Дыёдны тэст | так |
| Вымярэнне тэмпературы | Тэрмометр тыпу K |
| Дысплей | 4000 Count LCD |
| Accuracy (AC Current) | 3.0% (VAC) - Note: Product description states 3.0% (VAC) for AC/DC current, which is unusual. Assuming it refers to AC current accuracy. |
| Рэйтынг бяспекі | Category III - 600V |
| Крыніца харчавання | Харчаванне ад батарэі |
| Асаблівасці | One-touch auto zero, belt holster, molded rubber holster, auto on/off, Data Hold, Max Hold. |
9. Гарантыя і падтрымка
For warranty information and technical support, please refer to the official Craftsman webсайт або звярніцеся ў службу падтрымкі кліентаў. Захоўвайце чэк аб куплі як пацвярджэнне пакупкі для любых гарантыйных прэтэнзій.
Craftsman Customer Service: Калі ласка, наведайце www.craftsman.com/support for the latest support information and contact details.


