Уводзіны
This manual provides detailed instructions for the installation, operation, and maintenance of your Venstar T1900 Residential Slimline Platinum Thermostat. Please read this manual thoroughly before attempting to install or operate the thermostat to ensure proper function and to avoid potential damage.
Важная інфармацыя па бяспецы
- Always turn off power to the heating/cooling system at the main circuit breaker or fuse box before installing or servicing the thermostat.
- Гэты тэрмастат працуе ад 24 вольт пераменнага току. Не падключайце да сеткі пераменнага току.tage (120 В або 240 В).
- Калі вы не знаёмыя з электраправодкай, мантаж павінен выконвацца кваліфікаваным спецыялістам.
- Do not short circuit the terminals on the gas valve or at the system control to test the thermostat. This will damage the thermostat and void the warranty.
- Ensure all wiring connections are secure and insulated to prevent short circuits.
Змест пакета
Пераканайцеся, што ваш пакет змяшчае наступныя элементы:
- Venstar T1900 Thermostat Unit
- Мантажныя прыналежнасці (шрубы і дзюбелі для сцяны)
- Кіраўніцтва карыстальніка (гэты дакумент)
Прадукт скончаныview
The Venstar T1900 is a 7-day programmable digital thermostat designed for residential use. It offers precise temperature control and energy-saving scheduling capabilities. This thermostat is compatible with heat/cool, heat pump, and dual-fuel systems, controlling up to three heat stages і два крутых stagэс.
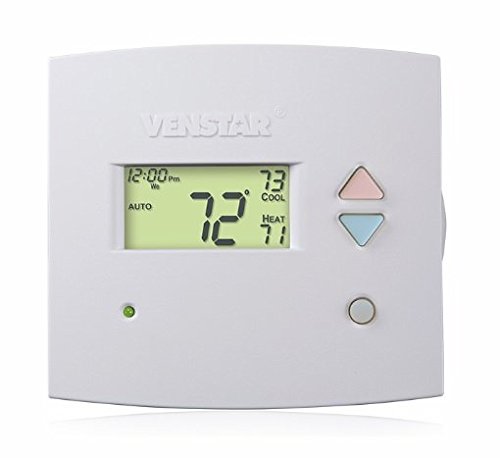
Малюнак 1: Фронт view of the Venstar T1900 Thermostat. This image displays the thermostat's LCD screen and control buttons, indicating its slimline design.
Асноўныя характарыстыкі:
- 7-дзённае праграмуемасць: Allows for customized heating and cooling schedules for each day of the week.
- Сумяшчальнасць сістэмы: Works with heat/cool, dual-fuel, and heat pump systems.
- Мульты-Stagэлектроннае кіраванне: Manages up to three heat stages і два крутых stagэс.
- Магчымасць дыстанцыйнага кіравання: Controllable by phone using an optional add-on (sold separately).
- Automatic or Manual Operation: Provides flexibility for scheduled or on-demand temperature adjustments.
Кіраўніцтва па ўстаноўцы
Неабходныя інструменты:
- Адвёртка (крыжовая і/або плоская)
- Drill with appropriate drill bit (if installing new wall anchors)
- Прылады для зачысткі правадоў
- Аловак
- Узровень (неабавязкова)
1. Выключыце харчаванне
Locate the circuit breaker or fuse box that controls your heating and cooling system. Turn off the power completely before proceeding with any wiring.
2. Remove Old Thermostat (if applicable)
- Асцярожна зніміце вечка старога тэрмастата.
- Take a picture of the existing wiring connections for reference.
- Label each wire with the terminal designation it was connected to (e.g., R, G, Y, W).
- Disconnect the wires and remove the old thermostat's mounting plate from the wall.
3. Mount the New Thermostat Base
- Separate the front cover of the T1900 thermostat from its base plate.
- Position the base plate on the wall where you want to install the thermostat. Ensure it is level.
- Адзначце алоўкам адтуліны для мацавання.
- Пры неабходнасці прасвідруйце адтуліны і ўстаўце ў іх анкеры.
- Secure the thermostat base plate to the wall using the provided screws.
4. Электраправодка
Connect the wires from your HVAC system to the corresponding terminals on the T1900 thermostat base. Refer to the wiring diagram provided with your specific HVAC system for precise connections. Ensure wires are stripped approximately 3/8 inch and securely fastened under the terminal screws.
Common Terminal Designations:
- П/Пр/Р: 24V Power (Heating/Cooling)
- C: Common (24V return)
- G: Вентылятар
- Г/Г1: Кампрэсар Stage 1 (астуджэнне)
- Y2: Кампрэсар Stage 2 (астуджэнне)
- З/З1: Цяпло Stage 1 (ацяпленне)
- W2: Цяпло Stage 2 (ацяпленне)
- O/B: Reversing Valve (Heat Pumps)
Note: The T1900 supports various system types. Consult the detailed wiring diagrams in the full installation manual for specific configurations (e.g., heat pump with auxiliary heat, conventional multi-stage systems).
5. Attach Thermostat to Base
Once wiring is complete and verified, carefully align the thermostat front cover with the mounted base plate and snap it into place.
6. Аднаўленне харчавання
Return to your circuit breaker or fuse box and restore power to your heating and cooling system.
Пачатковая налада
Upon initial power-up, the thermostat may prompt you to configure basic settings. Follow the on-screen instructions to set the current date, time, and system type (e.g., Conventional, Heat Pump).
Канфігурацыя тыпу сістэмы:
It is crucial to correctly configure the thermostat for your specific HVAC system. Incorrect settings can lead to improper operation or damage. Access the installer settings menu (refer to the full installation guide for specific button sequences) to select:
- Тып сістэмы: Heat/Cool, Heat Pump, Dual Fuel
- Колькасць Heat Stages
- Колькасць Cool Stages
- Reversing Valve Operation: O (Cooling) or B (Heating)
Інструкцыя па эксплуатацыі
Разуменне дысплея:
The LCD screen displays the current temperature, set temperature, system mode, fan mode, time, and programming status. Refer to the icons and indicators on the screen for current operational status.
Setting System Mode:
Націсніце РЭЖЫМ кнопка для пераключэння паміж даступнымі рэжымамі сістэмы:
- ЦЯПЛО: The system will operate to maintain the heating setpoint.
- ЦУД: The system will operate to maintain the cooling setpoint.
- АЎТА: Тэрмастат аўтаматычна пераключаецца паміж ацяпленнем і астуджэннем па меры неабходнасці, каб падтрымліваць зададзены дыяпазон тэмпературы.
- OFF: Сістэма ацяплення і астуджэння адключаецца.
Setting Fan Mode:
Націсніце FAN кнопка для пераключэння рэжымаў вентылятара:
- АЎТА: Вентылятар працуе толькі тады, калі сістэма ацяплення або астуджэння актыўна працуе.
- ВКЛ: Вентылятар працуе бесперапынна, незалежна ад таго, ці патрабуецца ацяпленне, ці астуджэнне.
Рэгуляванне тэмпературы:
Выкарыстоўвайце UP і УНІЗ arrow buttons to adjust the desired temperature setpoint. In programmable modes, this will temporarily override the schedule until the next scheduled change.
Расклад праграм (7 дзён):
The T1900 allows for 7-day programming, enabling different schedules for each day of the week. This feature helps save energy by adjusting temperatures when you are away or asleep.
- Націсніце ПРАГРАМА кнопку для ўваходу ў рэжым праграмавання.
- Выкарыстоўвайце ДЗЕНЬ каб выбраць дзень або групу дзён, якія вы хочаце запраграмаваць (напрыклад, панядзелак-пятніца, субота-нядзеля або асобныя дні).
- Выкарыстоўвайце ЧАС button to cycle through the four available periods: Wake, Leave, Return, Sleep.
- Выкарыстоўвайце UP і УНІЗ arrow buttons to set the desired temperature for each period.
- Выкарыстоўвайце ТРЫМАЦЬ button to exit programming mode or save changes.
Refer to the detailed programming section in the full user guide for advanced options and specific button sequences.
Remote Control (Optional Add-on):
The Venstar T1900 thermostat can be controlled remotely via a phone using an optional add-on module (sold separately). This module connects to the thermostat and allows for remote access and control through a dedicated application. Installation and setup instructions for the remote control module are provided with the module itself.
Тэхнічнае абслугоўванне
Чыстка тэрмастата:
Каб падтрымліваць знешні выгляд і функцыянальнасць тэрмастата, перыядычна працірайце яго вонкавыя паверхні мяккай анучайamp cloth. Do not use abrasive cleaners, solvents, or chemical sprays, as these can damage the plastic and electronic components.
Замена батарэі:
The Venstar T1900 thermostat does not require batteries for operation as it is powered by the 24V AC system.
Ліквідацыю непаладак
If you experience issues with your Venstar T1900 thermostat, consult the following common problems and solutions:
| праблема | Магчымая прычына | Рашэнне |
|---|---|---|
| Дысплей тэрмастата пусты | Няма харчавання на тэрмастат. | Праверце аўтаматычны выключальнік сістэмы ацяплення, вентыляцыі і кандыцыянавання паветра. Пераканайцеся, што ўсе правадныя злучэнні надзейныя. |
| Heating/Cooling system does not respond | Няправільны выбар рэжыму сістэмы; праблема з праводкай; блакіроўка сістэмы. | Verify the system mode (HEAT/COOL/AUTO). Check wiring connections. Wait 5 minutes for system lockout to reset. |
| Паказчыкі тэмпературы здаюцца недакладнымі | Размяшчэнне тэрмастата; засмечванне датчыка. | Ensure the thermostat is not exposed to direct sunlight, drafts, or heat sources. Clean any dust from the thermostat vents. |
| Programming schedule is not working | Program not saved; temporary override active; incorrect time/day setting. | Ensure programs are saved. Check if a temporary override is active and cancel it. Verify current time and day settings. |
| Вентылятар працуе бесперапынна ў аўтаматычным рэжыме | Fan mode set to ON; wiring issue. | Press the FAN button to ensure it is set to AUTO. Check fan wiring. |
If these solutions do not resolve the issue, please contact customer support or a qualified HVAC technician.
Тэхнічныя характарыстыкі
| Асаблівасць | Спецыфікацыя |
|---|---|
| Марка | Венстар |
| Назва мадэлі | Венстар Т1900 |
| Тып кантролера | Кнопка |
| Асаблівасць | Праграмуемы |
| Колер | Белы |
| Канкрэтнае выкарыстанне прадукту | Heat Pump, Heater |
| Тып кантролю тэмпературы | Programmable, Smart/Remote (with add-on) |
| тtage | 24 Volts AC |
| Тып дысплея | LCD або LED |
| Метад кантролю | Remote (with add-on) |
| Падсвятленне | так |
| Памеры прадукту | 5.3 х 2 х 2 цалі |
| Вага прадмета | 0.01 унцый |
| Патрабуюцца батарэі? | няма |
Інфармацыя аб гарантыі
Venstar products are manufactured to high-quality standards. This product is covered by a limited warranty against defects in materials and workmanship. The specific terms and duration of the warranty may vary. Please refer to the warranty card included with your product or visit the official Venstar webсайт для атрымання падрабязнай інфармацыі аб гарантыі і працэдурах рэгістрацыі.
Падтрымка кліентаў
For technical assistance, troubleshooting, or warranty inquiries, please contact Venstar customer support. You can typically find contact information, including phone numbers and email addresses, on the official Venstar webсайт (www.venstar.com) або на ўпакоўцы прадукту.
When contacting support, please have your thermostat model number (T1900) and any relevant purchase information ready.