1. Уводзіны
This manual provides detailed instructions for the installation, operation, and maintenance of your Zebronics H61 Motherboard. Please read this manual thoroughly before proceeding with installation to ensure proper setup and functionality.
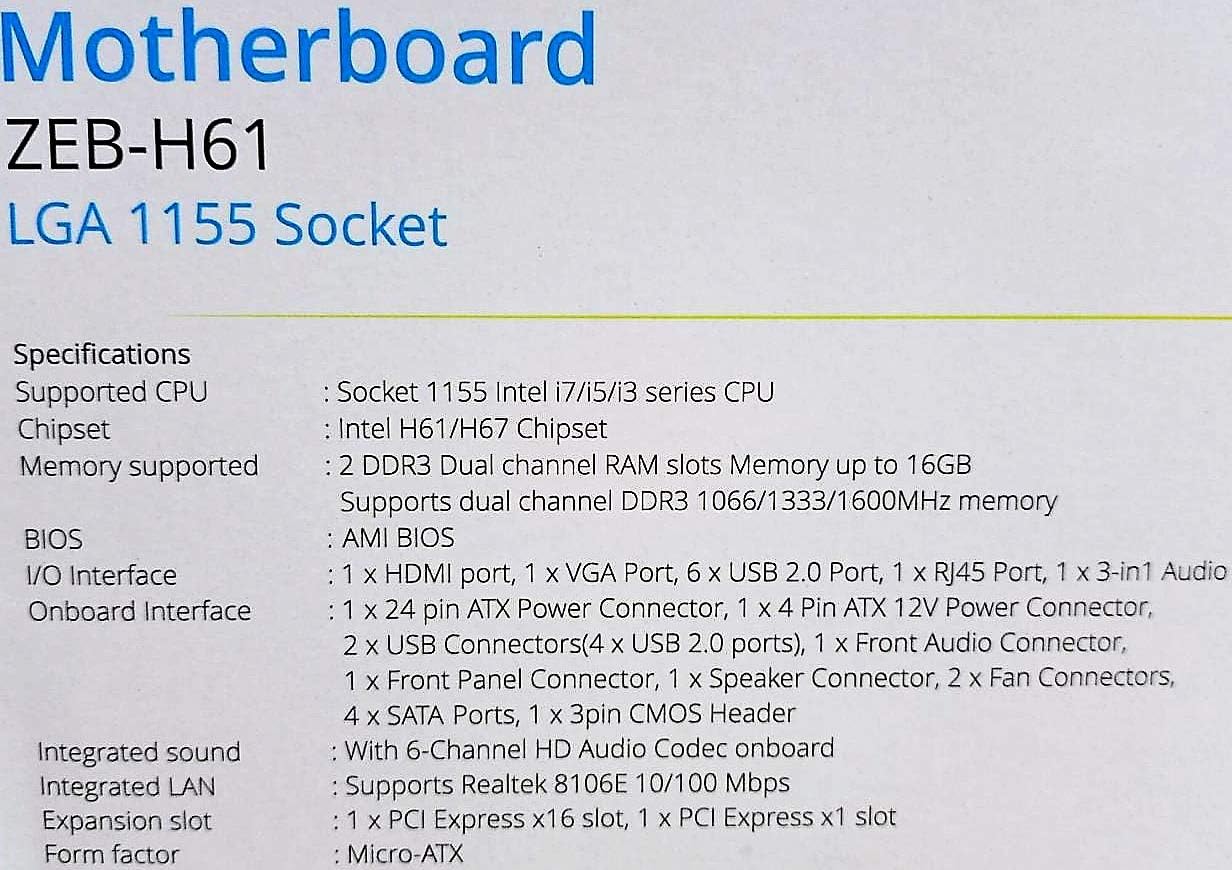
The Zebronics H61 Motherboard is designed to support Intel LGA 1155 socket processors (i7/i5/i3/Pentium/Celeron series) and DDR3 dual-channel memory. It features an Intel H61 chipset, providing a stable and efficient platform for your computing needs.
2. Інфармацыя па бяспецы
- Заўсёды адключайце сілкаванне перад усталёўкай або зняццем якіх-небудзь кампанентаў.
- Handle the motherboard by its edges to avoid electrostatic discharge (ESD) damage. Use an anti-static wrist strap if available.
- Забяспечце належную вентыляцыю ўнутры корпуса кампутара, каб прадухіліць перагрэў.
- Не падвяргайце матчыну плату ўздзеянню вільгаці або экстрэмальных тэмператур.
- Звярніцеся да інструкцый вытворцы кампанентаў, каб атрымаць канкрэтныя інструкцыі па ўсталёўцы працэсара, аператыўнай памяці і іншых перыферыйных прылад.
3. Змесціва ўпакоўкі
Праверце наяўнасць усіх прадметаў у камплекце:
- Zebronics H61 Motherboard
- I / O Shield
- Кабель(і) перадачы дадзеных SATA
- Driver CD (for operating systems that do not automatically install drivers)
- Кіраўніцтва карыстальніка (гэты дакумент)
4. Тэхнічныя характарыстыкі
| Асаблівасць | Апісанне |
|---|---|
| мадэль | H61 |
| Набор мікрасхем | Intel H61 Express |
| Гняздо працэсара | LGA 1155 |
| Сумяшчальныя працэсары | Intel i7/i5/i3/Pentium/Celeron processors (2nd and 3rd Generation) |
| Слоты памяці | 2 x DDR3 Dual-channel slots |
| Падтрымка памяці | DDR3 1066/1333/1600MHz, up to 16GB |
| Графічны інтэрфейс | 1 x PCI-Express x16 slot |
| Слоты пашырэння | 1 слот PCI Express x1 |
| Захоўванне | 4 x SATA II ports |
| лакальная сетка | Realtek 8106E 10/100 Mbps Ethernet |
| Аўдыё | 6-Channel HD Audio Codec onboard (5.1 surround sound support) |
| Заднія парты ўводу/вываду | 1 x HDMI, 1 x VGA, 6 x USB 2.0, 1 x RJ45, 1 x 3-in-1 Audio Jacks (Line-in, Line-out, Mic-in), PS/2 (Keyboard/Mouse) |
| Формаў-фактар | ATX |
| Памеры | 25 х 20 х 3 см |
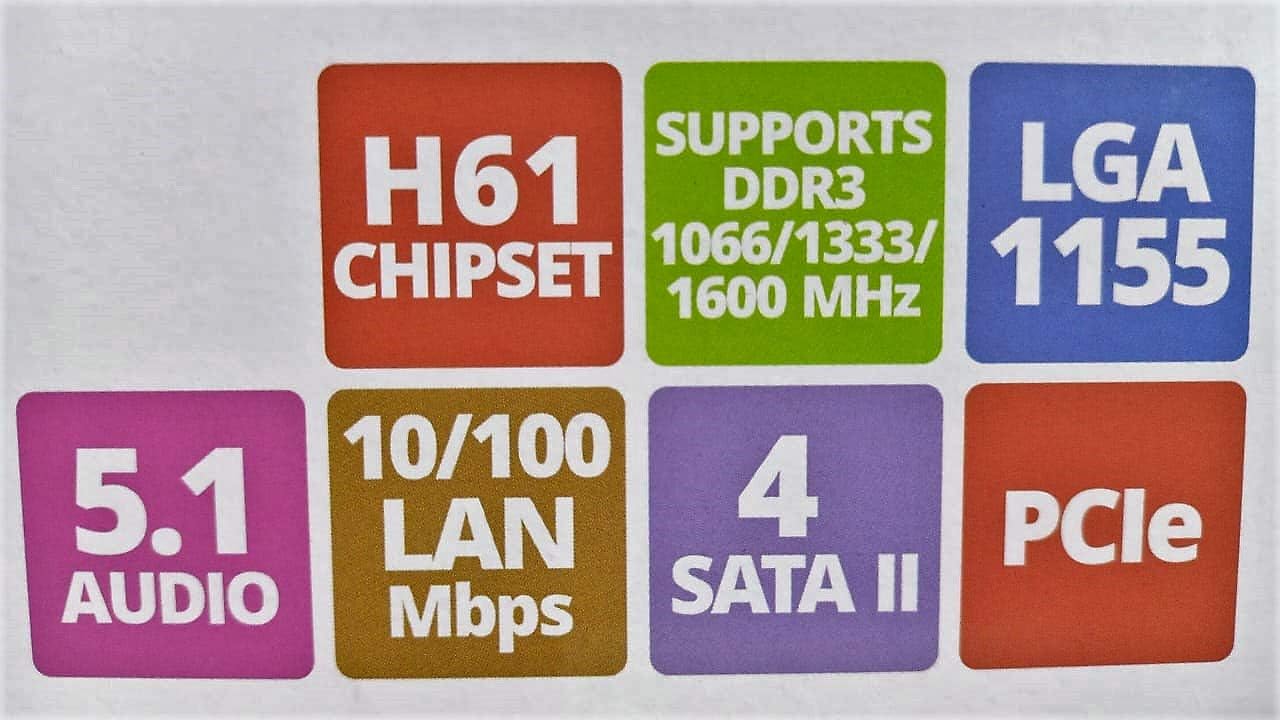
Image: Detailed specifications of the Zebronics H61 Motherboard, including chipset, CPU socket, memory support, and I/O interfaces.

Image: Visual representation of key features such as H61 Chipset, DDR3 support, LGA 1155 socket, 5.1 Audio, 10/100 LAN, 4 SATA II ports, and PCIe.
5. Настройка і ўстаноўка
5.1 Схема мацярынскай платы

Выява: зверху ўніз view of the Zebronics H61 Motherboard, showing the CPU socket, RAM slots, PCIe slot, and various headers.

Image: Another top-down perspective of the Zebronics H61 Motherboard, highlighting component placement.
5.2 Задняя панэль уводу/вываду

Image: Rear I/O panel of the Zebronics H61 Motherboard, displaying ports for PS/2 keyboard/mouse, VGA, HDMI, USB 2.0, LAN, and audio jacks.
Выява: Заключны элемент view of the rear I/O ports, detailing the VGA, HDMI, USB, LAN, and audio connections.
5.3 Этапы ўстаноўкі кампанентаў
- Усталюйце працэсар:
- Адкрыйце рычаг раздыма працэсара.
- Carefully align the CPU with the socket, ensuring the golden triangle on the CPU matches the mark on the socket.
- Акуратна ўстаўце працэсар у раз'ём, не прыціскаючы яго да сілы.
- Зачыніце рычаг, каб зафіксаваць працэсар.
- Нанесці цеплавую пасту і ўсталяваць кулер працэсара ў адпаведнасці з інструкцыямі вытворцы.
- Усталяваць аператыўную памяць:
- Адкрыйце зашчапкі з абодвух канцоў слотаў памяці DDR3.
- Сумясціце модуль памяці са слотам, пераканаўшыся, што выемка на модулі супадае з ключом у слоце.
- Моцна націсніце на абодва канцы модуля памяці, пакуль зашчапкі не зафіксуюцца.
- Усталюйце відэакарту (неабавязкова):
- Locate the PCI-Express x16 slot.
- Зніміце адпаведную вечка слота пашырэння з корпуса кампутара.
- Align the graphics card with the slot and press down firmly until it is seated correctly.
- Замацуеце карту шрубай да корпуса ПК.
- Падключэнне прылад захоўвання дадзеных:
- Connect SATA data cables from the motherboard's SATA ports to your hard drives or SSDs.
- Ensure power cables from the power supply are connected to these devices.
- Падключыце крыніцу сілкавання:
- Падключыце 24-кантактны раз'ём харчавання ATX ад блока харчавання да матчынай платы.
- Падключыце 4-кантактны раз'ём харчавання ATX 12V (сілкаванне працэсара) да матчынай платы.
- Падключэнне раздымоў пярэдняй панэлі:
- Connect the power switch, reset switch, HDD LED, and power LED cables from your PC case to the corresponding pins on the motherboard's front panel header. Refer to the motherboard diagram for pin assignments.
- Connect front USB and audio headers.
6. Інструкцыя па эксплуатацыі
6.1 Першая загрузка і налада BIOS
- Пасля зборкі ўсіх кампанентаў падключыце манітор, клавіятуру і мыш.
- Уключыце кампутар.
- Press the designated key (usually DEL or F2) некалькі разоў падчас запуску, каб увайсці ў ўтыліту налады BIOS/UEFI.
- У BIOS пераканайцеся, што ўсе ўсталяваныя кампаненты (працэсар, аператыўная памяць, назапашвальнік) правільна вызначаюцца.
- Наладзьце парадак загрузкі, каб усталяваць аперацыйную сістэму з USB-назапашвальніка або аптычнага прывада.
- Захавайце змены і выйдзіце з BIOS. Сістэма перазагрузіцца.
6.2 Ўстаноўка драйвера
After installing your operating system, install the necessary drivers for optimal performance. Drivers can be found on the included driver CD or downloaded from the official Zebronics webсайт.
- Драйверы чыпсэта
- Драйверы графікі (калі выкарыстоўваецца інтэграваная графіка або асобны графічны працэсар)
- Драйверы лакальнай сеткі
- Аўдыё драйвера
- USB Drivers (if applicable)
7. Тэхнічнае абслугоўванне
- Трымайце яго ў чысціні: Regularly clean dust from inside your PC case, especially from fans and heatsinks, to ensure proper airflow and prevent overheating. Use compressed air.
- Абнаўленні BIOS: Check the Zebronics website periodically for BIOS updates. BIOS updates can improve system stability, compatibility, and performance. Follow update instructions carefully.
- Абнаўленні драйвераў: Keep your drivers updated to ensure compatibility and optimal performance with your operating system and applications.
- Батарэя CMOS: The motherboard uses a CR2032 battery to retain BIOS settings. If your system frequently loses time or BIOS settings, the battery may need replacement.
8. Выпраўленне непаладак
- Няма харчавання / сістэма не загружаецца:
- Ensure all power cables (24-pin ATX, 4-pin ATX 12V) are securely connected to the motherboard.
- Check if the power supply unit (PSU) is switched on and functioning.
- Праверце падключэнне выключальніка харчавання на пярэдняй панэлі.
- Try reseating RAM modules and the graphics card.
- Няма адлюстравання на маніторы:
- Ensure the monitor is connected to the correct video output (either integrated graphics on the motherboard or dedicated graphics card).
- Праверце харчаванне манітора і выбар уваходнага сігналу.
- Reseat the graphics card (if installed) and RAM modules.
- Нестабільнасць сістэмы / Збоі:
- Праверце тэмпературу працэсара і відэакарты. Перагрэў можа прывесці да нестабільнасці.
- Ensure RAM modules are properly seated and compatible. Test with one RAM stick if multiple are installed.
- Абнавіце драйверы і BIOS да апошніх версій.
- Запусціце інструменты дыягностыкі памяці, каб праверыць наяўнасць няспраўных аператыўных прылад.
- CMOS Battery Issue (Loss of Time/Settings):
- If the system loses time or BIOS settings after being powered off, the CMOS battery (CR2032) may need replacement.
- To reset CMOS: Disconnect power, remove the CMOS battery, short the battery socket's positive and negative terminals for 30 seconds, then reinsert the battery.
9. Гарантыя і падтрымка
Каб атрымаць інфармацыю пра гарантыю і тэхнічную падтрымку, звярніцеся да афіцыйнага сайта Zebronics. webсайт або звярніцеся ў службу падтрымкі кліентаў. Захоўвайце чэк аб куплі як пацвярджэнне пакупкі для прэтэнзій па гарантыі.
Zebronics Official Webсайт: www.zebronics.com


