1. Уводзіны
This manual provides detailed instructions for the installation, operation, and maintenance of your ZEBRONICS H81 LGA 1150 Socket Motherboard. Designed for Intel Core i7/i5/i3 processors, this ATX motherboard supports DDR3 memory and features an Intel H81 Chipset. Please read this manual thoroughly before proceeding with installation to ensure proper functionality and to prevent damage.

Выява 1: Асноўная view of the ZEBRONICS H81 LGA 1150 Motherboard, showcasinяго кампаноўку і кампаненты.
2. Тэхнічныя характарыстыкі
The following table outlines the key technical specifications of the ZEBRONICS H81 Motherboard:
| Асаблівасць | Апісанне |
|---|---|
| Падтрымка працэсара | Intel Core i7/i5/i3 processors (LGA 1150 Socket) |
| Набор мікрасхем | Intel H81 |
| Падтрымка памяці | 2 x DDR3 dual-channel slots, 1066/1333/1600MHz, Max 32GB |
| лакальная сетка | Realtek 8105E 100/1000 Mbps |
| Аўдыё | Realtek 662, 3x Audio Jacks for 6 channel HD Audio |
| Парты на задняй панэлі | 1x USB Mouse/Keyboard, 1x VGA, 1x HDMI, 2x USB 3.0, 2x USB 2.0, 1x LAN, 3x Audio Jacks |
| Убудаваныя раздымы | Front panel, Speaker, Front panel audio, USB 2.0, 4x SATA, 4-pin CPU fan, SYS fan, 24-pin ATX power, 4-pin ATX 12V power, Clear CMOS header |
| Слоты пашырэння | 1 слот PCI Express x16 |
| Формаў-фактар | ATX |
| Памеры | 21.3 х 5.7 х 26.8 см |
| Вага | 560 г |

Image 2: Visual representation of key features including H81 Chipset, DDR3 support, LGA 1150 socket, HDMI, 5.1 Audio, 100/1000 LAN, 4 SATA ports, and PCIe slot.
3. Кіраўніцтва па наладцы
Выканайце наступныя дзеянні для правільнай усталёўкі матчынай платы і яе кампанентаў:
- Падрыхтоўка: Ensure your computer case is compatible with the ATX form factor. Gather necessary tools including a screwdriver, thermal paste, and anti-static wrist strap.
- Усталяваць працэсар: Open the CPU socket lever. Carefully align the CPU with the socket (match the golden triangle on the CPU with the triangle on the socket) and gently place it in. Close the lever to secure the CPU. Apply a thin, even layer of thermal paste to the CPU's heat spreader.
- Усталюйце кулер для працэсара: Mount the CPU cooler according to its manufacturer's instructions, ensuring good contact with the CPU and proper fan orientation. Connect the CPU fan cable to the 4-pin CPU fan connector on the motherboard.
- Усталяваць аператыўную памяць: Open the clips on both ends of the DDR3 memory slots. Align the RAM modules with the slots, ensuring the notch on the module matches the key in the slot. Press down firmly on both ends until the clips snap into place.
- Мацаванне матчынай платы: Install the I/O shield into the rear opening of your computer case. Carefully place the motherboard into the case, aligning the screw holes with the standoffs. Secure the motherboard with screws.
- Падключыце харчаванне: Падключыце 24-кантактны раз'ём асноўнага сілкавання ATX і 4-кантактны раз'ём сілкавання працэсара ATX 12V ад блока харчавання да адпаведных партоў на матчынай плаце.
- Падключэнне прылад захоўвання дадзеных: Use SATA cables to connect your hard drives or SSDs to the SATA ports on the motherboard. Connect the power cables from your power supply to these devices.
- Падключэнне кабеляў пярэдняй панэлі: Connect the power switch, reset switch, HDD LED, power LED, and front panel audio/USB cables from your case to the respective headers on the motherboard. Refer to the motherboard diagram for correct pin assignments.
- Усталюйце платы пашырэння (неабавязкова): If installing a graphics card or other PCI Express cards, insert them into the appropriate slots and secure them with a screw.
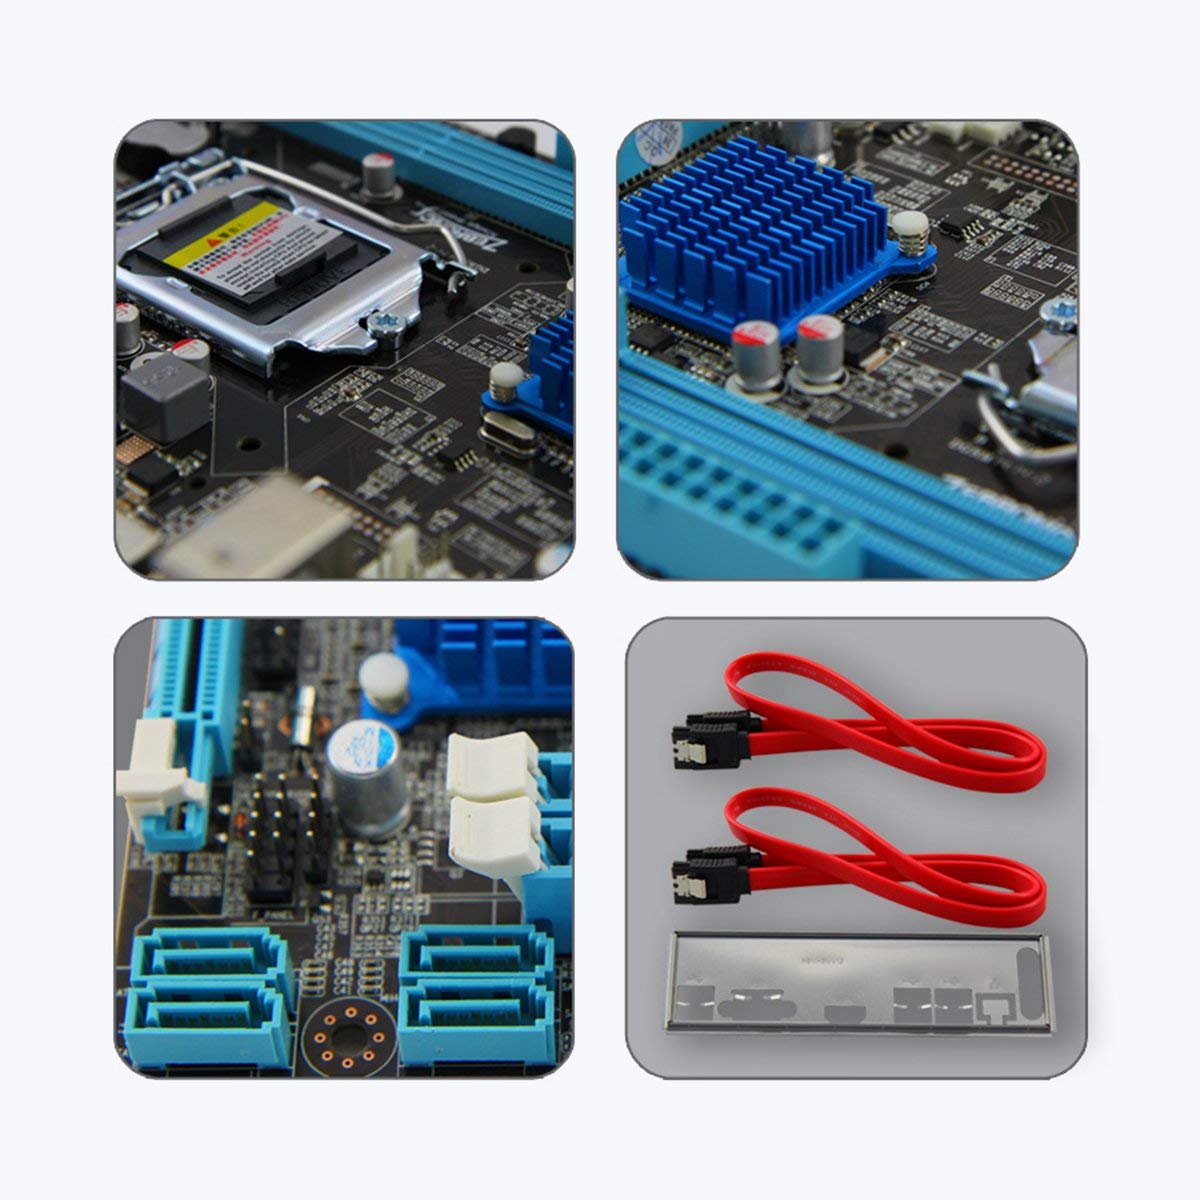
Малюнак 3: Крупны план views of motherboard components such as the CPU socket, chipset heatsink, SATA ports, and included accessories like SATA cables and the I/O shield.
4. Інструкцыя па эксплуатацыі
Once all components are installed and connected, you can power on your system:
- Першапачатковае ўключэнне: After ensuring all connections are secure, connect your monitor, keyboard, and mouse. Plug in the power cord and press the power button on your computer case.
- Налада BIOS/UEFI: Падчас запуску некалькі разоў націскайце патрэбную клавішу (звычайна DEL or F2) to enter the BIOS/UEFI setup utility. Here you can configure boot order, system time, and other advanced settings. Save changes and exit to continue booting.
- Ўстаноўка аперацыйнай сістэмы: Устаўце ўсталявальны носьбіт аперацыйнай сістэмы (USB-назапашвальнік або DVD-дыск) і выконвайце падказкі на экране, каб усталяваць АС.
- Ўстаноўка драйвера: After OS installation, install the necessary drivers for your motherboard (chipset, LAN, audio, graphics) from the included driver CD or the ZEBRONICS webсайт.
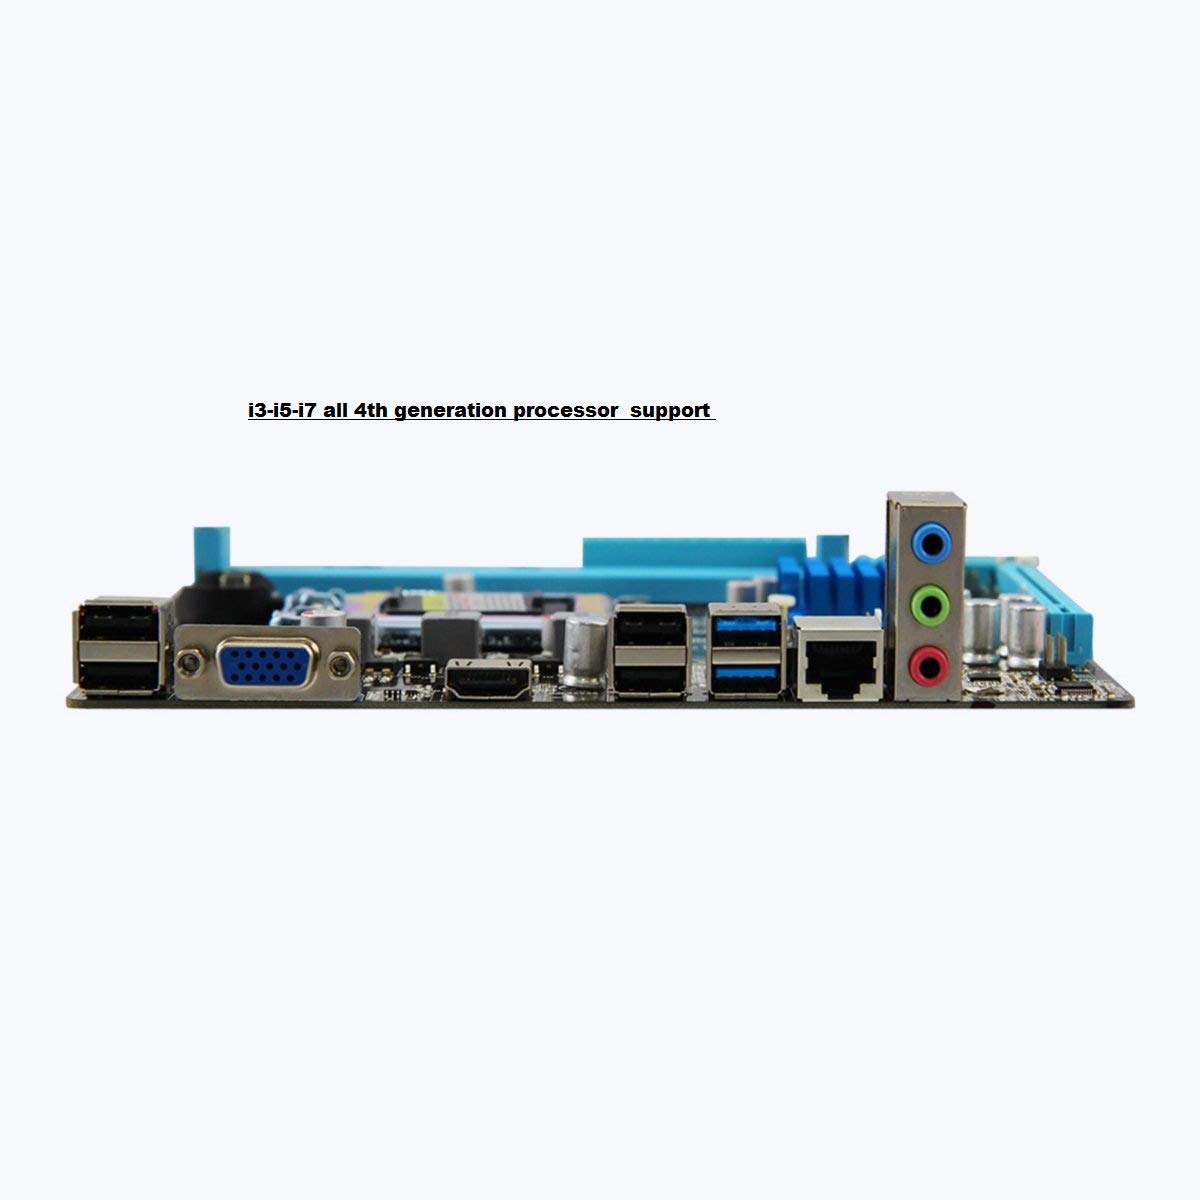
Image 4: Rear I/O panel of the ZEBRONICS H81 Motherboard, showing ports for USB, VGA, HDMI, LAN, and audio.
5. Тэхнічнае абслугоўванне
Рэгулярнае тэхнічнае абслугоўванне дапамагае забяспечыць даўгавечнасць і аптымальную прадукцыйнасць вашай матчынай платы:
- Выдаленне пылу: Перыядычна чысціце пыл з унутранай часткі корпуса кампутара, асабліва з радыятараў і вентылятараў, з дапамогай сціснутага паветра. Перад чысткай пераканайцеся, што сістэма выключана і адключана ад сеткі.
- Абнаўленні драйвераў: Keep your motherboard drivers (chipset, LAN, audio) updated to the latest versions available from the ZEBRONICS official webсайт, каб забяспечыць сумяшчальнасць і прадукцыйнасць.
- Абнаўленні BIOS/UEFI: Only update the BIOS/UEFI if necessary, following the instructions provided by ZEBRONICS carefully. Incorrect BIOS updates can render your motherboard inoperable.
- Кабельнае кіраванне: Пераканайцеся, што ўнутраныя кабелі акуратна пракладзены, каб палепшыць цыркуляцыю паветра і прадухіліць перашкоды.
6. Выпраўленне непаладак
Калі ў вас узніклі праблемы з матчынай платай, звярніцеся да наступных распаўсюджаных крокаў па ліквідацыі непаладак:
- Няма харчавання/няма загрузкі:
- Check all power connections (24-pin ATX, 4-pin ATX 12V, CPU fan).
- Пераканайцеся, што блок харчавання ўключаны і працуе.
- Праверце падключэнне выключальніка харчавання на пярэдняй панэлі.
- Try clearing the CMOS (refer to the Clear CMOS header on the motherboard).
- Няма дысплея:
- Ensure the monitor is connected to the correct video output (VGA or HDMI on the motherboard, or dedicated graphics card).
- Reseat the RAM modules. Try booting with only one RAM module.
- Калі выкарыстоўваецца спецыяльная відэакарта, пераканайцеся, што яна правільна ўсталявана і падключана да кампутара.
- Нестабільнасць/збоі сістэмы:
- Check for overheating. Ensure CPU cooler is properly installed and fans are spinning.
- Запусціце інструменты дыягностыкі памяці, каб праверыць цэласнасць аператыўнай памяці.
- Update motherboard drivers and BIOS/UEFI.
- Peripheral Issues (USB, LAN, Audio):
- Ensure drivers for these components are installed and up to date.
- Check physical connections of cables and devices.
- Test with different peripherals to isolate the issue.
7. Гарантыя і падтрымка
Your ZEBRONICS H81 Motherboard comes with a Гарантыя 2 год provided by CORE COMPUTERS. Please retain your proof of purchase for warranty claims.
For technical support, driver downloads, or further assistance, please visit the official ZEBRONICS support webсайт або звярніцеся ў службу падтрымкі.


