1. Важная інфармацыя па бяспецы
Please read and understand all instructions before beginning installation. Failure to do so may result in electric shock, fire, or other injuries that could be fatal or cause property damage.
- ПАПЯРЭДЖАННЕ: To avoid electric shock, ensure power is turned off at the circuit breaker or fuse box before installation.
- Усе электрычныя падключэнні павінны адпавядаць мясцовым нормам, пастановам або Нацыянальнаму электрычнаму кодэксу (NEC).
- Пракансультуйцеся з кваліфікаваным электрыкам, калі вы не ўпэўнены ў працэсе ўстаноўкі.
- This fixture is designed for indoor use in damp месцы.
- Do not attempt to alter the fixture or its components.
2. Змесціва ўпакоўкі
Verify that all parts are included before proceeding with installation.
- LED Chips (Integrated)
- Installation Kits (Mounting hardware)
- Кіраўніцтва па эксплуатацыі (гэты дакумент)
3. Тэхнічныя характарыстыкі прадукту
| Асаблівасць | Спецыфікацыя |
|---|---|
| Марка | Гамілія |
| мадэль | CL |
| Памеры | 12 см Д х 12 см Ш х 3.3 см В |
| Матэрыял | Anti-rust Metal, LED |
| Ватtage | 18 ват |
| тtage | 120 вольт (пераменны ток) |
| Тып крыніцы святла | Святлодыёд (інтэграваны) |
| Каляровая тэмпература | 3000 кельвінаў |
| Яркасць | 2200 люмен |
| Зацямняецца | Так (сумяшчальны з большасцю дымераў) |
| Тып ўстаноўкі | для ўстаноўкі западліцо |
| Выкарыстанне ў памяшканні/на вуліцы | У памяшканні (D)amp Месцазнаходжанне (рэйтынг) |
| Сертыфікаты | ETL Listed (for electrical components) |
4. Інструкцыя па ўсталёўцы (Налада)
Перш чым пачаць: Ensure the power is OFF at the circuit breaker. Use a voltage tester to confirm the power is off before touching any wires.
- Падрыхтуйце мантажную пласціну:
The fixture includes a mounting plate. Attach this plate to your junction box using the provided screws. Ensure it is securely fastened.
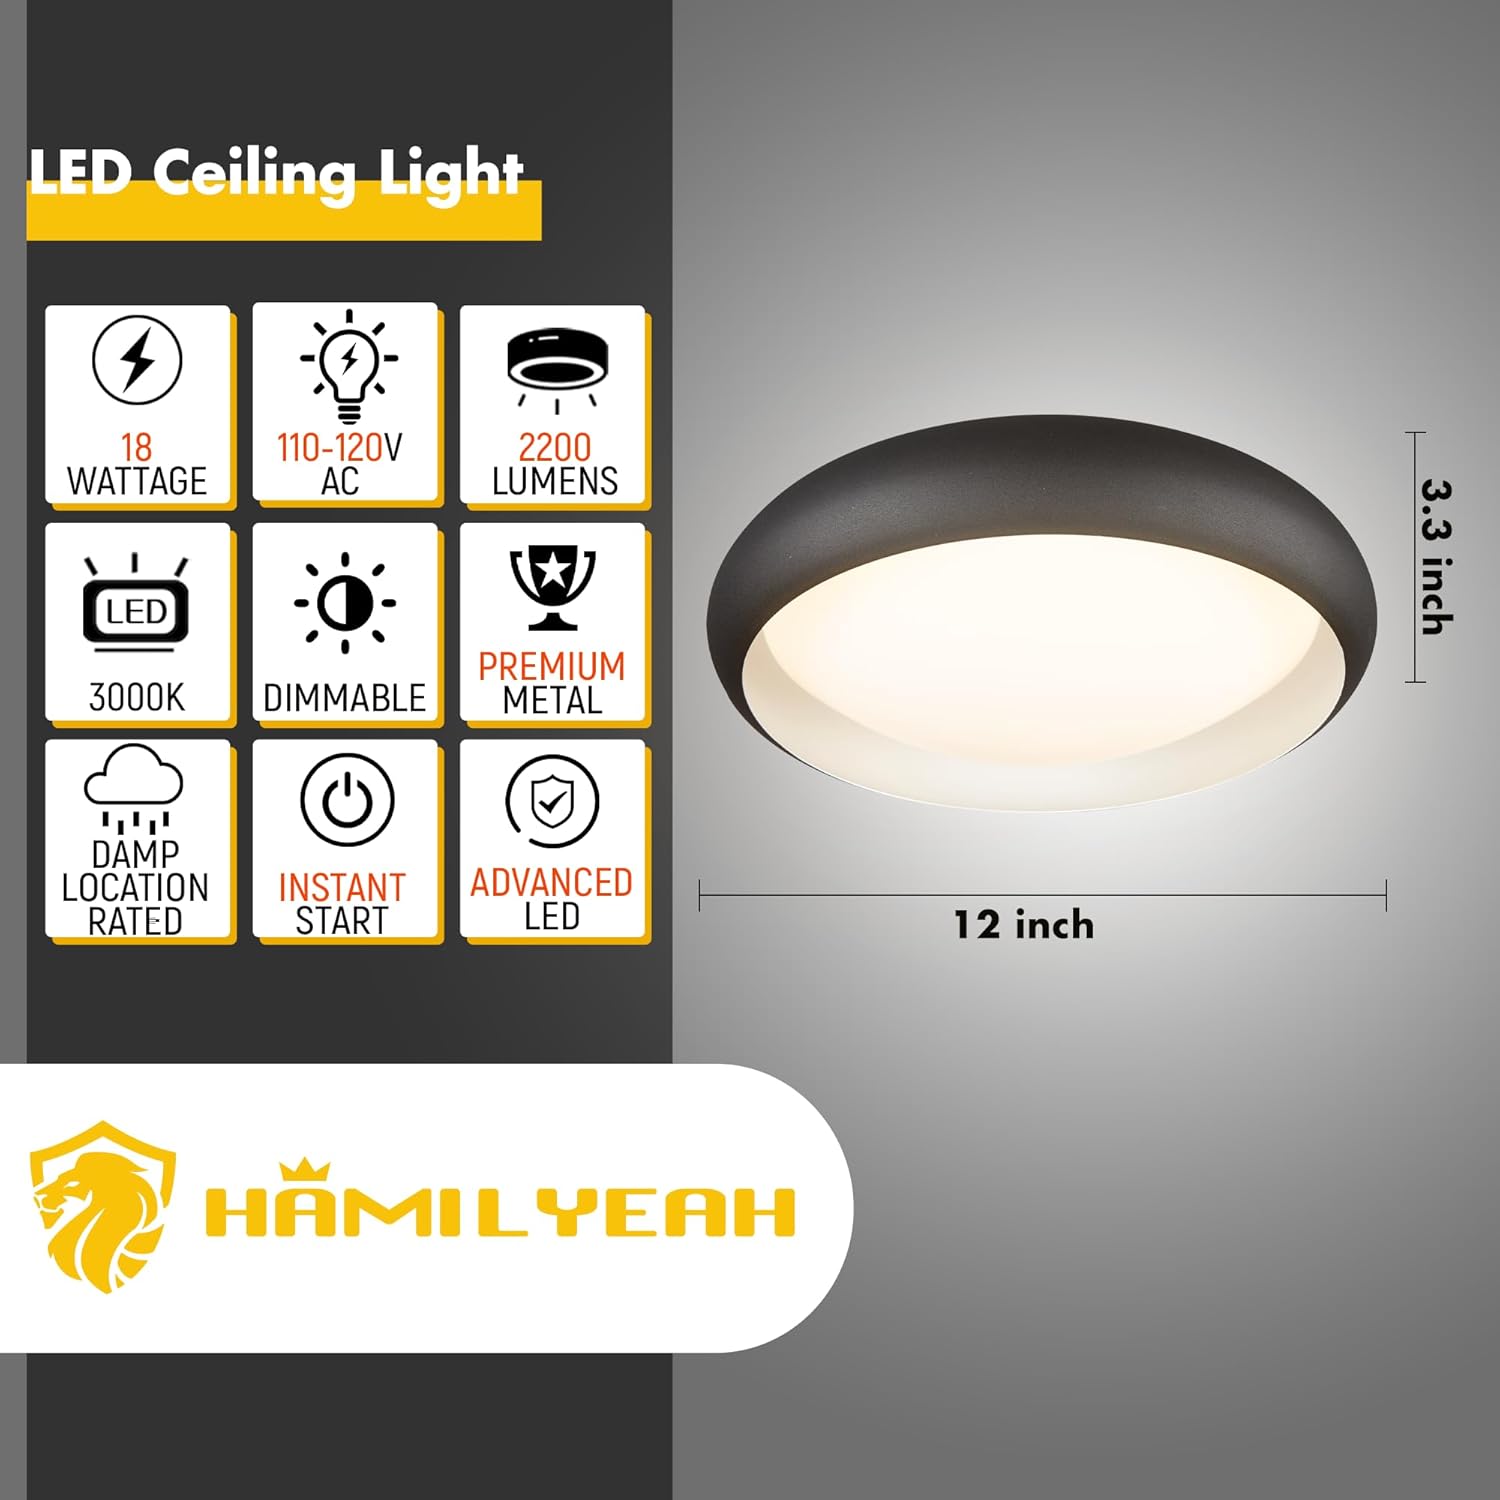
Image 1: Product dimensions and key specifications. This image illustrates the physical size and electrical characteristics of the light fixture.
- Электрычныя злучэнні:
Connect the fixture's wires to the corresponding wires from your junction box. Typically, this involves:
- Падключыце чорны провад ад свяцільні да чорнага (пад напругай) провада ад размеркавальнай скрынкі.
- Падключыце белы провад ад свяцільні да белага (нейтральнага) провада ад размеркавальнай скрынкі.
- Connect the green or bare copper (ground) wire from the fixture to the ground wire from the junction box.
Secure connections with wire nuts. Ensure all wires are tucked neatly into the junction box.
- Устанавіце свяцільня:
Align the fixture with the mounting plate and secure it firmly. This usually involves tightening screws that pass through the fixture into the mounting plate.

Image 2: The Hamilyeah flush mount LED ceiling light installed and illuminated. This shows the light's appearance when operational.
- Аднавіць сілу:
Once the fixture is securely installed and all connections are made, restore power at the circuit breaker. Test the light fixture.
Note on older junction boxes: Some older homes may have smaller junction boxes where the LED plate might obstruct mounting holes. In such cases, it may be necessary to carefully disassemble the LED plate from the mounting bracket to access the holes, then reassemble after securing the bracket. If you encounter difficulties, consult a professional electrician.
5. Інструкцыя па эксплуатацыі
This Hamilyeah LED ceiling light is designed for simple operation.
- Уключэнне/выключэнне харчавання: Control the light using a standard wall switch connected to the fixture.
- Функцыя зацямнення: This fixture is dimmable. If connected to a compatible dimmer switch (sold separately), you can adjust the light intensity to your preference.
Video 1: Hamilyeah Flush Mount LED Ceiling Light Modern. This video demonstrates the light fixture in various room settings, showcasing its aesthetic and functionality.
6. Тэхнічнае абслугоўванне
To maintain the appearance and performance of your Hamilyeah LED ceiling light, follow these simple guidelines:
- Уборка: Перад чысткай пераканайцеся, што электрычнасць адключана. Працярыце прыбор мяккай, сухой або злёгку змочанай тканінай.amp тканінай. Не выкарыстоўвайце абразіўныя ачышчальнікі або растваральнікі, бо яны могуць пашкодзіць пакрыццё або электрычныя кампаненты.
- Даўгавечнасць святлодыёда: The integrated LED chips are designed for long life and do not require replacement.
7. Выпраўленне непаладак
Калі ў вас узніклі праблемы са свяцільняй, звярніцеся да наступных распаўсюджаных праблем і рашэнняў:
| праблема | Магчымая прычына | Рашэнне |
|---|---|---|
| Святло не ўключаецца. | Няма харчавання на свяцільні. Няшчыльнае злучэнне правадоў. Няспраўны насценны выключальнік. | Check circuit breaker/fuse. Ensure power is on. Праверце надзейнасць усіх правадных злучэнняў (пры выключаным харчаванні). Праверце насценны выключальнік з дапамогай іншай прылады або заменіце яго. |
| Святло нечакана мігціць або цьмянее. | Несумяшчальны рэгулятар яркасці святла. Няшчыльнае злучэнне правадоў. | Ensure dimmer switch is LED-compatible. Replace if necessary. Праверце злучэнні правадоў (пры выключаным харчаванні). |
| Святло не такое яркае, як чакалася. | Занадта нізкі ўзровень рэгулятара яркасці. Няправільная ўстаноўка. | Усталюйце рэгулятар яркасці на максімальную. Review installation steps to ensure proper wiring. |
8. Гарантыя і падтрымка
Гарантыя: Hamilyeah provides a 1-year hassle-free warranty for this product. This warranty covers defects in materials and workmanship under normal use.
Падтрымка кліентаў: If you have any questions, require assistance, or need to claim warranty service, please contact Hamilyeah customer support. You can typically reach us through your purchase platform by navigating to "Your Orders," finding your order in the list, selecting "Problem with Order," and choosing the relevant topic.
For more information, visit the official Hamilyeah store: Hamilyeah Store


